

|
|
 |
 |
 |
|
 |
BMW Garage | BMW Meets | Register | Search | Today's Posts | Mark Forums Read |
 |

|
BMW 3-Series (E90 E92) Forum
>
Turbo Installs--Who has done it? Tricks/Tips etc..
|
 |
| 08-12-2014, 11:24 AM | #1 |
|
Out Boosting...

248
Rep 3,987
Posts |
Turbo Installs--Who has done it? Tricks/Tips etc..
Looking for advice on things that may make the install easier.
Going to be replacing turbos on a car over the weekend. Or anyone have a DIY listing that they can share? Got the new turbos, install kit from ECS tuning, new coolant, new oil, and the vehicle already has 3 inch downpipes, exhaust so that will come off easily/quickly. Thanks in advance for your help! 
__________________
Alpine White M-Sport F30
|
| 08-12-2014, 11:53 AM | #2 |
|
Major
 
34
Rep 1,093
Posts |
__________________
07 335XI (A008006) 6AT ~94K miles JB4 G5 ISO VSRF DP's
09 135I M (VK80379) 6MT. Race Project car. 1) Install Cobb/piggyback? and Motiv 600 Kit[HTA3076R w/ tial .82] 2) JRZ or Moton suspension. 3) Build high flow intake manifold with multi-port fuel and relocate OFH 4) Build full cage 5) Complete staged twin setup with HTA4205R [w/Tial 1.16] 6) Complete dry sump system |
|
Appreciate
0
|
| 08-12-2014, 11:59 AM | #3 |
|
Out Boosting...

248
Rep 3,987
Posts |
__________________
Alpine White M-Sport F30
|
|
Appreciate
0
|
| 08-12-2014, 01:44 PM | #4 |
|
Colonel
 
439
Rep 2,136
Posts |
Since you'll have to remove the water pump, this video is also good to watch...
[u2b]https://www.youtube.com/watch?v=o-BpUzAemyQ[/u2b] Get yourself a good set of torx and E sockets. Some socket extensions of various lengts and u-joints... it'll make your life much easier. I recommend dropping the subframe. I didn't do it and it cost me a lot of time. It's a tight fit in there with the subframe still in place. By far the hardest part of the job for me was to remove the oil and coolant lines out of the turbo. You have to pry them out and there isn't a lot of room in there to get leverage. Another thing that cost me alot of time was two of the studs that go on the block, the threads on the nut side of the stud were stripped. I only found out when the replacement turbo was already installed so it was a pain in the ass to get them out with the turbo in place. Before mounting the turbo in place, drive a nut down each stud to make sure the threads are not stripped. Since the nipples on the vacuum canisters are so weak, on or more will probably break. Buy a couple of the MIP/NPT fittings shown in this DIY. They're cheap and chances are you will need them. http://www.e90post.com/forums/showthread.php?t=870905 One other thing that caused me a headache is the heat shield between the turbo and the block. They are held by 4 bolts and a spot of glue in the middle. I removed the 4 bolts and it still wouldn't come out. I had to fight with it for quite some time before I realized the son of a bitch was actually glued to the block.. Good luck! PM me if you have any questions while doing the job.
__________________
 JB4 G5 w/ Backend flash - Walbro 450lpfp - VRSF DPs - VRSF 5" stepped IC - DCI - ER CP w/ Tial BOV - 335is clutch |
|
Appreciate
0
|
| 08-12-2014, 01:44 PM | #5 |
|
Colonel
 
439
Rep 2,136
Posts |
Here is a quick DIY... This one is without dropping the subframe.
Turbo Removal -Jack up car and place on jack stands -Remove engine and transmission plastic under tray. After the bolts are off the trans tray rotate 90 degrees to line up tab and remove (8mm socket 21 bolts) -Remove 2 small metal bracket that tray attaches to (8mm socket, 2 bolts) -Remove Intercooler. Remove clamps or clips depending on if you have a factory or aftermarket setup. Place a floor jack under the intercooler and remove 2 T25 bolts. Slowly lower intercooler and tape/cover openings on intercooler and car. (T25 socket, 2 screws) -Drain engine oil (17mm wrench) -Drain coolant. There is a green plug on the driver side of the radiator. Use a large Phillips head to remove plug and remove cap on reservoir on the passenger side of the car. -Remove power steering line from the rubber mount on the right side of the steering rack. Use a 17mm wrench on the flats of the rubber and remove with a 10mm socket/wrench. -Using a E14 and 16mm wrench remove the 2 bolts holding the power steering rack in place. Pull the whole rack down and forward. Wire the previously removed line out of the way -Remove Sway bar and brackets. Remove the 4 nuts from the brackets and disconnect the end links using a 17mm wrench and 16mm socket. Now remove the sway bar - Remove the cowl using a 8mm sockets and disconnecting 2 plugs. -Remove the engine cover (5mm allen wrench, 4 bolts). -Remove the vac canisters using a 10mm socket. Label the 4 vac lines and then remove the lines -Remove the front air tube from grills to airbox. (T20, 2 screws) -Unplug the electric fan then remove the one screw on the passenger side (T25) and remove the fan by pulling straight up. It is tight but it will come - Remove the 2 lines going to the coolant reservoir and the 2 bolts holding it in place (10mm) -Remove thermostat and water pump. Have a pan ready because coolant will drain when removing most of these lines. Remove the small connector going to the tstat using a small flat head to lift the connector). Remove the connector going to the water pump. Remove the u shaped hose that connects the thermostat to water pump (2 clamps). Remove the 3 hoses that run to the thermostat (Spring clamps and worm gear). Remove the 2 bolts holding the thermostat in place (10mm). Now pull the thermostat out. Remove the clamp and hose going to the top of the water pump. Now remove the 3 water pump bolts (E12). The top one is hard to see but reachable. Slowly lower the water pump and remove the last hose. -Remove the brace holding the mid pipe. (E10, 1bolt) -Remove the 4 nuts that hold the downpipes to exhaust. Use penetrating oil if they have not been off recently. (12mm, 4 nuts). - Label the 2 lower o2 sensor plugs to know what side socket it plugs into. Unplug the lower o2 sensors. -Mark the upper o2 sensors (front and rear) then remove using a 7/8 wrench. Cover (I used saran wrap) and place safely on top of valve cover to avoid damage -Loosen the 2 vband clamps holding the downpipes to the turbos (13mm). -The downpipes are now loose and ready to remove -Place jack under oil pan or use engine hook at support from the top. I used a piece of wood and scissor jack under the oil pan so I did not have to worry about a hydraulic jack leaking. Do not lift the engine just provide support. Remove the center nut on the passenger side motor mount (16mm). No lift the engine slightly to take weight off the mount. Remove the 2 bolts holding the motor mount to subframe (E12). Jack the engine up enough to remove the mount. Now remove the 4 bolts holding the mount bracket to the block and remove bracket. -In the middle of the turbos remove the two bolts holding 2 coolant lines to the coolant supply pipe (T30). Pull both lines out of coolant supply hose. All of the turbo lines are hard to remove. I found spraying penetrating oil around the fittings helped. Be careful prying on the lines you do not want to damage them. Pull straight out. Once the 2 lines are removed remove the 4 bolts holding the coolant supply pipe to the block (E8). Now remove the pipe -Back up top remove the 4 nuts (10mm) holding the solenoids to the heat shield right above the turbo. Unclip/lines wires from holders and secure lines and solenoids to top of valve cover. Now remove the heat shield by removing the 4 bolts (E8) -Loosen the 2 clamp using a 5mm allen wrench that holds the charge y-pipe to the compressor outlet. Remove the pipe out the top -Remove the 2 oil drain lines from the turbo ( 1 T30 on the block side and 2 T30 on the turbo side per turbo) From here on I worked on the front turbo first until it was removed then the rear. -Remove heat shield bolts behind turbo (4 on each turbo). For the front turbo I could not get at the upper right bolt so I had to remove the turbo feed line on top of the turbo. If you can get at this bolt leave the turbo feed in place. -Remove the coolant lines from the front the turbo (T30). Leave the other end of the upper lines in the block and remove the lower lines. -Disconnect the oil feed (junction) for the front turbo if you did not remove the feed earlier on the turbo side of the line -Remove 2 bolts that hold the front intake tube in place (T30) and slowly pull the tube off the turbo -Disconnect the wastegate line to the actuator. On the front turbo I followed the line and removed it from the solenoid -Remove bolts holding the turbo to the head and remove the turbo out of the bottom. Be careful to move the upper coolant line out of the way. Repeat for the rear turbo except the turbo feed pulls out of the block. Make sure the turbo slides out of the rear tube when coming out and does not put too much pressure on the tube bending the bracket.
__________________
 JB4 G5 w/ Backend flash - Walbro 450lpfp - VRSF DPs - VRSF 5" stepped IC - DCI - ER CP w/ Tial BOV - 335is clutch |
|
Appreciate
0
|
| 08-12-2014, 03:26 PM | #6 |
|
Major
 102
Rep 1,040
Posts |
Damn... So far, I've done all the mods myself from stock to FBO on two 335i's in my garage just on ramps and I think when the turbo lady starts singing, I will be drawing the line here and paying someone else who has done this before! Props to you dudes who tackle this one yourselves. This would take me a week to do haha.
__________________
2009 335i M Sport coupe, BSM with black/aluminum interior, 6MT, JB4 G5, MDH Backend Flash, Walbro 255 inline LPFP, VRSF Inlets, BMS 3" catless DP's, Borla Aggressive catback, ER FMIC, ER charge pipe, Tial BOV, BMS 2.3 gal Meth Kit, BMS Sport Oil Cooler Valve, Ported CDV, RB PCV, Cyba ram air scoops, Status Gruppe SRS coilovers, ECS trailing arms, Forgestar F14 SDC.
|
|
Appreciate
0
|
| 08-12-2014, 03:47 PM | #7 | |
|
Colonel
 
439
Rep 2,136
Posts |
Quote:
Here are some pics with the rear turbo off... 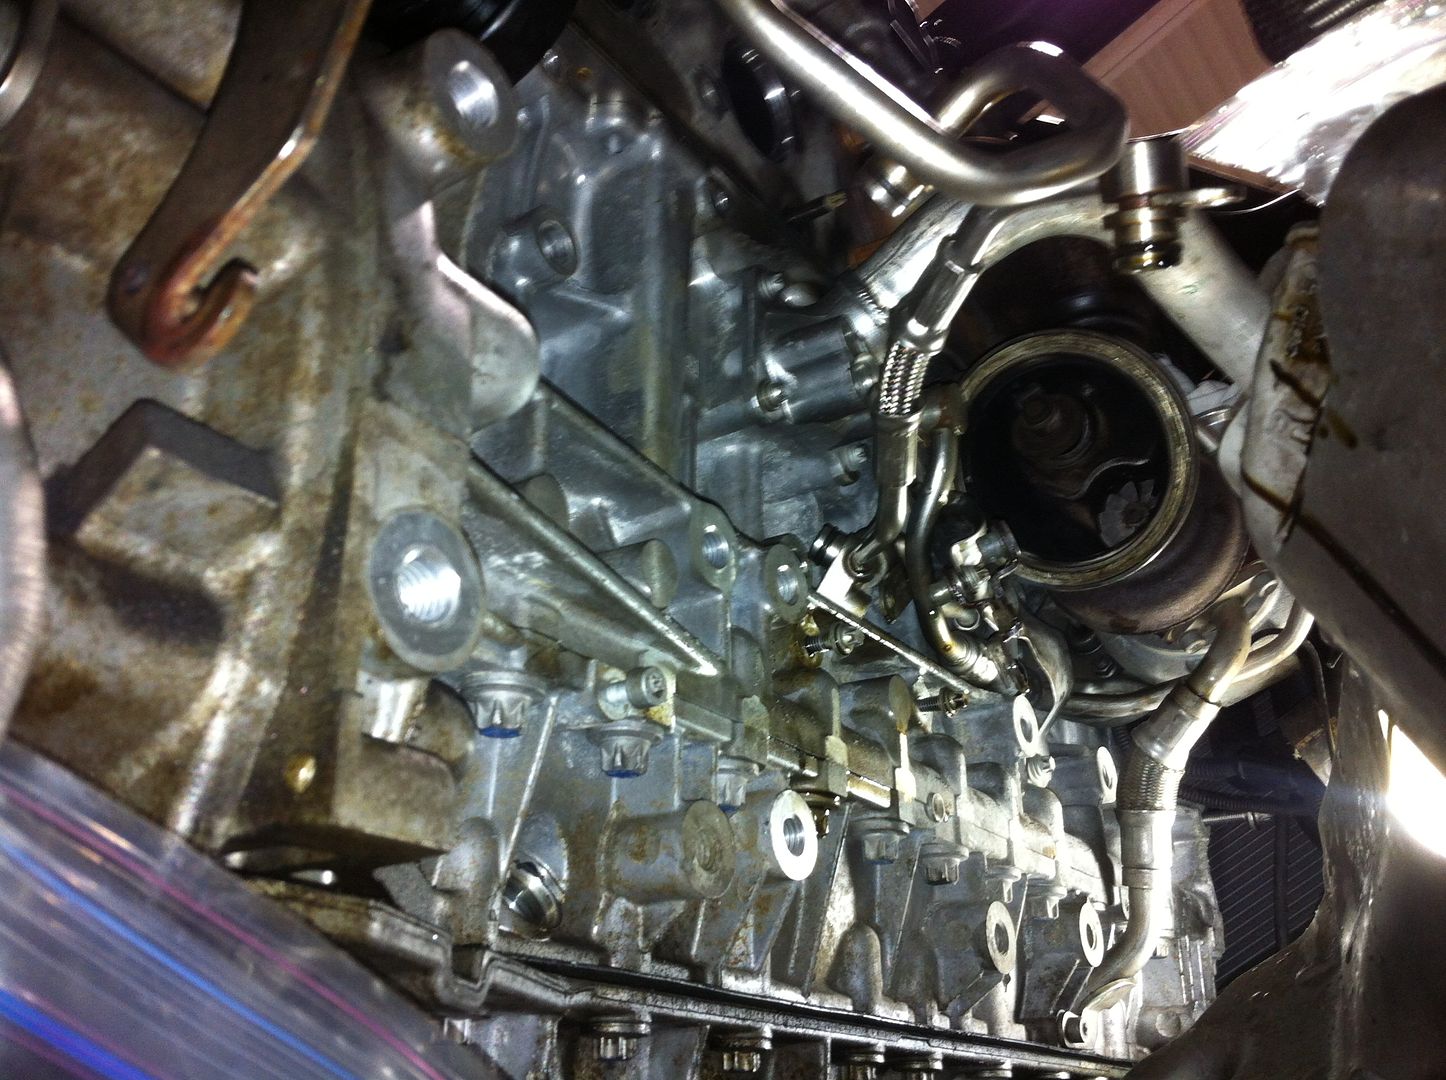 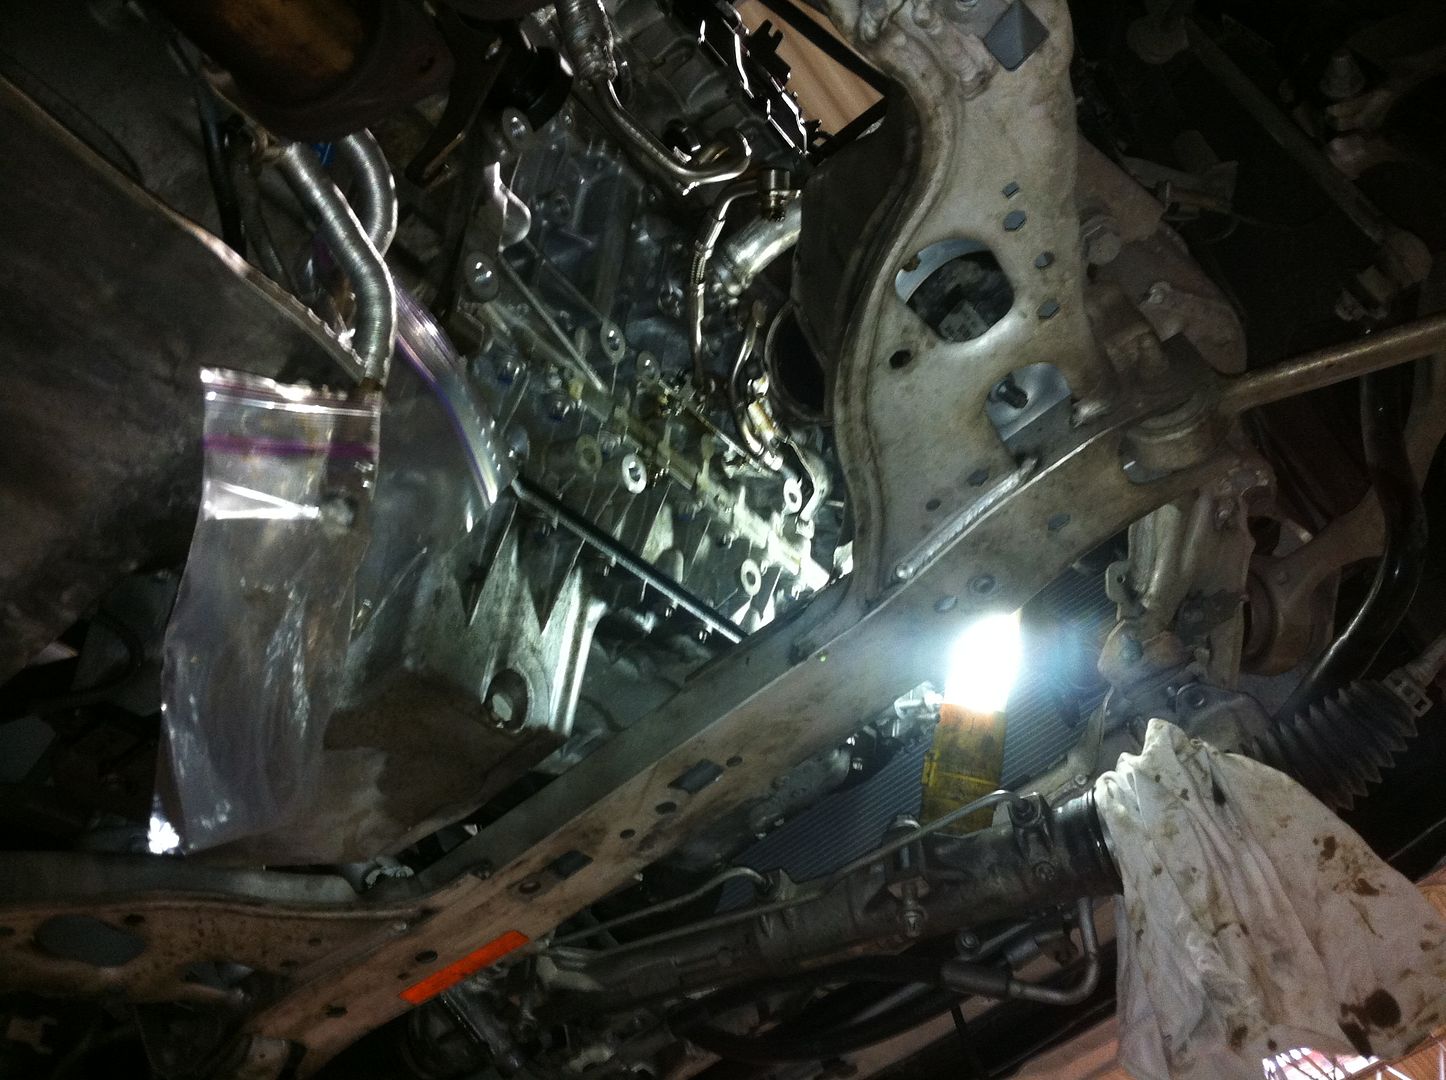 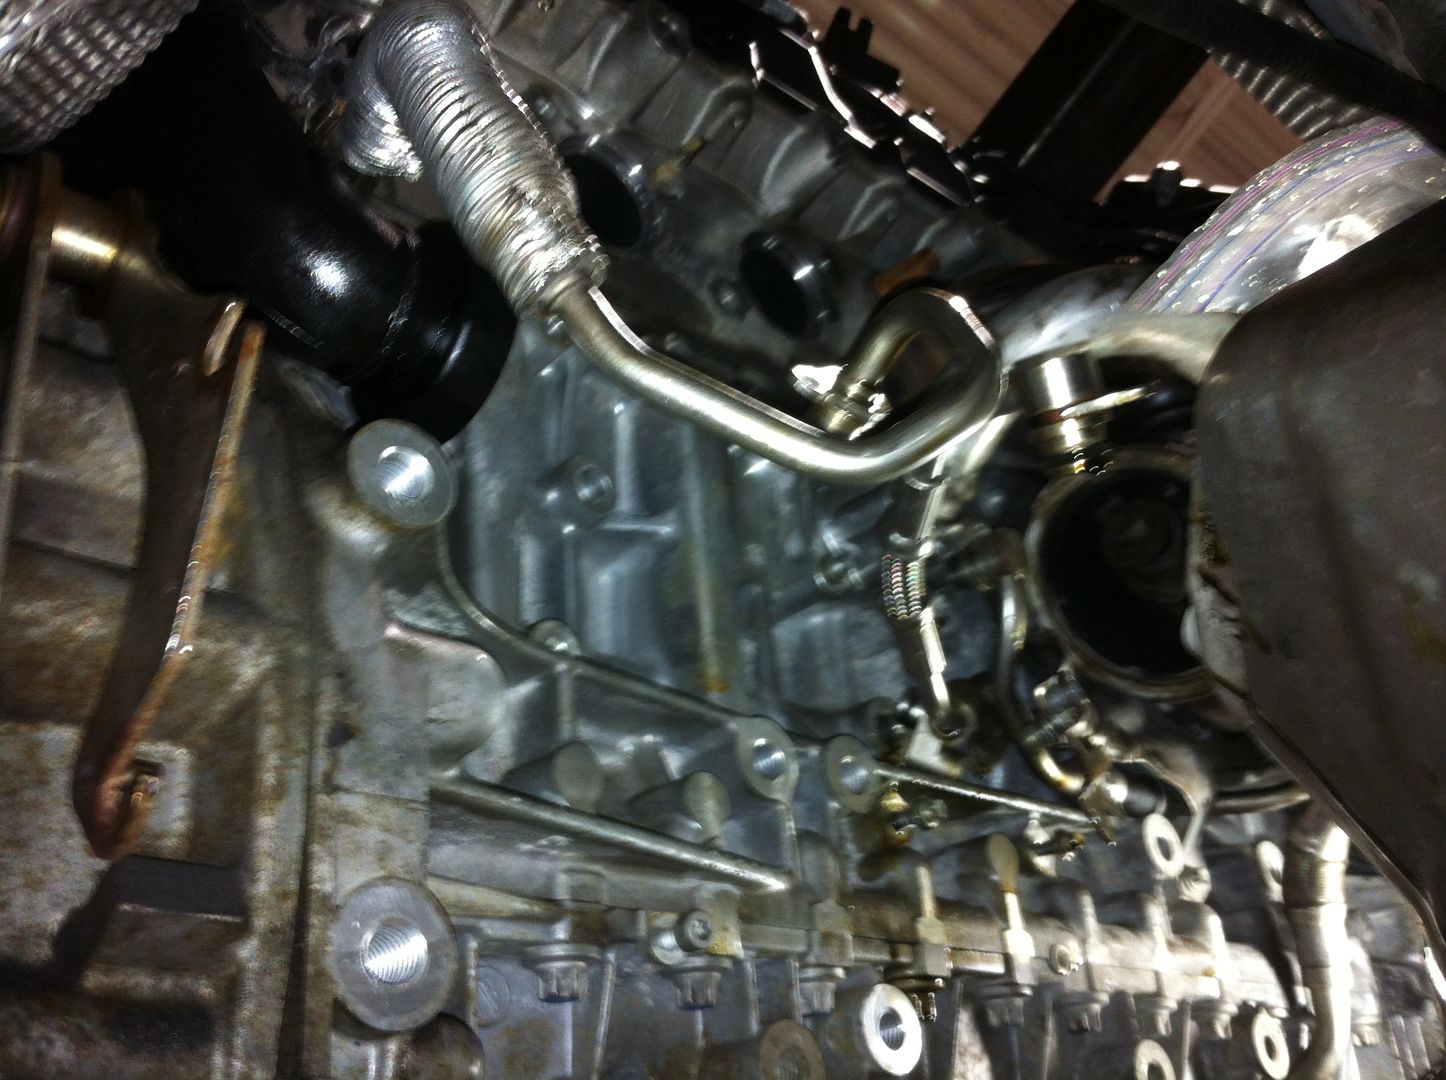 Here is the way to do it without having to squeeze in the tight space though... forget about dropping the subframe... drop the whole damn engine/tranny lol  This is what BMW did to replace a buddy's turbos. This is what BMW did to replace a buddy's turbos.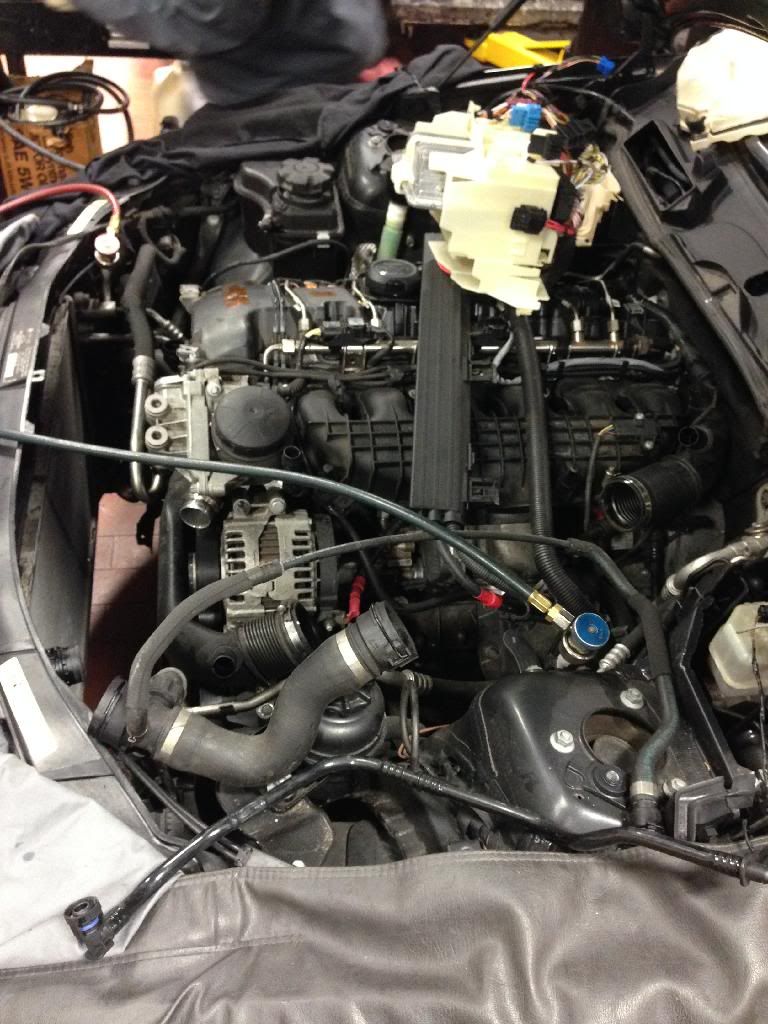 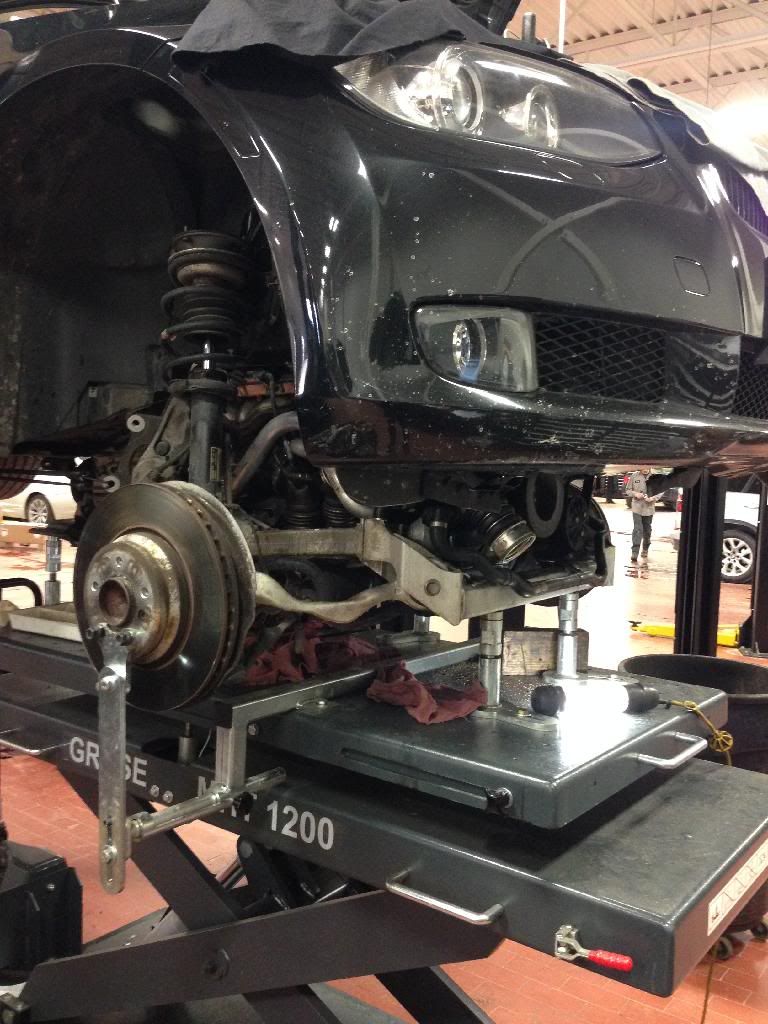 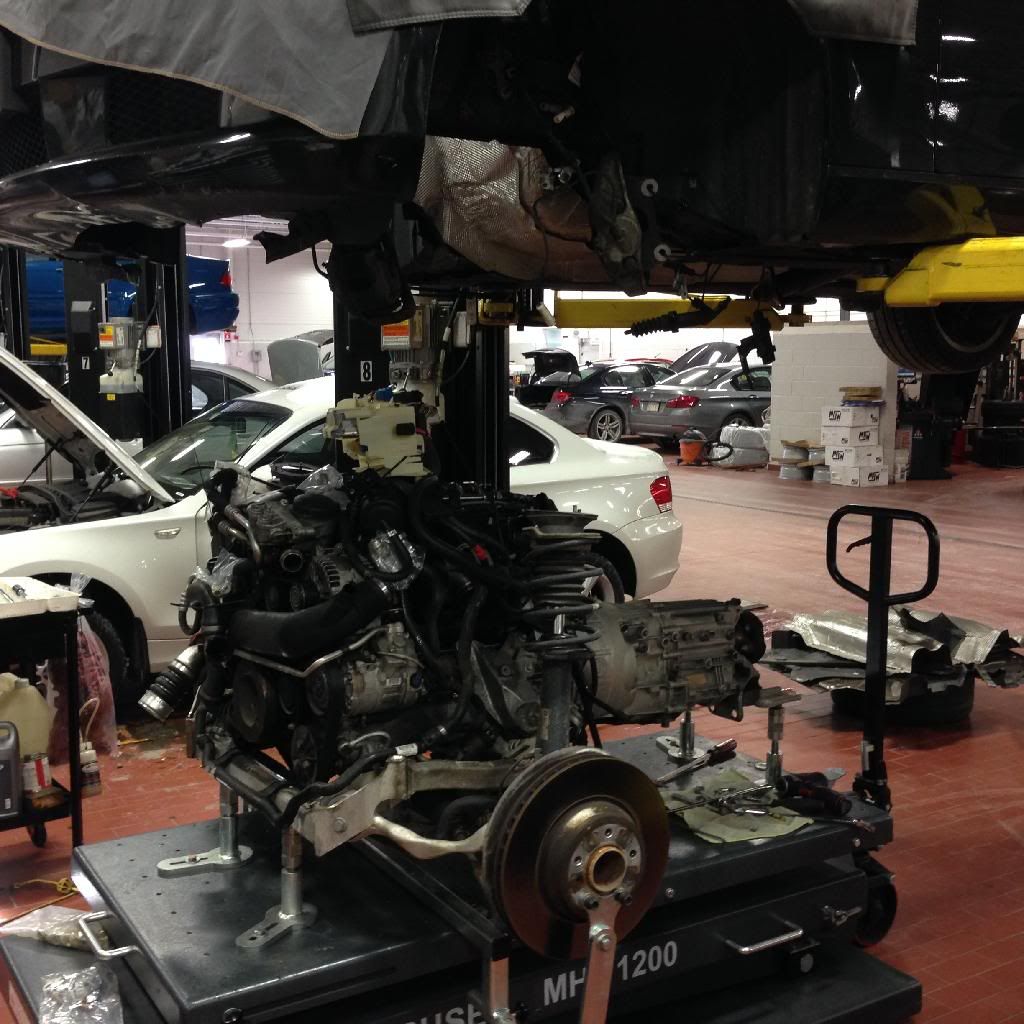 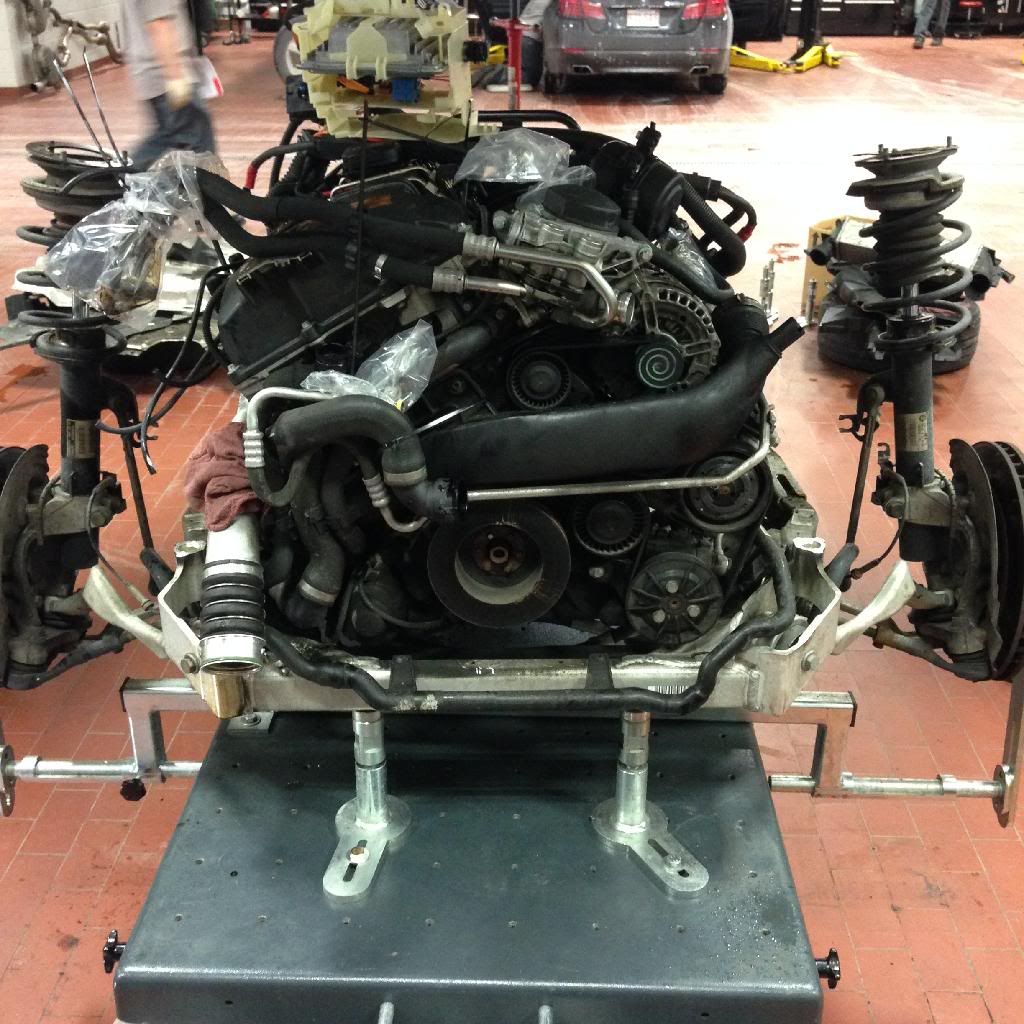
__________________
 JB4 G5 w/ Backend flash - Walbro 450lpfp - VRSF DPs - VRSF 5" stepped IC - DCI - ER CP w/ Tial BOV - 335is clutch Last edited by Gizm0; 08-12-2014 at 03:53 PM.. |
|
|
Appreciate
0
|
| 08-12-2014, 04:20 PM | #8 |
|
Out Boosting...

248
Rep 3,987
Posts |
Thank you for all of the useful information Gizmo!!! And holy hell i didn't realize dropping the engine would be the way to go hahhaaa i don't think we will be messing with doing it that way, but my buddy is a mechanic, the other pretty much should be a mechanic, with a lift and all tools needed, minus a few that you let me know about i will ask them to make sure we have those already or buy them. I am thinking it will be a bitch but should get it done this weekend.
__________________
Alpine White M-Sport F30
|
|
Appreciate
0
|
| 08-12-2014, 04:21 PM | #9 |
|
Major
 102
Rep 1,040
Posts |
[QUOTE=Gizm0;16453644]Quote from BMW for labor alone was almost $2000... the money I saved was well worth the 20 some hours I spent working on the car myself.
I wonder how many hours this actually takes a shop that's done a few. Dealers charge by hours listed in a book, but its doesn't take nearly that amount of time to complete. I think I read something about a dealer charging $400 or so just for labor to change the low pressure fuel sensor that took me an hour and a half going slow and fiddling with clips. I believe DBC Tuning in San Antonio said they bill 8 hours for the turbos... Either way, I prefer working on my car not just for saving money, but the sense of accomplishment when you complete something and piece of mind.
__________________
2009 335i M Sport coupe, BSM with black/aluminum interior, 6MT, JB4 G5, MDH Backend Flash, Walbro 255 inline LPFP, VRSF Inlets, BMS 3" catless DP's, Borla Aggressive catback, ER FMIC, ER charge pipe, Tial BOV, BMS 2.3 gal Meth Kit, BMS Sport Oil Cooler Valve, Ported CDV, RB PCV, Cyba ram air scoops, Status Gruppe SRS coilovers, ECS trailing arms, Forgestar F14 SDC.
|
|
Appreciate
0
|
| 08-12-2014, 04:44 PM | #10 | |
|
Out Boosting...

248
Rep 3,987
Posts |
[QUOTE=brewnami;16453853]
Quote:
__________________
Alpine White M-Sport F30
|
|
|
Appreciate
0
|
| 08-12-2014, 05:52 PM | #11 | |
|
Major
 102
Rep 1,040
Posts |
[QUOTE=Eat.Sleep.Race;16454012]
Quote:
Until I read that DIY, I had no idea. I come from a B5 S4 where the motor had to be pulled to change the turbos, so most places would bill 24 hours.
__________________
2009 335i M Sport coupe, BSM with black/aluminum interior, 6MT, JB4 G5, MDH Backend Flash, Walbro 255 inline LPFP, VRSF Inlets, BMS 3" catless DP's, Borla Aggressive catback, ER FMIC, ER charge pipe, Tial BOV, BMS 2.3 gal Meth Kit, BMS Sport Oil Cooler Valve, Ported CDV, RB PCV, Cyba ram air scoops, Status Gruppe SRS coilovers, ECS trailing arms, Forgestar F14 SDC.
|
|
|
Appreciate
0
|
| 08-12-2014, 07:22 PM | #12 | |
|
Colonel
 
439
Rep 2,136
Posts |
[QUOTE=Eat.Sleep.Race;16454012]
Quote:

__________________
 JB4 G5 w/ Backend flash - Walbro 450lpfp - VRSF DPs - VRSF 5" stepped IC - DCI - ER CP w/ Tial BOV - 335is clutch |
|
|
Appreciate
0
|
| 08-12-2014, 07:40 PM | #13 |
|
Captain
    
53
Rep 719
Posts |
I agree... Nothing beats the feeling of doing something yourself, the money saved is just a bonus. Funny story though... A few years ago I blew the 4.0 SOHC motor in my winter beater Explorer. Previously (12 years) I was a Ford master tech so I decided to throw a junk yard motor in it. The job took 17 hours in my garage. Right before I was about to fire up the "new" motor I moved a box sitting on my work bench, under that box was the spacer plate that went I between the motor and the transmission! Apparently I set the box on it and forgot to install it... Hard life lesson learned.
__________________
ASE master tech (many moons ago)335xi- JB4 G5 iso/e50 custom flash/Custom meth/Borla mids/Custom x-pipe/DCI/ER charge pipe/Dual Ebay BOV's/Alpina B3 flash/Paddle shifter retro fit
|
|
Appreciate
0
|
| 08-12-2014, 07:53 PM | #14 | |
|
Colonel
 
439
Rep 2,136
Posts |
Quote:
Yea, the feeling of knowing that you've successfully done a job like this by yourself is amazing... Looking back at it, it really wasn't that complicated, just time consuming. |
|
|
Appreciate
0
|
| 08-12-2014, 10:46 PM | #15 |
|
Banned
141
Rep 1,202
Posts |
Drop the subframe, drop the subframe, drop the subframe, drop the subframe. If someone tells you its faster not to drop the subframe, ignore them and drop the subframe. We can drop a subframe in less than 45 minutes, and it saves you hours, and untold headaches. The subframe is not the motor, just buy a engine support bar from harbor freight and you are good to go.
|
|
Appreciate
0
|
| 08-12-2014, 11:22 PM | #16 | |
|
Captain
    
53
Rep 719
Posts |
Quote:
best 65 dollars I've spent in a while
__________________
ASE master tech (many moons ago)335xi- JB4 G5 iso/e50 custom flash/Custom meth/Borla mids/Custom x-pipe/DCI/ER charge pipe/Dual Ebay BOV's/Alpina B3 flash/Paddle shifter retro fit
|
|
|
Appreciate
0
|
| 08-13-2014, 08:29 AM | #17 | |
|
Out Boosting...

248
Rep 3,987
Posts |
Quote:

__________________
Alpine White M-Sport F30
|
|
|
Appreciate
0
|
| 08-13-2014, 05:55 PM | #18 | |
|
Brigadier General
 2246
Rep 3,353
Posts
Drives: F85 X5M
Join Date: Feb 2013
Location: Chicago West Burbs
iTrader: (9)
Garage List 2016 BMW X5M [9.00]
2012 BMW X5 35i (SOLD) [9.67] 1989 BMW 325i Track ... [10.00] 2007 E90 WTCC Wideb ... [8.50] |
Quote:
|
|
|
Appreciate
0
|
| 08-13-2014, 06:23 PM | #19 | ||
|
Captain
    
53
Rep 719
Posts |
Quote:
__________________
ASE master tech (many moons ago)335xi- JB4 G5 iso/e50 custom flash/Custom meth/Borla mids/Custom x-pipe/DCI/ER charge pipe/Dual Ebay BOV's/Alpina B3 flash/Paddle shifter retro fit
|
||
|
Appreciate
0
|
 |
| Bookmarks |
| Thread Tools | Search this Thread |
|
|