|
|
|
|
 |

|
 |
BMW Garage | BMW Meets | Register | Search | Today's Posts | Mark Forums Read |
 |

|
BMW 3-Series (E90 E92) Forum
>
Finally Got my GP's Installed
|
 |
| 06-01-2009, 11:30 PM | #1 |
|
Lieutenant
 70
Rep 534
Posts |
Finally Got my GP's Installed
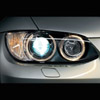
Install time took about 5 minutes per side and was way easier than I thought. I went with the 8500K for both cornering and angel eyes. I am waiting for the 8500K fogs which should arrive any day. They are a bit bluer than the HID's, but I like it
  |
| 06-02-2009, 11:07 PM | #6 |
|
Colonel
 
46
Rep 2,653
Posts |
Excellent! I went with the 7500's and I think they are blue. I can't imagine the 8500's...
__________________
'07 E92 335i |Crimson Red|Saddle|ZSP|ZPP|PDC|Heated|Logic|Step|Paddles|  Mods |Painted Kidneys|Black Lower Mesh Grills|Rho-plate|7500 GP Fogs|JB3 2.0|LED Tag Lights|Rear Fogs|And maybe some day an M3 Rear Spoiler  | | |
|
Appreciate
0
|
| 06-03-2009, 10:53 AM | #8 | |
|
889
Rep 35,253
Posts |
Quote:
|
|
|
Appreciate
0
|
| 06-03-2009, 11:48 AM | #9 | |
|
Lieutenant
70
Rep 534
Posts |
Quote:
Tools you will need: 1. Philips screwdriver 2. Pair of latex gloves 3. Needle nose plyers  Remove the 3 philip's screws on the access panel to expose the cavity to the cornering bulb. You will notice a brown wire that extends from the back of the bulb. Take your set of needle nose and gently pull the wire out to disconnect. For the next step, if you have smaller hands you can do this without the needle nose. You will notice that there is a u-shaped pin supporting the bulb to the housing. Pinch the ends to release the bulb. Install replacements and you are good to go!!  For the Angel eyes, you will notice a fan like cover on the back of the light housing. If you are looking from the front, turn the cover clock-wise to release it. If you peek in the hole, you will see the back of the bulb housing that is angled about 45 degrees. There is not a whole lot of room to work with, but all I did was take my 2 index fingers and squeezed the sides of the bulb housing. Now turn it counter-clock-wise so that the bulb housing is vertical. You can now pull out the bulb using your thumb and index finger. Bulb can now be replaced. Make sure the fan-like cover is put back on tight to prevent moisture build up in the housing. That is it!! Literally a 10 minute job!!  |
|
|
Appreciate
0
|
| 06-03-2009, 09:50 PM | #10 |
|
Perfect
45
Rep 543
Posts |
how come i install the GP thunder 8500k and it looks so dim.. yours look so brighter than me! is your install different than mine?
Mine car is the same as yours BTW |
|
Appreciate
0
|
| 06-03-2009, 10:24 PM | #12 | |
|
Lieutenant
70
Rep 534
Posts |
Just make sure the bulb is nice and secure. The rubber gasket on the bulb housing should be snug against the headlight housing. Gaps in the seal will lose light.
Quote:
|
|
|
Appreciate
0
|
| 06-06-2009, 02:27 PM | #13 | |
|
Banned
6
Rep 114
Posts |
Quote:
 does it make a difference? does it make a difference? |
|
|
Appreciate
0
|
| 06-06-2009, 02:48 PM | #14 |
|
Lieutenant
70
Rep 534
Posts |
I haven't looked under the hood with a vehicle with halogens, so I can't elaborate too much. If you see the same light housing under your hood, it should be the same.
|
|
Appreciate
0
|
| 06-07-2009, 05:41 PM | #18 |
|
Colonel
374
Rep 2,189
Posts |
correct me if i'm wrong but doesn't this void the warranty for the headlights on the lci? I remember bmw put a sticker somewhere where if you change anything the warranty on the headlights get voided
|
|
Appreciate
0
|
 |
| Bookmarks |
| Thread Tools | Search this Thread |
|
|