

|
|
|
|
 |

|
 |
BMW Garage | BMW Meets | Register | Search | Today's Posts | Mark Forums Read |
 |

|
BMW 3-Series (E90 E92) Forum
>
Questions about Orion V4 DIY (or other rings)
|
 |
| 04-18-2014, 04:31 AM | #1 |
|
------
8302
Rep 10,737
Posts |
Questions about Orion V4 DIY (or other rings)
So I plan on tackling this project soon and have been looking through the limited DIY threads on the Orion V4 install, I had a few questions.
Is cutting the outer ring necessary to achieve the non-full ring look? I noticed @Cbozz and a few others have this black plastic separator on top of the ring. Is this a custom piece they added? 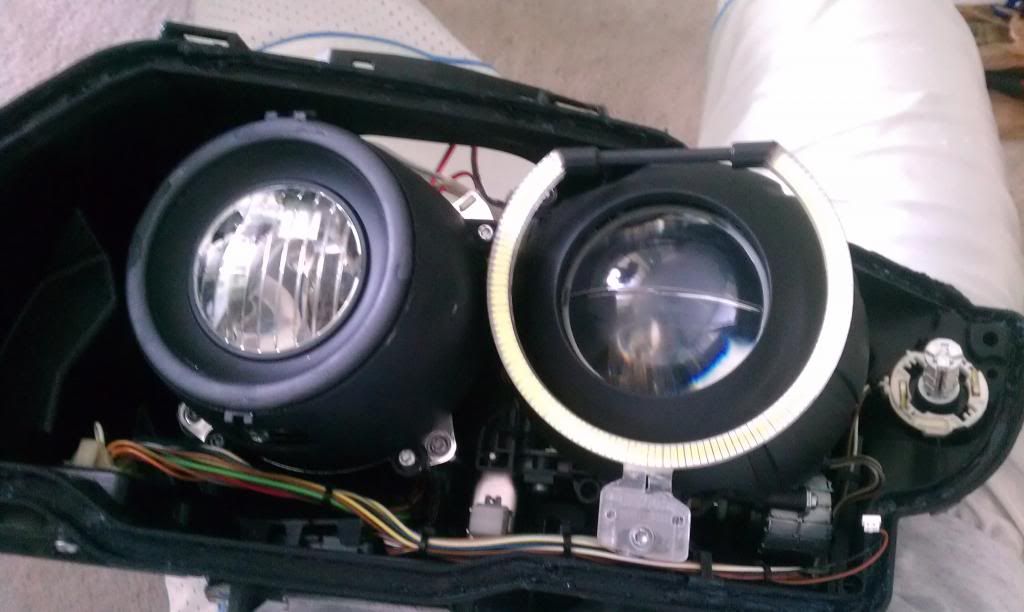 Is high temperate paint necessary to paint the housing/shrouds? Which is the easier route to open/reseal the headlights: Oven or heat gun?
__________________
 |
| 04-18-2014, 05:29 AM | #2 |
|
Yiannis Gazis

100
Rep 734
Posts
Drives: 2007 328xi
Join Date: Jul 2012
Location: Somers, CT
|
No you do not cut it usually people paint that part to match the black out of the rest of the headlight...it's clear with red wiring or something before
__________________
2nd Bimmer - 2013 335is | Alpine White | DCT | Loaded
1st Bimmer - 2007 328xi | SGM | e90 | Premium | Navi | Gloss black trim | Cold | AA headers | 3 stage intake manifold | AA stage 3 tune | AFE stage 2 intake | Cyba Scoops | OEM Blacklines | OEM LCI mtech front bumper | OEM LCI hood | OEM gloss black kidney grills | Orion v4 LED halos with blackout headlights | Valentine 1 Radar | Sport wheel with paddles | kw v1 coilovers | VMR 710 | Continental ExtremeContact DW | |
|
Appreciate
0
|
| 04-18-2014, 07:51 AM | #3 |
|
Major
 70
Rep 1,024
Posts |
First the black bar comes on it. But most people cut it off since it looks wierd on e92 since it cuts across a fully round shroud (where on like an e46 it would be at the top of the headlight)
If you want a fully OEM look some people cut the majority of the ring out but leave it so you can glue the 2 ends on the led ring right to the old ring tube so it sorta continues into the old ring. (That's after removing the black bar) Best way is oven since it gives you even heat |
|
Appreciate
0
|
| 04-18-2014, 10:06 AM | #4 |
|
Lieutenant Colonel
 
134
Rep 1,534
Posts |
Don't use an oven! You can't direct or control the heat and you run the risk of melting parts of the light housing such as the plug socket. Buy a heat gun
|
|
Appreciate
0
|
| 04-18-2014, 07:31 PM | #5 | |||
|
------
8302
Rep 10,737
Posts |
Quote:
Quote:
Quote:
Haha funny how some will say oven and some will say avoid the oven. I've heard success stories with both. I have a heat gun (and of course an oven). I'm hesitant of putting them in the oven, but I think even heat is the best route to go. Another question - Do you apply a sealant when re-assembling the headlights, or just throw them back in the oven. I saw in the Umnitza video they just put it back in the oven.
__________________
|
|||
|
Appreciate
0
|
| 04-20-2014, 06:06 PM | #8 | ||
|
------
8302
Rep 10,737
Posts |
Quote:
Quote:
__________________
|
||
|
Appreciate
0
|
| 04-20-2014, 06:17 PM | #9 |
|
Colonel
 
755
Rep 2,782
Posts
Drives: M3
Join Date: Feb 2012
Location: South Florida/ St. Louis
iTrader: (28)
Garage List 2016 BMW X5M [0.00]
08 BMW M3 [0.00] 14 BMW X5 50i - sold [0.00] 09 BMW 335i - Sold [0.00] 09 BMW 328i - Sold [0.00] 07 BMW 328i - Sold [0.00] |
you can leave that part alone, in my first DIY I painted it black so you can't see it, in this last one I cut it off and I cut off the ends of the original angel eyes and epoxied them together so it looks more OEM... and it turned out perfectly.. although it was waaay harder than the first one! About the sealant, and opening it... you don't even need to heat them up, they will come apart if you use some force.. easier with a screwdriver... when putting them together I left the OEM sealant and heated it with heat gun and also added a bulk of new sealant and I have no leaks or condensation!!!
__________________
Evolve, Eisenmann, Strasse, StopTech, Active Autowerke
|
|
Appreciate
0
|
| 04-20-2014, 06:22 PM | #10 |
|
Colonel
755
Rep 2,782
Posts
Drives: M3
Join Date: Feb 2012
Location: South Florida/ St. Louis
iTrader: (28)
Garage List 2016 BMW X5M [0.00]
08 BMW M3 [0.00] 14 BMW X5 50i - sold [0.00] 09 BMW 335i - Sold [0.00] 09 BMW 328i - Sold [0.00] 07 BMW 328i - Sold [0.00] |
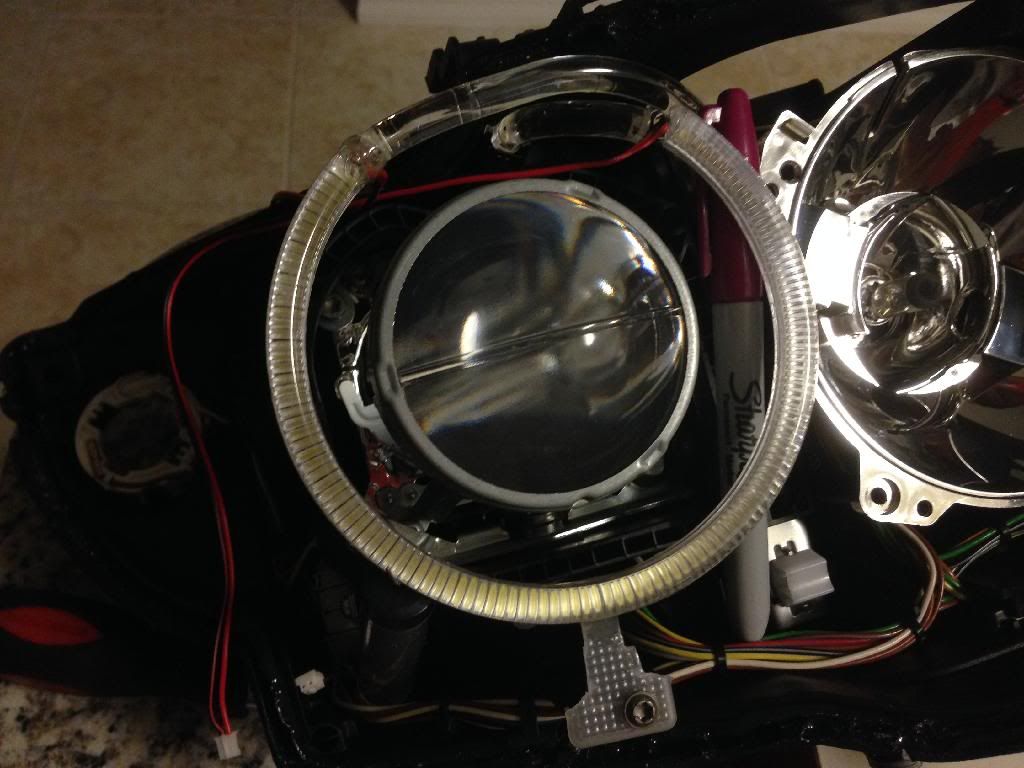 also I would recommend not cutting off the OEM angel eye tab and epoxing it to Orions but making a new tab like in the picture above, because you will need it to be longer for a better grip and epoxy it to the back of the angel eye then drill the hole in it to gauge where it should be exactly to be centered....
__________________
Evolve, Eisenmann, Strasse, StopTech, Active Autowerke
|
|
Appreciate
0
|
| 04-20-2014, 06:38 PM | #11 | ||
|
------
8302
Rep 10,737
Posts |
Quote:
Quote:
What's your custom tab made of?
__________________
|
||
|
Appreciate
0
|
| 04-20-2014, 09:00 PM | #13 | |
|
------
8302
Rep 10,737
Posts |
Quote:

__________________
|
|
|
Appreciate
0
|
| 04-20-2014, 09:39 PM | #15 | |
|
Colonel
755
Rep 2,782
Posts
Drives: M3
Join Date: Feb 2012
Location: South Florida/ St. Louis
iTrader: (28)
Garage List 2016 BMW X5M [0.00]
08 BMW M3 [0.00] 14 BMW X5 50i - sold [0.00] 09 BMW 335i - Sold [0.00] 09 BMW 328i - Sold [0.00] 07 BMW 328i - Sold [0.00] |
Quote:
__________________
Evolve, Eisenmann, Strasse, StopTech, Active Autowerke
|
|
|
Appreciate
0
|
 |
| Bookmarks |
| Thread Tools | Search this Thread |
|
|


