

|
|
|
|
 |

|
 |
BMW Garage | BMW Meets | Register | Today's Posts | Search |
 |

|
BMW 3-Series (E90 E92) Forum
>
Curb Rash Repair - Matte Black Forgestar F14s
|
 |
| 06-21-2012, 08:27 PM | #1 |
|
Private First Class
 
32
Rep 131
Posts |
Curb Rash Repair - Matte Black Forgestar F14s
I performed this DIY several weeks ago but haven't had a chance to post until now.
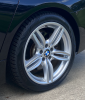
Got some curb rash. Did some research, bought some supplies, made the repairs, and I would give myself a grade of 90%. See for yourself... Step 1 (to be avoided if possible): Get curb rash. Step 2: Apply that painter's tape between the tire and the rim. Get it all the way down in there. It will come off later. Step 3: Collect your supplies. I got all this stuff at Advance Auto Parts. Don't remember the cost exactly but it was like $35 or something. Not too bad. - Dupli-Color Grey Filler Primer - Bondo Glazing and Spot Putty - Paint Thinner - Dupli-Color Perfect Match Flat Black - Assorted sand paper Step 4: Use your paint thinner to clean the damaged areas vigorously. Get the crud out of there. Clean, clean, clean. Step 5: Use your coarse grit sand paper to "feather" the damaged areas. You can use a piece of wood or something and wrap the sandpaper around it. Be careful as you're sanding - don't sand your fender or an unaffected area of your rim. You may or may not be able to see where I did just that  . Don't ask me how. . Don't ask me how.Steps 6 and 7: Apply the putty to try to fill in the gouges in your beautiful rim. While it dries, cover your whole car so the spray paint doesn't waft over and land on your hood or something. Step 8: When the putty is dry, you will attempt to sand it down flush to the surface of the rim. I think I used the medium grit sand paper for this - use your judgement. Step 9: Get ready to paint. You will apply several coats (maybe 4 or 5) of the Filler Primer. Your first coat will look something like this: Make sure to let the paint dry in between coats. When you are finished it will look something like this: Step 10: When the paint is dry, you will again try to sand it down flush to the surface of your rim. The putty and Filler Primer have "filled in" the gouges in the rim. This is where my project came off track a bit - you can see exposed putty which means I sanded all the Filler Primer off, and you can also see some bare metal. WTF. It may be that the paint needed more time to dry between coats. I followed the directions on the can, so maybe some extra drying time is called for. Step 11: Now you will be ready to paint some more. I agonized at the auto parts store over which paint to get to match the matte black rim. Don't know whether that was necessary, but in the end the Flat Black really did match the rim pretty well. Follow the same procedure as for the Filler Primer. Your first coat will look something like this: When you are finished applying a few coats, your rim will look something like this  : :This last pic is from about the same angle/position as the first, so hopefully you can get a good idea of the end result. This was almost two months ago, and the repair is holding up well. You literally have to get down on your hands and knees and look for the repaired area to see it. I am pretty particular about my stuff, especially this car, and I am happy with the work I did. If you have comments, or had another experience repairing curb rash, let me know! I hope this is helpful for you guys. - BR |
| 06-21-2012, 10:05 PM | #2 |
|
Private
 14
Rep 64
Posts |
Good write up! Same thing happened to me like 2 weeks ago. Mine wasnt too bad. I was able to grind smooth with dremel and sanding stone. Only way you can tell is the way it feels other then that no one will notice.
|
|
Appreciate
0
|
| 06-22-2012, 05:04 AM | #3 |
|
Private
0
Rep 58
Posts
Drives: 2006 Barrique Red 325i
Join Date: Dec 2011
Location: Central New Jersey
|
Nice work! I am going to attempt the same on my oe wheels.
After you finish painting, in order to get the most oe finish, you will need to sand and hit it with compound. |
|
Appreciate
0
|
| 06-28-2012, 01:17 PM | #4 |
|
e92javy
47
Rep 1,056
Posts |
Attachment 710694
Great job !! I think it would have came out better if you would of properly tapped off the rim to only paint the actual curb damage.
__________________
Instagram- (javy_e92) 09 335i coupe / M package / Alpine White / Dinan Stage 2 / Alpina B3 Flash / Alufelgen SF71 / ST coils / Lux H8 / AFE Stage 2 intake / 6700k mtech HID / Performance trunk spoiler / Gloss black roof / CF interior wrap / PE Muffler Mod / ETS Charge pipe / Tial BOV / Cyba Quad Diffuser / Cyba Quad Black Chrome tips / Gloss black grills / AW reflectors / LED turn signals / Remote Key +
|
|
Appreciate
0
|
| 06-28-2012, 03:16 PM | #5 |
|
Major General
 1008
Rep 5,150
Posts |
Next time, go to your local automotive paint supplies store, get some sem high build surface primer and some good quality body filler. Avoid duplicolor products and "bondo." Crap products that will give you shotty results.
|
|
Appreciate
0
|
| 07-08-2012, 10:46 AM | #6 |
|
Private First Class
32
Rep 131
Posts |
SEM products - will definitely try them next time. More important, I think, will be a good quality filler. You can see the Bondo crap came off when I tried to sand it. Well, lesson learned.
__________________
Current Fling: 2016 Jet Black F10 550i xDrive | ARM Motorsports Cat-less DPs | 19" Style 351 M Double-spoke Wheels & Vredestein Quatrac Pro XLs | 35% tint
 Lost love: 2011 Space Gray E92 335i |
|
Appreciate
0
|
 |
| Bookmarks |
|
|


