

|
|
 |
 |
 |
|
 |
BMW Garage | BMW Meets | Register | Today's Posts | Search |
 |

|
BMW 3-Series (E90 E92) Forum
>
DIY: e92/e93 335i Upper Control Arms (RWD only)
|
 |
| 11-15-2015, 12:10 PM | #1 |
|
'08 e93 335i

10
Rep 35
Posts
Drives: BMW e93 335i
Join Date: Jul 2015
Location: Pittsburgh, Pennsylvania
|
DIY: e92/e93 335i Upper Control Arms (RWD only)
E90post,
NOTE: Please understand that I am not liable or responsible in any way for negligence, issues resulting from the replacement of these parts or your safety. I wanted to put together a DIY on replacing upper control arms/thrust arms. There is another DIY that adequately walks you through the steps for replacing these, but the DIY includes lower control arm and other suspension part replacement. You can skip a bunch of steps and make the process much easier if you're only replacing upper control arms. If doing lowers and sway bar links, use the DIY linked below: http://www.e90post.com/forums/showthread.php?t=788761 I upgraded to M3 upper control arms because the stock driver-side bushing on 335i (e93) was cracked and leaking. As you probably know, options for fixing are: 1.) Use a special tool to remove bushings, hydraulic press to push in new bushings. This involves full removal of upper control arms, purchasing of bushings and tools. 2.) OEM replacement of stock control arm with some sort of oil-filled bushing. These are susceptible to deteriorating and leaking and do not perform as well as a solid bushing application would. 3.) Various upgraded upper control arms with better bushings (solid, high-durometer urethane). I opted #3 above and replaced stock upper control arms with OEM M3 arms which are a direct replacement. They will also allow a bit of extra negative camber. Pic taken from robc:  Gather the following tools, stuff: 1.) Whatever you use to remove your wheels (to remove your wheels) 2.) 8mm socket, nut driver, etc. (to remove belly shield) 3.) 21mm combo wrench (to turn nut that connects upper control arm to knuckle) 4.) 18mm socket (to remove bolt connecting upper control arm bushing to subframe) 5.) T40 torx bit (preferably one that is in a socket; to hold bolt connecting upper control arm to knuckle while you turn with 21mm combo wrench) 6.) Anti-seize (aluminum or silicon based) 7.) Penetrating oil (to help with removing nuts) 8.) A good pair of mechanics gloves (to save your knuckles) 9.) Trolley jack, jack stands or something to secure your vehicle off the ground. (Duhh) 10.) A creeper helps. 11.) A torque wrench that'll do 125 ft/lb or better, 21mm and 18mm sockets. (For wheels and nuts that connect upper control arm to subframe and to knuckle) 12) Drive-up Ramps (you're not going to drive on them, just lower car on to them to get suspension to drive height and some clearance to tighten some final bolts to torque specs.) Please read the entire post and map out your own game plan prior to kicking off this process. I'm going to explain the process for one side of the vehicle but it is certainly most efficient to remove both wheels, and perform finishing torquing at the same time. To replace upper control arms, follow the below: 1.) Remove your wheels and get your car off the ground high enough to ride around safely and comfortably on your creeper. 2.) Remove belly shield using 8mm socket. I use a low torque 1/4" drill and 8mm bit to zip these out in seconds. Move shield to side. If you're unsure which shield to remove, look for the largest shield that has the trap door for oil pan nut access. 3.) Spray penetrating oil on the self-locking nut that connects the bottom of the upper control arm to the knuckle, and on the nut side of the bolt that holds the bushing of the upper control arm to the subframe. (Wait 15 minutes or so to allow penetration) 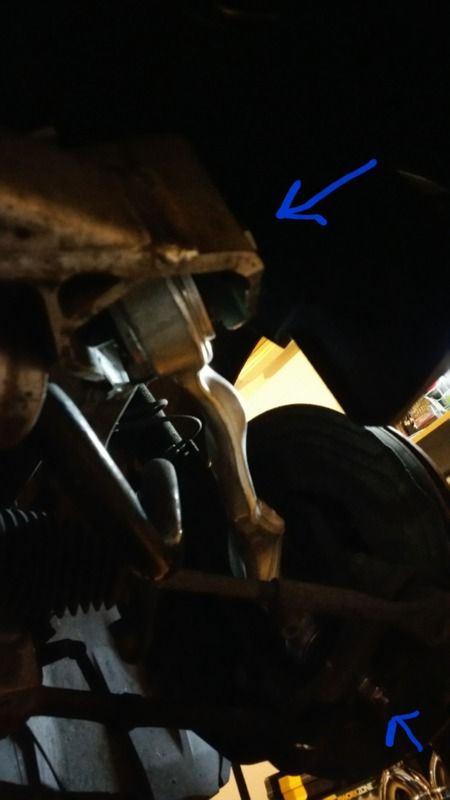 4.) Remove the locking nut that connects the upper control arm to the knuckle. Use a T40 torx bit to hold the bolt while you turn the nut with 21mm wrench. (This can be a pain in the ass. Be very careful not to strip the bolt out or you will be cutting the bolt off in a tight space.) Second image taken from robc--hope you don't mind!! 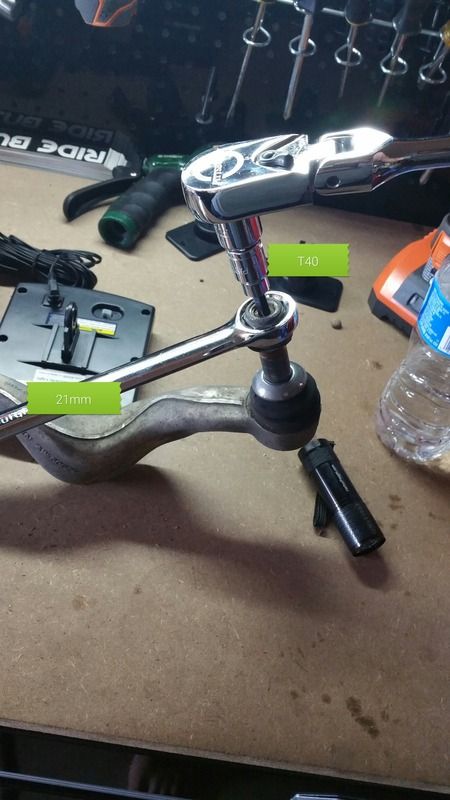 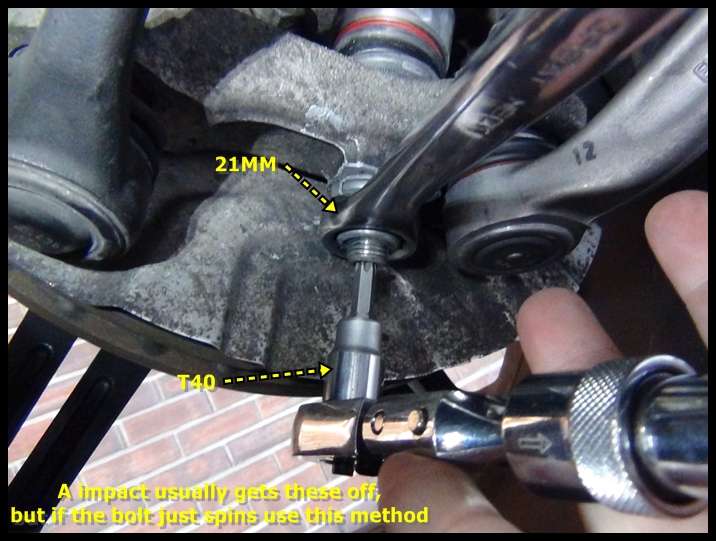 5.) Remove the bolt that connects the upper control arm bushing to the subframe using 18mm socket. The nut is captive using a clip, so you shouldn't have to hold it with anything. You may need to use a breaker bar to get this loosened up but this part should be pretty easy. Pic taken from robc (only need to remove bottom two nuts in picture that connect control arm to subframe/knuckle: 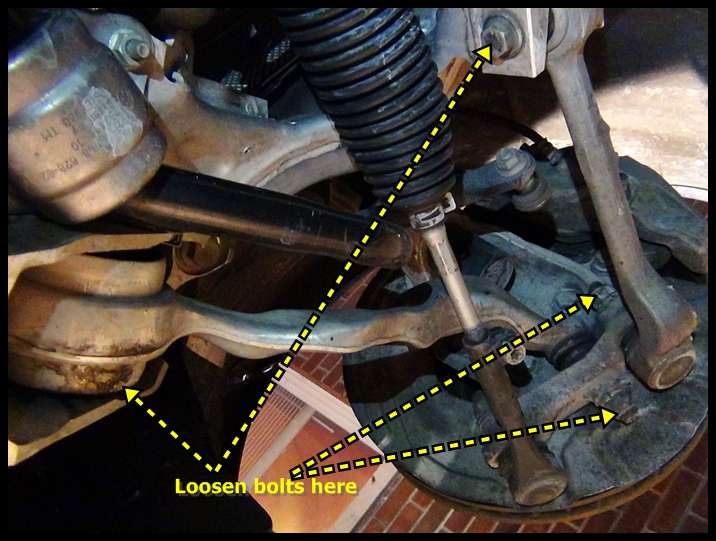 6.) Pull the bushing-side of the upper control arm down and out of the housing in the subframe, and push the lower side up and out of the knuckle. (Congratulations, the hard part is done--for that side at least.) 7.) Grab your shiny new upper control arm and add some anti-seize to the taper bolt that articulates with the knuckle. 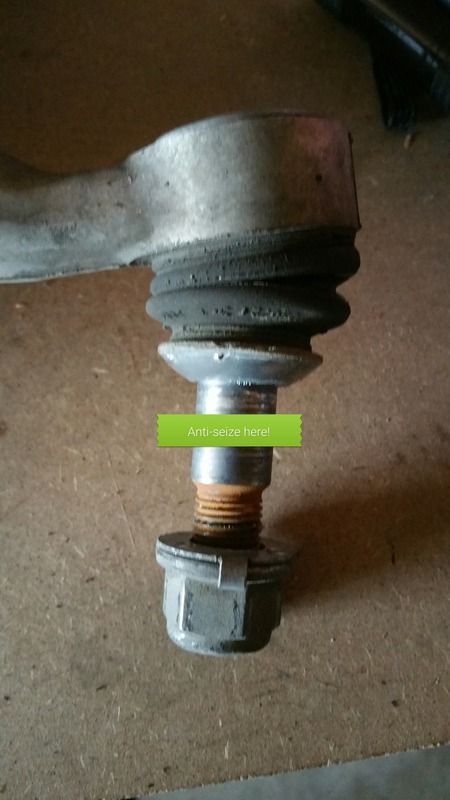 8.) Install the lower bolt into the knuckle the same way you removed it, hand thread the locking nut as far as you can (you absolutely have to replace all locking nuts that you remove! Make sure your replacement comes with a new one. Mine did.) 9.) Add anti-seize to the bolt that holds the upper control arm bushing into the subframe. 10.) Push the bushing into the subframe housing and manipulate the suspension so that the hole in the bushing aligns with the hole in the subframe where the bolt goes. 11.) Push the bolt that holds the upper control arm bushing into the subframe through the subframe hole, through the bushing itself and begin threading into the captive nut. (Don't tighten yet!) 12.) Now, tighten the locking nut that connects the upper control arm to the knuckle. Hold the bolt with torx T40 until the night is tight (use 21mm combo wrench to tighten.) Torque this bolt to 122 ft/lb. (I would now start and do the same on the other side of the vehicle) 13.) Put wheels back on (I torque all to 88 ft/lb). 14.) Carefully lower the vehicle onto the drive-up ramps (get the suspension to ride height.) 15.) Torque the 18mm bolt that connects the upper control arm bushing to the subframe to 74 ft/lb using your torque wrench. 16.) Reinstall belly shield using 8mm socket or nut driver. You're done! Most people suggest doing an alignment. I've done this a handful of times and wasn't ever out of alignment. Sorry pictures aren't great. More to come... Last edited by JamieR; 11-15-2015 at 12:51 PM.. |
 |
| Bookmarks |
|
|