

|
|
 |
 |
 |

|
 |
BMW Garage | BMW Meets | Register | Today's Posts | Search |
 |

|
BMW 3-Series (E90 E92) Forum
>
DIY: Rear Door Lock Actuator Repair - '07 335i (with pics)
|
 |
| 08-12-2014, 12:20 PM | #1 |
|
Captain
    
71
Rep 628
Posts
Drives: ...when not replacing gaskets
Join Date: Apr 2011
Location: Friendly Maritimes ;)
|
DIY: Rear Door Lock Actuator Repair - '07 335i (with pics)
Hey all! I just saved myself a bit of money by repairing one of my door lock actuators. It didnít cost me a cent and all it took was a little of my time.
I had a situation where all four of my doors wouldnít unlock. The only way into the vehicle was to use the integrated key from the fob. Once inside, I tried pressing the central locking system button on the center console but no luck. After some online searching, I discovered that the systemís 15A fuse which is located at the back of the glove box had blown. A new fuse was installed and this time oddly enough, all but the rear passenger door unlocked. The other doors worked fine repeatedly. I ruled out a possible short in the door wiring because the new fuse would have blown. Something within the lock actuator must have gotten jammed but not in a way that would trip the circuit. Ultimately, I managed to take the actuator apart to discover that one of its two drive motors had seized. As you read on youíll learn what caused the motor to fail and how to make the repair by simply using a couple of household items. This DIY is based on a 2007 335i e90 and please note that much of it is not the usual step by step set of instructions but is more of a personal account. Nonetheless it will help guide you through the process. Letís get started. Lock Actuator Removal: There was really nothing in the way of information for rear door lock actuator removal to speak of but thanks to e90post member tracerit, his DIY for the Ďfront door lock actuator replacementí post was a great starting point. See http://www.e90post.com/forums/showthread.php?t=477507 All in all, everything came apart quite well. The tool kit for trim removal was a Godsend. A few nice things about doing the rear lock is that I didnít have to disconnect the battery nor unhook the glass from the window regulator. I kept the window rolled up the whole time which allowed for more than enough access to the actuator. Also, since the handle is keyless there is no need to undo the 4mm Allen bolt on the edge of the door or go near any part of the handle for that matter. Well, you are now at a point where you have two options. You can either install a new actuator by reversing what you just did to remove the old one or continue on into the mysterious and wondrous realm of door lock actuator repair.  Actuator Housing Disassemble: At first glance I thought that the actuator was a sealed unit and couldnít be opened without destroying the housing. The riveted metal strike plate fooled me momentarily. Looking more closely, I noticed the five Torx20 screws; four around the plastic perimeter and one going through the strike plate. Once removing the five screws, the housing began to separate into what appeared to be two pieces. I pulled at the plastic tabs around the edge and could see some more separation going on. It was clear at this point that there were now three sections to the unit. The third had the riveted strike plate attached. I lifted the triangular end of the plate off a plastic locking nub and slid the piece straight out. It had jammed on one end so I used a bit of force (maybe too much) but it finally yielded and luckily without any damage or parts flying everywhere. Whew! I was a bit more cautious when separating the two other pieces. Talk about a Chinese puzzle! Point of Failure and Actuator Repair: I set aside the strike plate section of housing and focused on separating the other two pieces. As expected, one of the halves was filled chock a block with gears, linkages and springs and the other was just a mating cover. Two toy size 12v DC motors accompanied the workings. A visual inspection showed no obvious damage to any of the exposed parts. The condition of the plastic gears looked fine. All linkages seemed to be in their place and all springs ready for action. The greased brass worm gears on the motor drive shafts showed no signs of wearing and I was able to rotate them using my thumb with little or no resistance from the motors. Carefully, I pried one of the motors loose leaving two small +/- electrical prongs exposed in the housing base. I hooked the motor up to a 9v battery and put it through a series of stop and start tests without any problem. The other motor was a different story. It would stop alright but would only start intermittently. The motor could only be started again by rotating the worm gear with my finger. I then went on to separate the metal motor casing from the plastic end piece which houses the tiny brushes by straightening the two crimped metal side tabs. Inside, the brushes were in good condition but the commutator (the rotating part that the brushes touch) was black with a patina or carbon. There was also a half melted tiny nylon flat wear washer separating the rotor from the end of the plastic motor housing. So with the motor apart, I sealed off the magnet and windings with a layer of masking tape (sticky side out) leaving only the commutator exposed. Then using very fine steel wool, I removed the carbon build up, paying special attention to the lateral grooves. The purpose of the tape is to keep the steel wool filaments separated from the magnet. After the cleaning, the motor was reassembled and tested again. It started flawlessly every time. I even cleaned up the other motor while I had everything apart. Repair complete! Information regarding commutator surface conditions can be found here: http://www.electrographite.co.za/cus...surface-chart/ 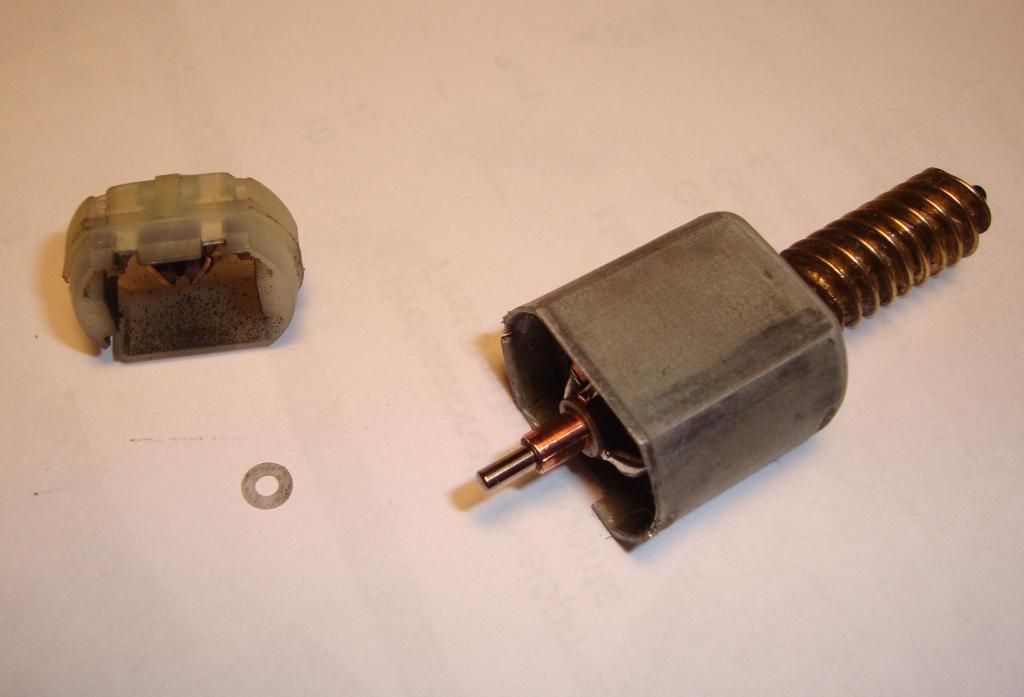 Conclusion: I believe that electrical contact between the commutator and the brushes had diminished over time due to a build up of patina/carbon. Finally the rotor could no longer overcome the resistance from the layer of residue and the motor seized. This caused an over-current situation in the door locking circuit and blew the 15A fuse. I'm still not sure why the replacement fuse didn't blow. In technical service bulletin SIB 511907 of June 2013, BMW recommends changing fuse #57 (up to 9/07 production) or fuse #73 (from 9/07 production) from a 15A to a 20A. A function test must then be performed and actuator(s) are to be replaced if locking and unlocking is sluggish or abnormally noisy. BMW blames silicon contamination or intermittent but acceptable amperage spikes. I really have my doubts about these explanations. My bets are on the motors. Iíve included some photos at the end of this DIY of the open actuator to not only get a feel of what to expect but to know in what order the pieces go just in case a loaded spring decides to go rogue. These actuators are failing far too early in the life of the vehicle IMO. Originally I blamed the overloading of the motor on the sheer work required to move the locking mechanism components. A further search leads me to believe that the buildup of black patina has resulted over time from the effects of the presence of a damp electrical environment within the motor. Unusually high air moisture content coming in contact with the copper commutator and carbon brushes will produce these results. This makes sense as I live in a region where relative humidity is high. Removing the Door Handle/Pull and Handle Backing Plate (Optional): Before reinstalling the lock actuator, I decided to take a detour and remove the entire door handle/pull workings just to see how it all fit together and it gave me a chance to clean and wax the painted surface area and to properly lubricate the sometimes Ďstickyí spring mechanism on the handle/pull backing plate. Removal of the handle and backing plate is unnecessary when doing the lock actuator fix but Iíve included a short procedure in case you decide you want to take this route. I followed traceritís DIY and removed the 4mm Allen bolt located on the doorís edge under the black plastic circular cover. I removed the loose end block piece of the door handle, being careful not to damage the courtesy light and then pulled the end of the handle closest to the doorís edge out. The other end of the handle rotated and pulled right out. A Torx-20 screwdriver was used to loosen the exterior screw holding the backing plate to the door pull area. I slid the door handle backing plate off and fed it out through the door. Putting the handle back is somewhat tricky. Dry fit the handle/pull and the backing plate together first to understand how it goes together. Reverse the order of steps to assemble. Here are pictures of the door handle assembly. Backing plate (interior side) 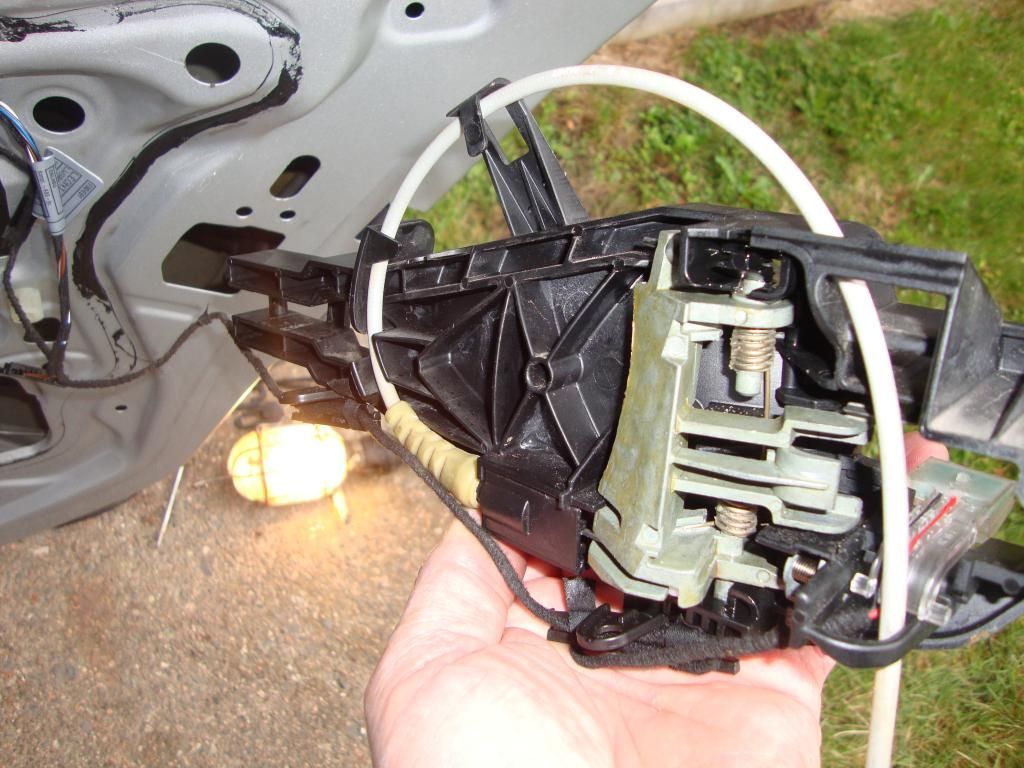 Backing plate (exterior side) 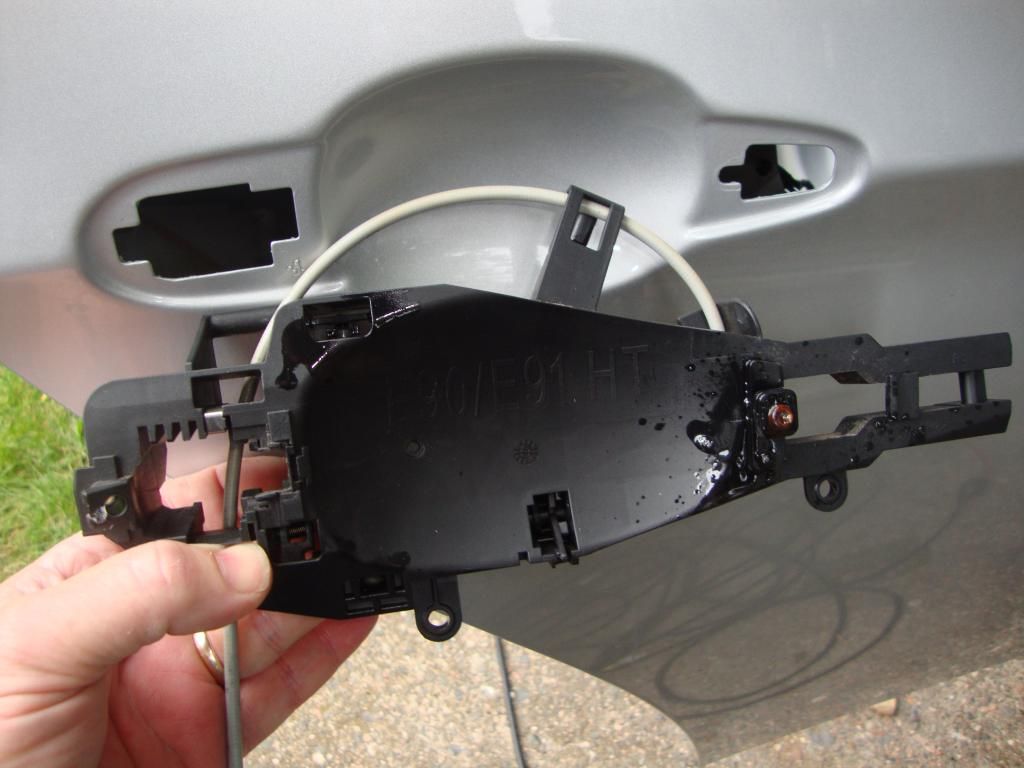 Door handle/pull 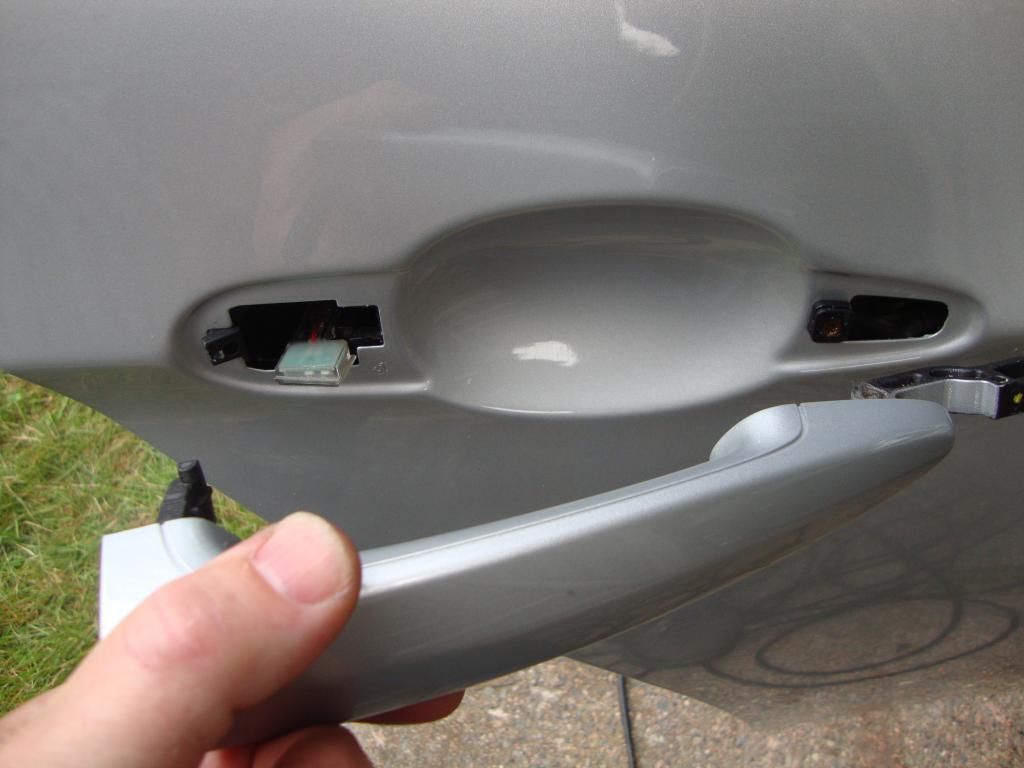 Pretty Pictures of Inside the Actuator: Note: These pictures aid in the re-placement of components that are more likely to become dislodged during handling of the open actuator. Order of component installation Ė left to right and top to bottom 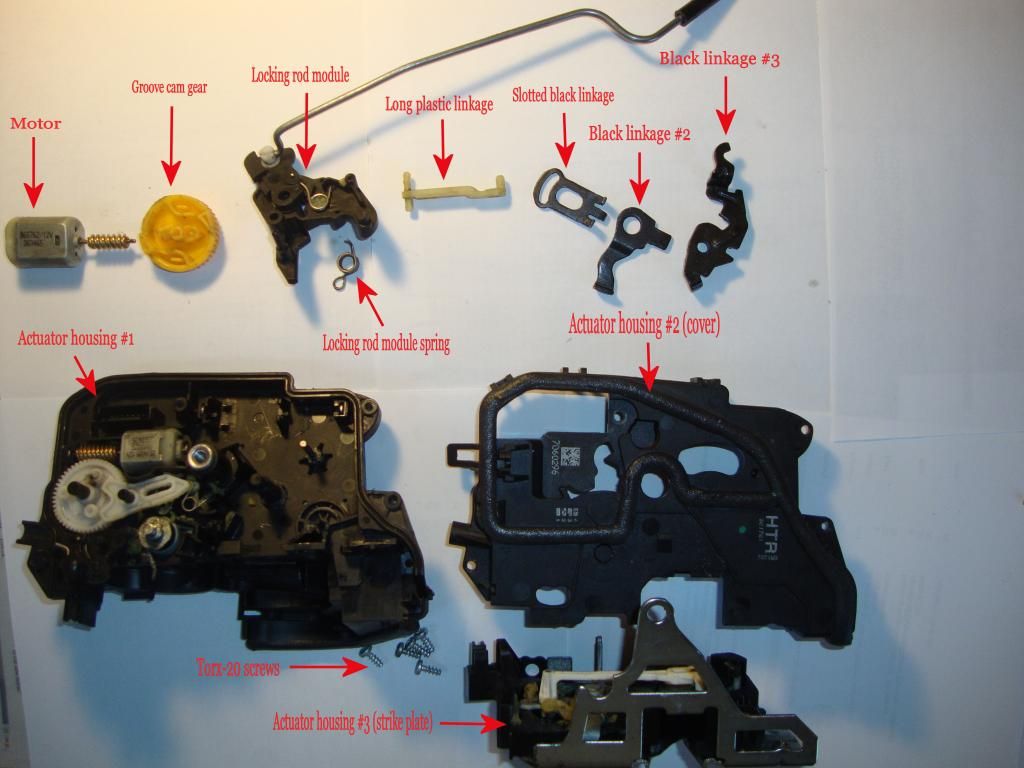 The motors can be installed or removed at anytime during the procedure. The problem motor was the one on the right. 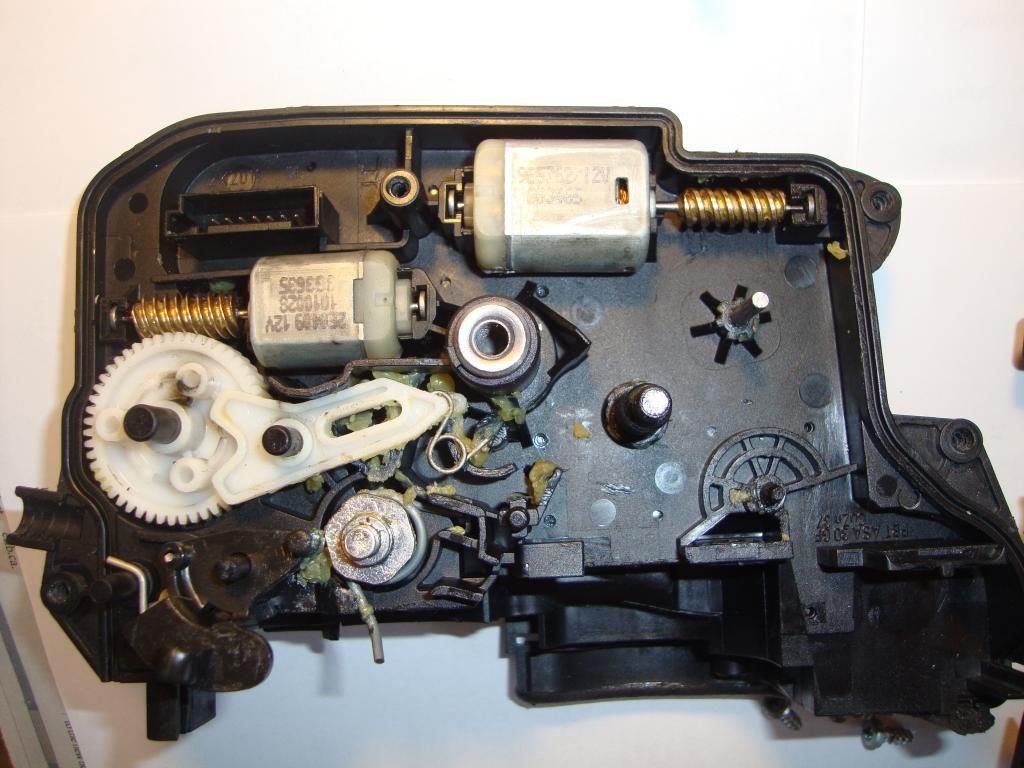 Yellow groove cam gear 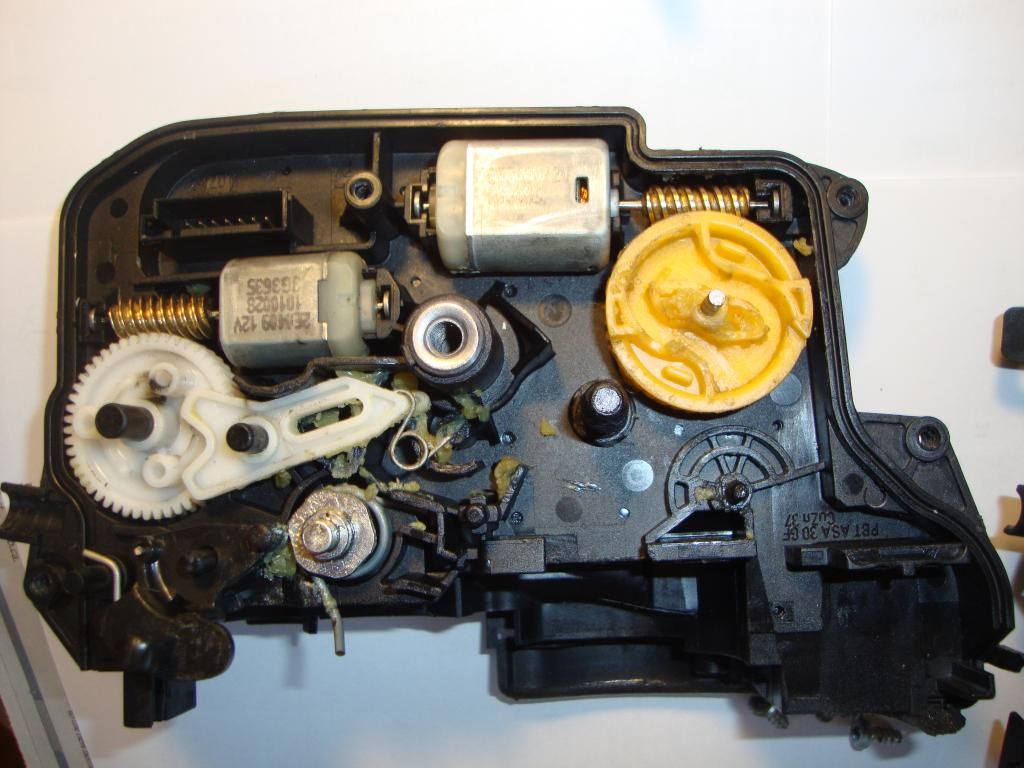 Locking rod module with spring in place 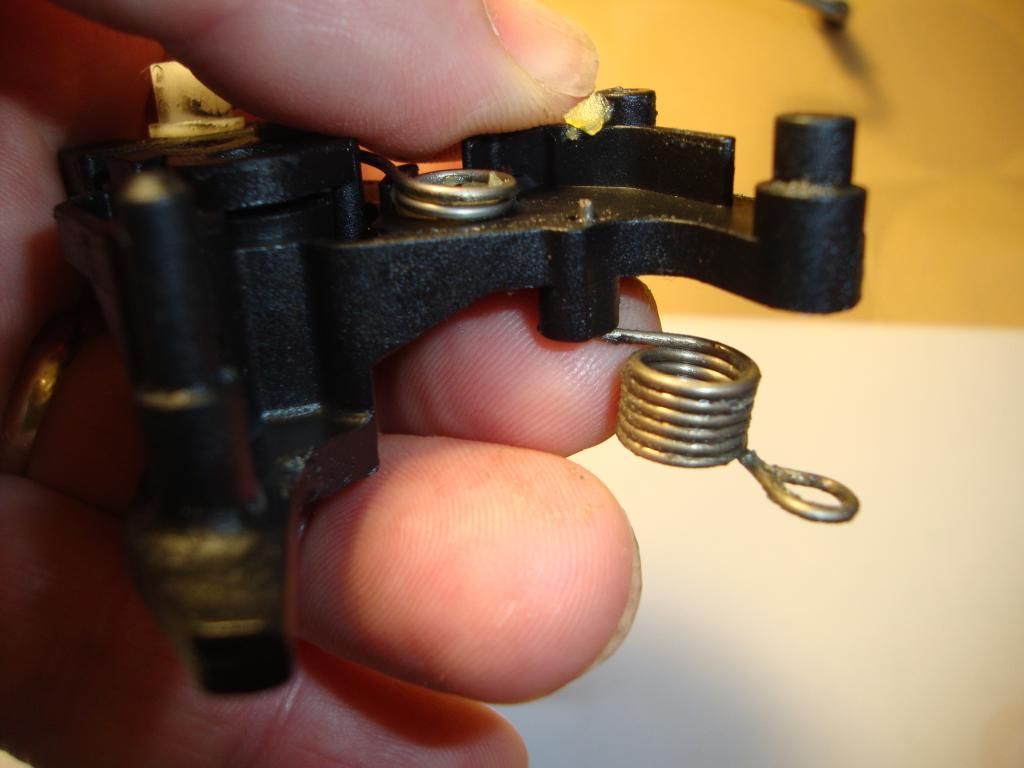 Dry fitting the locking rod module without loading the spring to ensure that the follower on the underside lines up with the yellow groove cam gear 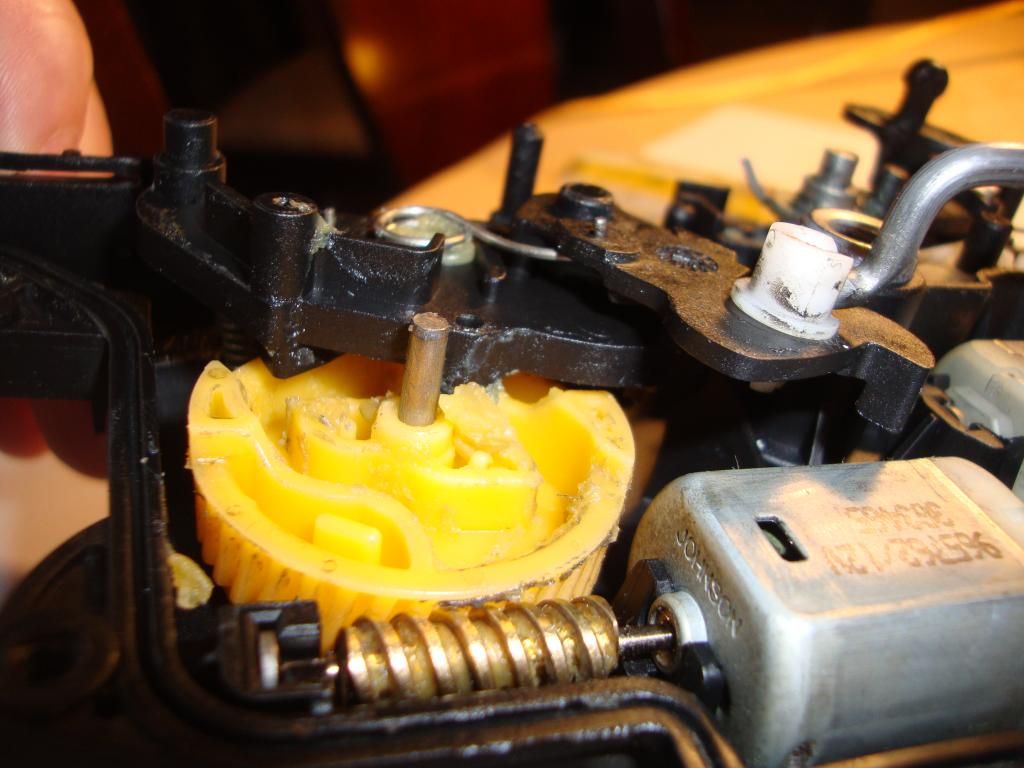 Installing the locking rod module by first putting the spring into place 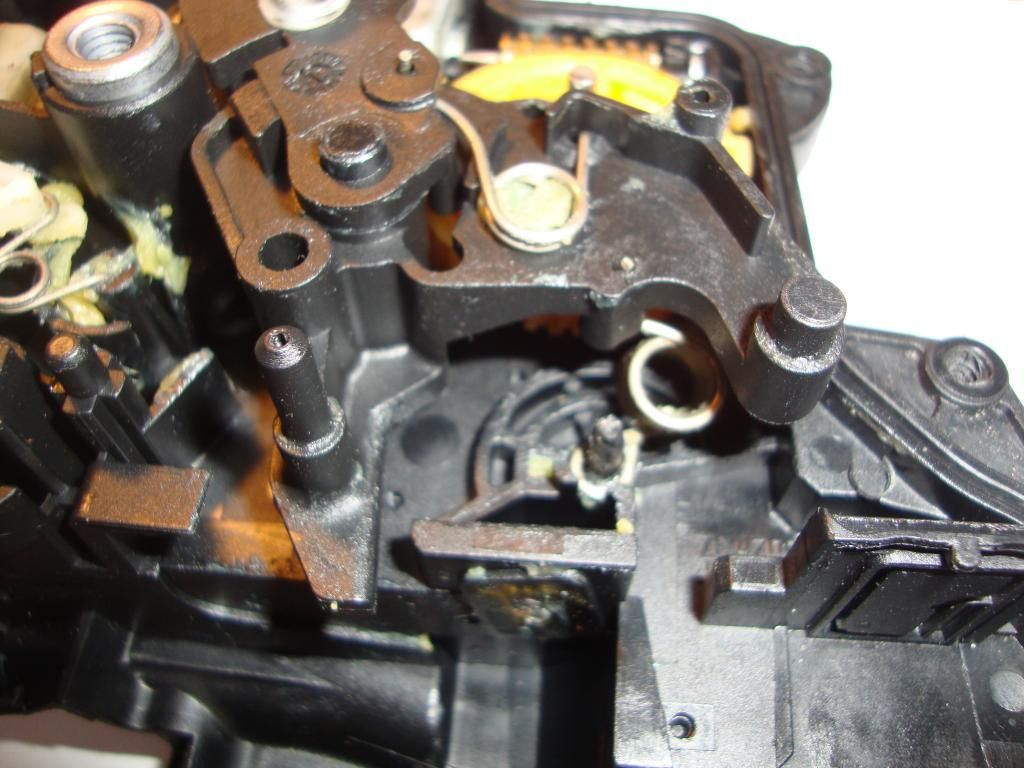 Setting the long plastic linkage in position as shown 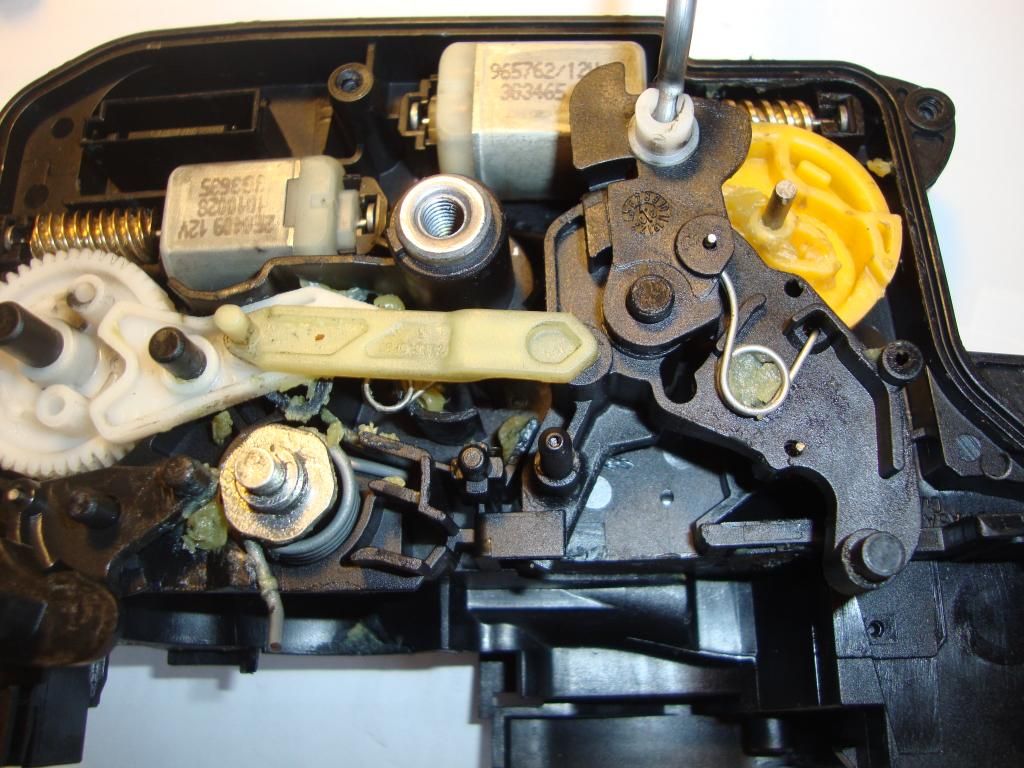 Loading the large spring against the plastic tab as shown 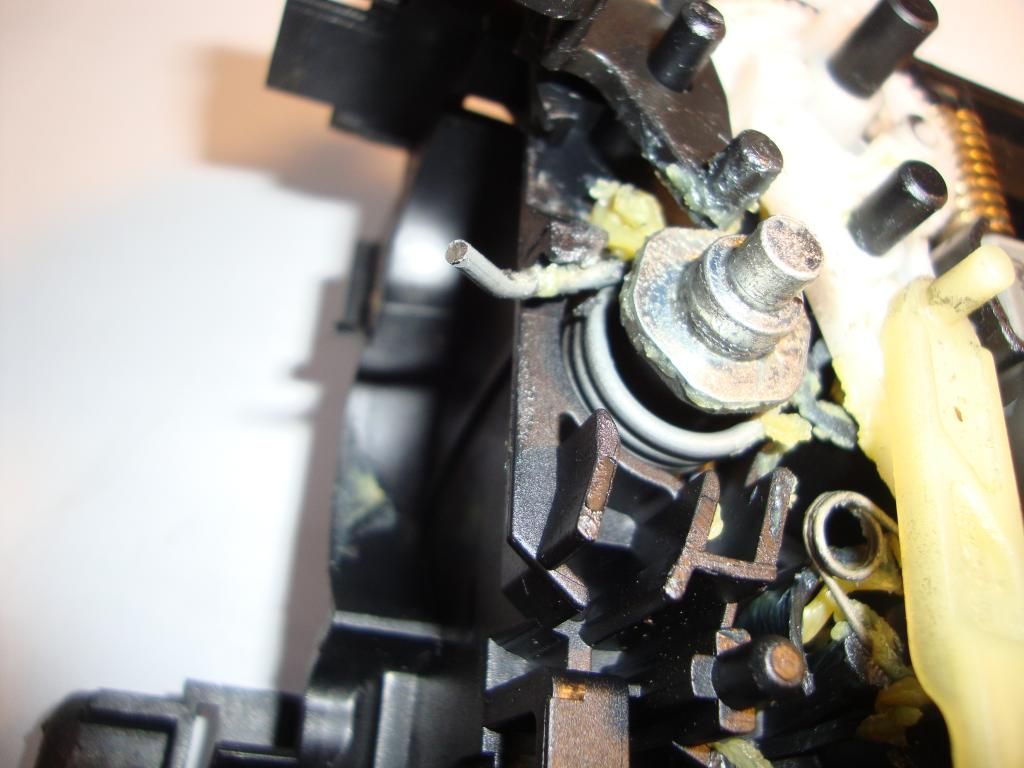 Positioning the small black slotted linkage. 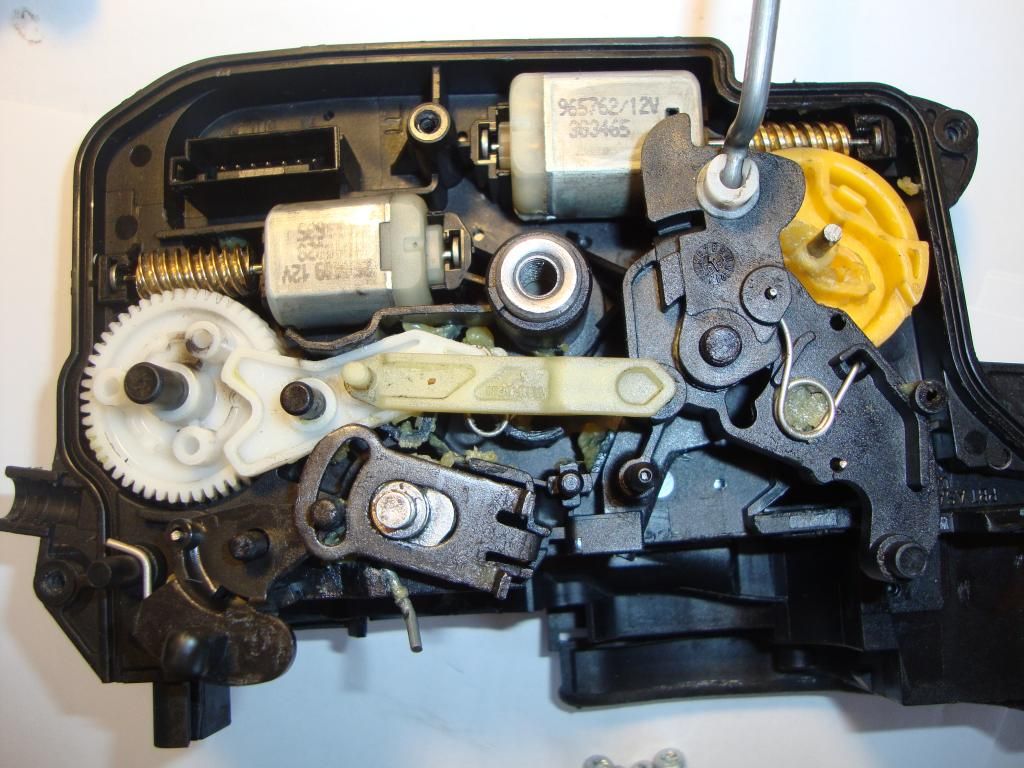 Setting the second black linkage on top of the slotted one 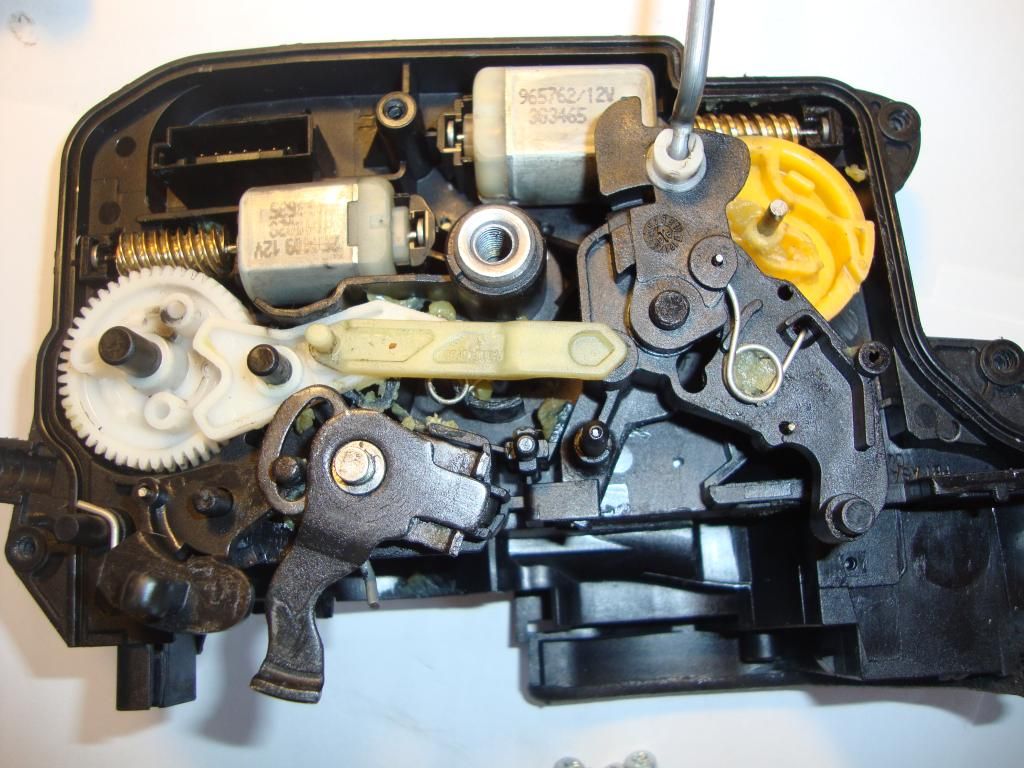 Setting the third black linkage on the previously loaded spring and rotating it CCW over the threaded pillar, pushing it down into place. It should stay put against the pillar but just be careful not to bump it. 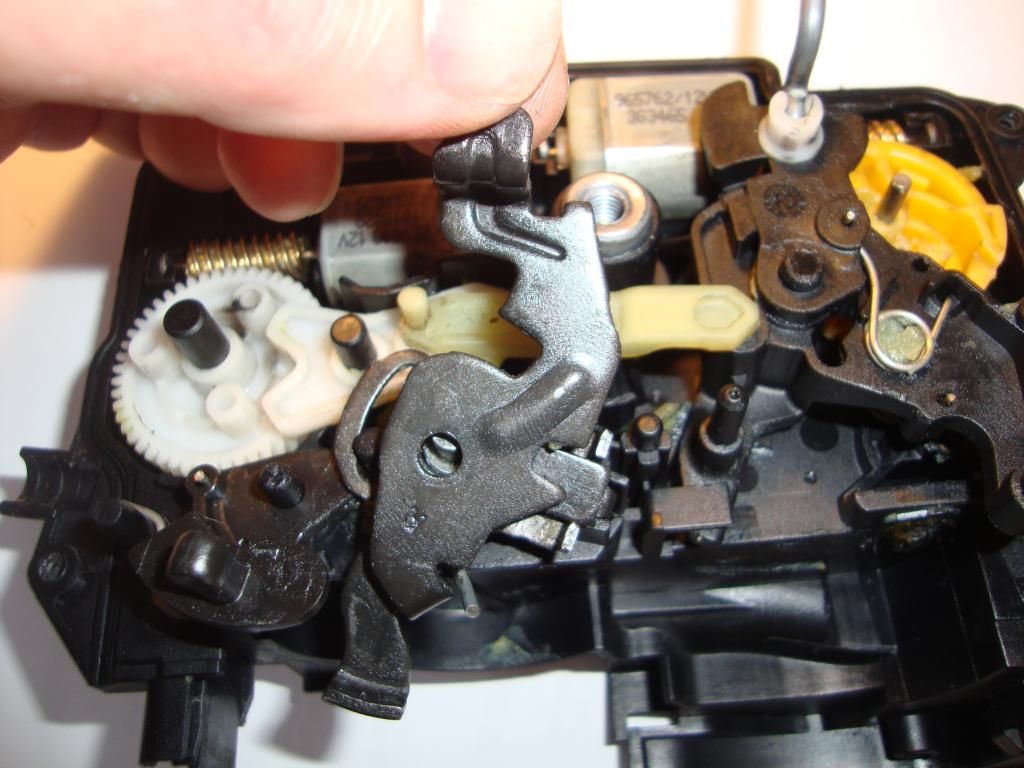 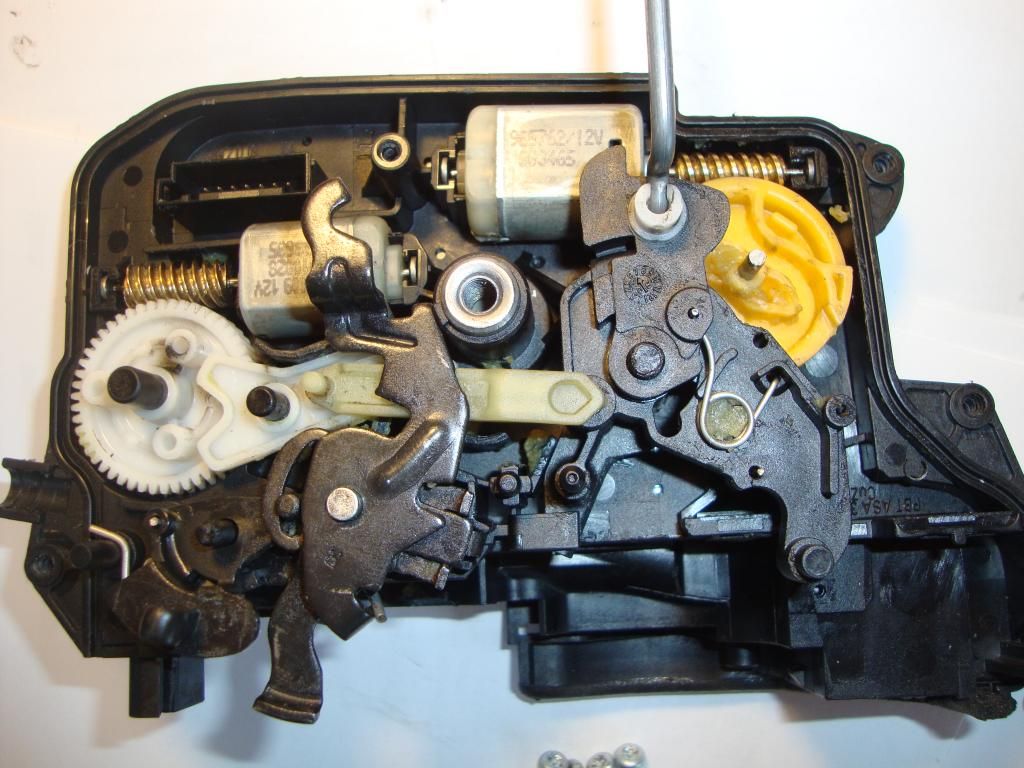 Putting the mating cover back on using four Torx-20 screws 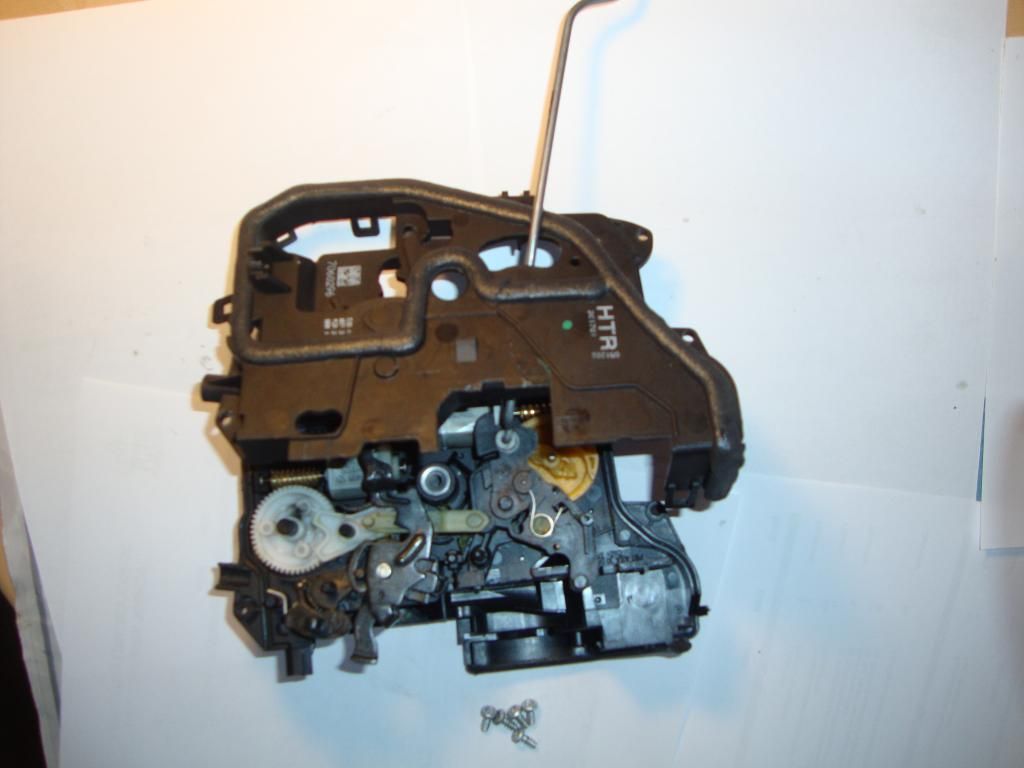 Sliding the third housing piece into place making sure that it lines up properly 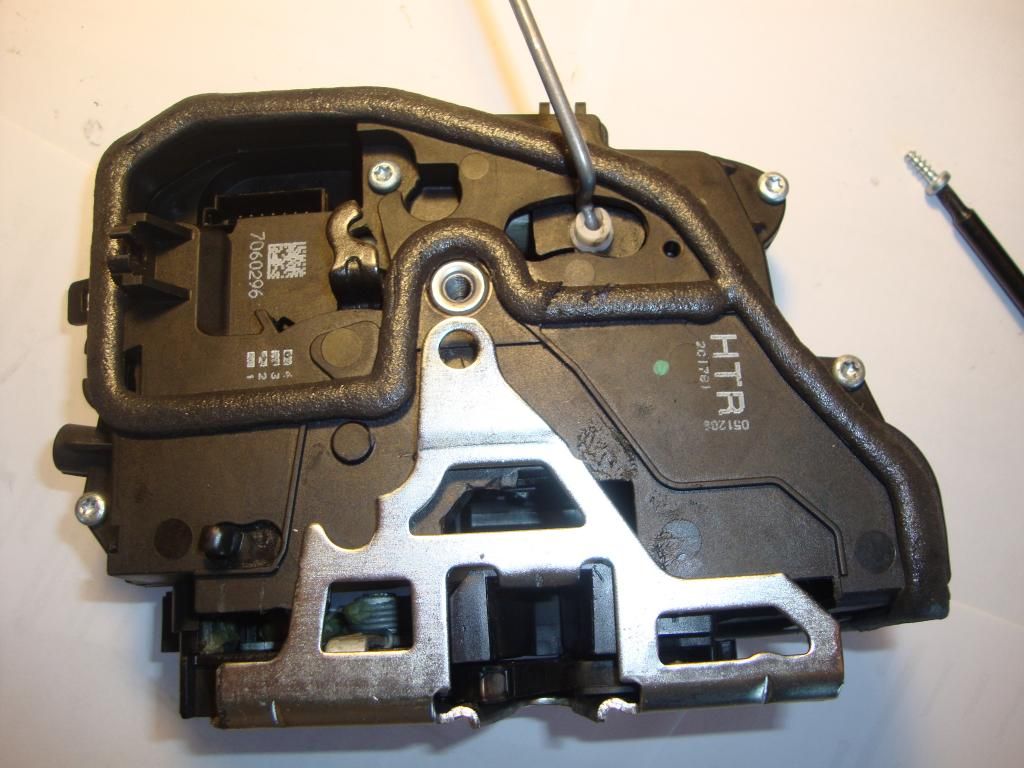 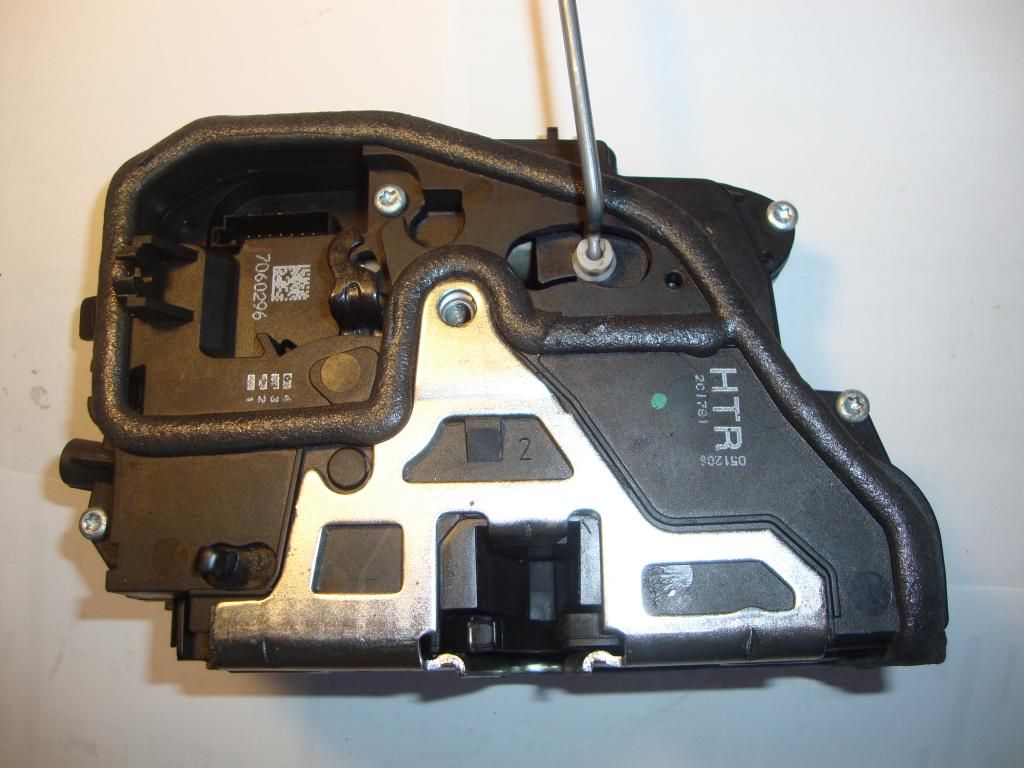 Attach fifth Torx20 screw as shown (lower right) 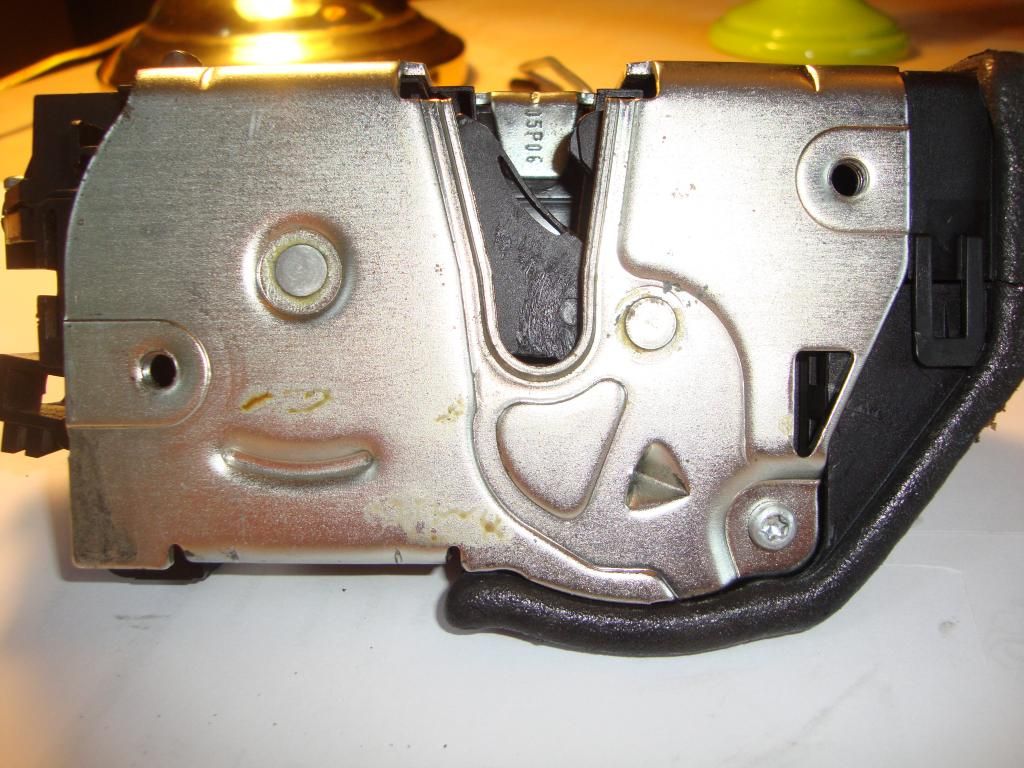 Well thatís it. Everything went back together nicely and the locking mechanism works like a charm. I plan on doing the remaining door lock actuators over time as preventive maintenance. I read somewhere that you donít have to detach the window from the regulator during front door lock actuator removal procedure. Simply unbolting the bottom of one of the window guides will provide the space needed to get the actuator out. I guess Iíll find out soon enough. Thanks for dropping by! Built My Way PS: See my DIYs for the 335i Water Pump/T-Stat replacement and the Hard Brake Pedal issue. Last edited by Built My Way; 10-10-2015 at 11:38 AM.. |
| 04-25-2015, 05:14 AM | #3 |
|
Captain
    141
Rep 862
Posts |
I bought a new door lock for mine, even though it was only replaced about 4 years ago.
One thing to note is that the metal housing that the two torxs screw go in to through the door aren't threaded in the housing. So you need a 6mm x 1 tap to cut threads in them. |
|
Appreciate
0
|
| 06-22-2015, 05:31 AM | #5 |
|
Captain
    
71
Rep 628
Posts
Drives: ...when not replacing gaskets
Join Date: Apr 2011
Location: Friendly Maritimes ;)
|
That's too bad. Maybe a forum member has an old one they can give you. But then there's the shipping cost. Good on you for trying.
|
|
Appreciate
0
|
| 09-24-2015, 10:30 AM | #6 |
|
Lieutenant
   38
Rep 401
Posts |
Great info.
I'm hoping not having to replace the whole lock actuator, The problem I have involves the white circlip that rod fits into. This clip broke and the rod keeps sliding out of the actuator and falling into the door. Does anyone know if its possible to change this circlip without having to remove the whole actuator? |
|
Appreciate
0
|
| 02-08-2016, 02:25 PM | #7 |
|
Registered
0
Rep 1
Posts |
I had just replaced the driver's door actuator when the right rear actuator quit on me, at 82k miles. So I thought I would try this detailed approach. I have a 2006 330xi so the equipment in the door should be pretty much the same as in this DIY. When I took the right rear actuator apart, the larger of the two motors was dead. I replaced it with one from the front door that was cannibalized but working. I also found that the "Long Plastic Linkage" was broken, in that one of the prongs at the moving end was broken off. I cannibalized that, also, from the front door actuator. They were identical. These two fixes did not fix the actuator, though. I reassembled it as carefully as I could and do not think I made any errors, but it is still dead. All three other doors work just fine. I can lock and unlock the right-read door manually with the lever, but that is it. I may take it apart again when I have some time to kill, and I may try to bench test it this time. If anyone is till following this thread, any ideas?
|
|
Appreciate
0
|
| 02-09-2016, 06:51 AM | #8 | |
|
Captain
    
71
Rep 628
Posts
Drives: ...when not replacing gaskets
Join Date: Apr 2011
Location: Friendly Maritimes ;)
|
Quote:
|
|
|
Appreciate
0
|
| 11-07-2016, 01:02 PM | #10 |
|
Enlisted Member
 5
Rep 46
Posts |
Rear door unlocking issue
Hey All,
My rear passenger door will lock with the key fob, but it will not unlock. Do you think I need to replace the whole actuator? or is it possibly a gear issue? If it may be just a replacement gear, where can I purchase it? Thanks.
__________________
2006 330i e90 -black, manual transmission, beige, sports package, 15% tint 35% front tint 1998 civic ek9 |
|
Appreciate
0
|
| 11-07-2016, 02:17 PM | #11 |
|
Lieutenant
   
188
Rep 589
Posts |
My rear driver's door actuator is currently broken. Mine would lock but not unlock. I'm guessing it's a similar issue with yours. On mine the gear under the lock rod was broken. I have a replacement gear coming in the mail...I found a seller on eBay selling gear kits from Turkey. It's supposed to arrive today, I can update you when it gets here. There was another seller in the UK and one in Germany...those are the only sources for replacement parts that I could find.
|
|
Appreciate
0
|
| 11-08-2016, 07:18 AM | #12 | |
|
Captain
    
71
Rep 628
Posts
Drives: ...when not replacing gaskets
Join Date: Apr 2011
Location: Friendly Maritimes ;)
|
Quote:
|
|
|
Appreciate
0
|
| 11-10-2016, 03:35 PM | #13 |
|
Lieutenant
   
188
Rep 589
Posts |
I repaired my actuator today. Here are some pictures of the damage and of the repair process. I forgot to take any pictures of removing the actuator from the door, but there are other threads that detail that process. I had the most trouble getting the wire for the door handle LED lights loose from the actuator. I ended up unwinding the blue tape holding the wire on, and then just tried my best to tape the wire back in place afterwards.
Here are the parts I received. I purchased the piece where the lock rod attaches separately; the other three pieces were sold as a kit. The quality seems pretty good...the gear was slightly heavier than the original gear. It's hard to tell with plastic, but I didn't notice any obvious flaws with any of the parts.  I had a very difficult time getting the actuator open at first...after a while I realized I was doing it wrong. I was trying to pry the metal strike plate off of the plastic pieces, but the metal is actually attached to a large section of plastic which all comes off as one piece. So after removing the silver torx screws the first step is to lift at the red arrow and release it from the tab, and then pry it open at the green arrow:  Pry it here:  It should pop loose fairly easily, and then you can just wiggle the rest out. Here's what comes out:  And here's what you're left with:  Then simply pry open the clips around the case and separate the two halves. Here's what was inside. I've marked all the damaged pieces with red arrows. You can see where a chunk of the white gear broke off and got stuck near the top of the photo:  Two pictures of broken pieces and their replacements:   So now we'll need to remove everything and clean out the old grease. I again forgot to take any pictures of that, but I used a pick to remove as much of the old grease as possible, and then used some brake cleaner to try to spray out anything that was left. You'll want to spend some time on this part...I spent a good 30 minutes or so cleaning it up. Then we'll start to reassemble it with new grease. I used white lithium, as far as I can tell that's what was in there originally. New grease being applied:  Be sure to get everything that moves:  I ended up using less grease than what you see in the pictures...I put a lot on and moved everything around to get it coated and then wiped off the excess. Just be sure that there is a coating of grease on all the moving parts. The pictures in the OP show the placement of all the rest of the parts. I also removed the white linkage on the strike plate piece and cleaned the old grease off from there, but I didn't disassemble that section any farther than that. I forgot to reattach the spring for the child safety lock and didn't realize it until I had the door panel back on. It only took a few minutes to pull it all out again, but take the time to check that every function works so you don't make the same mistake. I tried closing and opening the latch and it all worked, but I forgot to check the safety lock before I put it back in. Once again thanks to Built My Way for the great pictures in the OP, they were very helpful in getting everything back together correctly. Last edited by kkasson; 12-29-2016 at 02:01 PM.. |
|
Appreciate
0
|
| 06-19-2017, 12:58 PM | #14 |
|
Registered
0
Rep 1
Posts |
Sorry to revive an old thread. Same thing happened to me as kkasson, broken plastic arm & gear, worn locking module.
Where did you end up ordering the plastic pieces? Can't find them anywhere. Nevermind! Found it: Search for e90 Central Locking Actuator Repair Kit Last edited by m1218; 06-19-2017 at 01:08 PM.. Reason: Found what I was looking for. |
|
Appreciate
0
|
| 07-31-2017, 07:00 PM | #15 | |
|
Registered
0
Rep 4
Posts |
Quote:
|
|
|
Appreciate
0
|
| 07-31-2017, 10:13 PM | #16 |
|
Captain
    84
Rep 790
Posts |
What photobucket is doing is a crime..forcing to pay to have pictures be visible..
 I got this door lock actuator for anyone interested. Works well. Would've been easier to install if photobucket wasn't screwing the internet. https://rover.ebay.com/rover/1/711-5...yP%26vxp%3Dmtr |
|
Appreciate
0
|
| 12-07-2017, 11:11 PM | #17 |
|
First Lieutenant
  37
Rep 348
Posts |
I have a stuck rear driver door. The door doesn't open from the inside or the inside or the outside. The lock goes up and down when you lock and unlock from the keyfob.
I've taken the door panel off from the inside and looked inside, I tried to manually pull the wire to release the door but nothing is working. Anyone know what I can do to fix this? Can't open this door anymore. |
|
Appreciate
0
|
 |
| Bookmarks |
|
|