

|
|
|
|
 |

|
 |
BMW Garage | BMW Meets | Register | Today's Posts | Search |
 |

|
BMW 3-Series (E90 E92) Forum
>
VRSF Charge pipe
|
 |
| 01-06-2015, 02:14 AM | #266 | |
|
Colonel
 
564
Rep 2,085
Posts |
Quote:
|
|
|
Appreciate
0
|
| 01-08-2015, 12:11 PM | #267 |
|
Nerd

133
Rep 437
Posts |
Will the VRSF chargepipe with the Tial BOV clear the BMS DCI without a problem?
__________________
2009 E92 335i Sport 6AT - Finished, sold
Transport for Ireland - LEAP Pass with TFI smartapp because cars are stupid expensive in Ireland |
|
Appreciate
0
|
| 02-12-2015, 12:15 PM | #269 |
|
Private First Class
 8
Rep 110
Posts |
I am looking to buy a VRSF Charge Pipe and I noticed that unlike lots of other brands there is no differentiation between pre-09 and 09+ n54 engines. Is there no difference for the VRSF CP for whatever reason?
I have heard some stories of the lower elbow being too short. Have all of these issues been worked out? I'd hate to take my car apart only to find out the CP isn't going to fit. |
|
Appreciate
0
|
| 02-12-2015, 12:26 PM | #270 | |
|
3482
Rep 79,210
Posts
Drives: C6 Z06, 09 335i, 10 335xi
Join Date: Dec 2008
Location: www.TopGearSolutions.com
|
Quote:
|
|
|
Appreciate
0
|
| 02-13-2015, 08:07 PM | #273 |
|
Registered
0
Rep 3
Posts |
Finished the install of this chargepipe / Tial bov combo.
Few observations... 1. I don't like that the surface of the flange that connects to the bov is coated. This surface should have been masked prior to coating. 2. The tapped holes for the ATS were not plugged prior to coating, the threads needed to be chased with a tap prior to installation. 3. The tapped holes for the ATS are fine threaded. This is bad practice for aluminum and these holes should be tapped for coarse threaded fasteners. 4. The provided fasteners for the ATS are black oxide. These fasteners should be stainless steel or at the very least zinc plated. 5. Kit doesn't include all necessary vacuum hose to complete the job. 6. The charge pipe omits the mounting tab. 7. The orientation of the bov flange is poorly placed. The bov flange encroaches on the intake inlet hose (see pics). If the flange were to be rotated a few degrees towards the fender it would completely clear the inlet hose. 8. The included zip-ties are white, they should be black. 9. The welds on the charge pipe are messy. 10. The plastic caps, for the diverter tube connections, are cheap and the clamps that secure the caps are one size too large. Despite the downsides that I listed the assembly does function and is an okay value. I think you get what you pay for. I most likely will upgrade to a unit that is of higher quality. 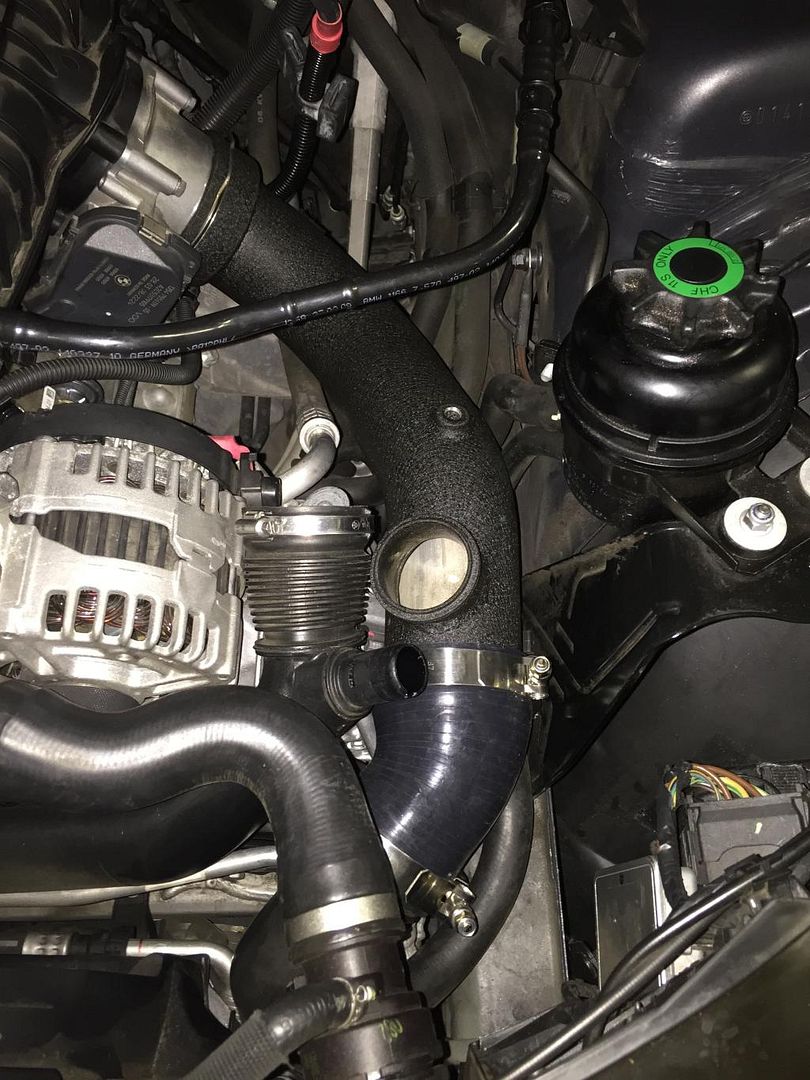   |
|
Appreciate
0
|
| 02-13-2015, 09:55 PM | #274 | |
|
2126
Rep 43,349
Posts |
Quote:
We've sold a few hundred of these without the mounting tab and have a few 700whp+ cars running our chargepipe without the tab. It's been proven that it isn't necessary. We also provide pictures of our product in order to eliminate any confusion and we've never claimed to offer a chargepipe with the mounting tab. The color of the zip ties, thread pitch, fastener material, "quality" of the plastic covers are absolutely subjective and also won't affect performance but we appreciate the feedback. |
|
|
Appreciate
0
|
| 02-15-2015, 02:34 AM | #275 | |
|
Registered
0
Rep 3
Posts |
Quote:
Thread pitch... Not really a subjective point. Lower strength, softer alloys like aluminum are more prone to thread stripping when fine pitched threads are utilized. This is a fact and why it's poor practice to tap aluminum with fine threads. With regards to the fasteners, black oxide is a poor choice as it tends to rust. Do you see any other fasteners under the hood from the factory that are black oxide? The cost of providing your customers with a fastener that won't tend to rust should be negledable. Why wouldn't you want to provide fastenets that resist rusting? Are the pennies that you save really worth it? I noticed that you didn't address my points about weld quality and the oring surface finish. Do you know that a textured, powder coated finish for a surface that is meant for an oring seal is extremely problematic and can cause leaks? Did you know that there are standards for the finish of sealing surfaces? Have you ever in your life seen the factory texturize an oring surface? You took the easy way out by not masking this surface prior to powder coating and again are doing your customers a disservice. weld quality... Not only does an ugly weld effect the appearance of your product but it can also effect the structural integrity of the part. Again there are standards when it comes to welding and I can assure you that you wouldn't be able to match up your welds to any of these standards. I am glad to hear that you are addressing the issues concerning the orientation of the bov mount as well as pluging the threaded holes. I would also highly recommend that you reconsider my other recommendations, especially the ones concerning o-ring surfaces and welding standards. Last edited by kingfork; 02-15-2015 at 02:42 AM.. |
|
|
Appreciate
0
|
| 02-15-2015, 07:57 AM | #276 | |
|
Private First Class
24
Rep 118
Posts |
Quote:
|
|
|
Appreciate
0
|
| 02-15-2015, 09:58 AM | #277 | |
|
Colonel

683
Rep 2,110
Posts |
Quote:
I had issues with 2,3,4, 6 and another one was the tmap sensor hole. My tmap sensor w oring would not go in, the oring was being squeezed out. Their hole size was 12mm, while stock was 13. Had to run to advance auto in yhe middle of the install to try and find a smaller oring. #2...had already installed the cp, when i realized the screws wont thread in. Had to pull the cp out, and retap the holes (with the screws). #6, dont like it. Entire load resting on the c clip. I can move the cp w my hand. Didnt have any zip ties, mine is dv valve set up. As you can tell frustrating and time consuming experience. Shipping back!
__________________
335i e92 TPC 19Ts
|
|
|
Appreciate
0
|
| 02-15-2015, 10:36 AM | #278 |
|
First Lieutenant
 89
Rep 319
Posts |
Might have been covered or in the description just cannot find it.
I don't want to upgrade my bov, can this be used with the stock one? I'm ordering JB4 soon and want to upgrade the CP so I don't have problems with the stock one blowing. |
|
Appreciate
0
|
| 02-15-2015, 07:08 PM | #279 | |
|
2126
Rep 43,349
Posts |
Quote:
|
|
|
Appreciate
0
|
| 04-22-2015, 03:57 PM | #280 |
|
Nerd
133
Rep 437
Posts |
Received my CP/Tial BOV combo a few weeks ago, along with my 7" FMIC. Ordered directly from Tiago. Prices were excellent, shipping was slightly faster than expected. FMIC was packed with spray foam very nicely. CP/BOV in a rectangular box with foam peanuts - didn't love it, but it kept everything protected so good enough.
First complaint - zero instructions were included. There wasn't even a parts list. This eventually cost me about $100, though it's only sorta VRSF's fault and mostly mine. Given that this isn't a direct bolt-in replacement, this seems like something that should be included. Second complaint - no parts list! How do I know that everything that's supposed to be in the kit was shipped to me prior to installation? In my case, it seems to have been (and maybe extra), but I wasn't able to check prior to beginning my install. I'm a shadetree mechanic - I paid to have my downpipe put in (mostly for lack of lift), but I did my own DCI and change my own coils and plugs. My mechanical experience is limited to that kind of thing and taking apart and rebuilding my CBR600F4i. I am sure that an experienced mechanic would have avoided my pitfalls. I had not planned on this installation - while doing a bit of hooning on a business trip to Houston this week, I shattered the stock CP. I thought I might be able to stick the factory pipe back on and just run a valet map, but the end of the stock plastic was cracked and missing bits, so nope. So it was a late night install and I was tired, working in an unfamiliar garage (a friend's apartment), and neither of us had ever done this before. Using the posted DYI, we managed to remove the factory bits and install the chargepipe with BOV. Here's the points I wish someone had told me ahead of time:
That last one caused me to break off both factory screws into the CP. This is partly my fault; it was dark, I didn't think to check the depth of the screw holes and I overtorqued the screw causing it to snap. However, it's partly VRSF's fault too - these are easy beginner mistakes that could have been avoided with a few pages of instructions. I'm super-happy with Tiago. I'm happy with the product. I'm pissed about the lack of instructions, because I'm going to have to take the pipe in and have the screws drilled out, the holes threaded, and then mount a new TMAP sensor. The new sensor would've been necessary anyway (the clips tore and the pins bent when the stock pipe blew), but the effort of pulling the pipe, having a down car, and the cost of having someone do that for me were wholly unnecessary, and could have been avoided with even just a single piece of paper saying "WARNING: MAKE SURE TO USE THE REPLACEMENT BOLTS FOR TMAP SENSOR". I don't blame VRSF, but I can tell you that I won't buy anything from them in the future that isn't a direct bolt-in replacement from them unless I plan to have a professional install it for me.
__________________
2009 E92 335i Sport 6AT - Finished, sold
Transport for Ireland - LEAP Pass with TFI smartapp because cars are stupid expensive in Ireland |
|
Appreciate
0
|
| 04-22-2015, 04:17 PM | #281 |
|
Major General
 
2051
Rep 8,339
Posts |
Love it.
__________________
'08 e93 AW 335i 6MT,Vargas Stg 2+ 20T clipped,VRSF catless dps & 7"FMIC,ER chargepipe&Tial, MMP inlets&outlets,Motiv Stg 2 fuel rail&dual disc clutch/fly, JB4G5,MHD w/Motiv tune,Fuel-it Stg 3 LPFP,Wavetrac LSD w/lockdown, KwV2,M3(Strut brace,frt control arms,steering wheel)AKE blk sub bush,re11 245/305,19x8.5et30&19x11et43,SmartTop,RE trans mounts,Msport rear bump & skirts,15%tint,ZSP knob,Stoptech rotors,241k miles
|
|
Appreciate
0
|
| 04-22-2015, 05:24 PM | #282 | |
|
2126
Rep 43,349
Posts |
Quote:
This is in fact a factory replacement part and we include everything needed to remove the OEM unit and replace it with ours. |
|
|
Appreciate
0
|
| 04-22-2015, 06:04 PM | #283 |
|
Private First Class
26
Rep 130
Posts |
[QUOTE=kingfork;17397144]Finished the install of this chargepipe / Tial bov combo.
Few observations... 1. I don't like that the surface of the flange that connects to the bov is coated. This surface should have been masked prior to coating. I had the same issue, I had to take a razor blade and pain stakingly remove all the thick wrinkle coating to have the BOV seat properly which was a real PIA. 2. The tapped holes for the ATS were not plugged prior to coating, the threads needed to be chased with a tap prior to installation. Same issue again, the holes were full of powder coating needing to be chased first 3. The tapped holes for the ATS are fine threaded. This is bad practice for aluminum and these holes should be tapped for coarse threaded fasteners. I agree 4. The provided fasteners for the ATS are black oxide. These fasteners should be stainless steel or at the very least zinc plated. Again, I agree 5. Kit doesn't include all necessary vacuum hose to complete the job. Mine did 6. The charge pipe omits the mounting tab. It would be nice but in the end I don't see it being crucial 7. The orientation of the bov flange is poorly placed. The bov flange encroaches on the intake inlet hose (see pics). If the flange were to be rotated a few degrees towards the fender it would completely clear the inlet hose. This was my biggest issue! The BOV placement is bad. Having read this thread and review I assumed it had been taken care of but I was wrong. It was a nightmare getting the factory air box back on while trying to wrestle the BOV out of the way. At this point there isn't much movement as it is already attached at the TB. Mine happened to have so much interference it pushed on the round intake accordion to the point it was oval in shape rather than round. Then take into account aesthetically having the BOV not sitting at the center it sits cock eyed towards the motor when there is a ton of room towards the powering steering pump resorvior. 8. The included zip-ties are white, they should be black. Personal opinion, but again I agree and switched mine out 9. The welds on the charge pipe are messy. mine were ok 10. The plastic caps, for the diverter tube connections, are cheap and the clamps that secure the caps are one size too large. Agree, hard plastic instead of rubber that would easier to remove in the future if need be and possibly crack more easily with all that heat under the hood. I had to cut down quite a bite of the excess hose clamp which looked horrible Despite the downsides that I listed the assembly does function and is an okay value. I think you get what you pay for. Agreed I most likely will upgrade to a unit that is of higher quality. Same here as I originally was waiting for the CP-E to be available and the reason I went with VRSF which was modeled after theirs. Mine was never a choice of money as I place quality, design over price. I don't like the ER design or others that are similar that has that abrupt/hard "step" from going 2.5 to 3". I'm sure that's all in my head as I'm sure it's not a major performance issue/difference but rather again an esthetic issue on my part. I had been waiting for CP-E to have another run and they are making one without the Meth bung but kept stringing me along so not being able to wait any longer and wanting to take advantage of my pro tuning and higher boost I pulled the trigger on the CP and the 7" FMIC. As soon as CP-E (local to me)makes my CP without the meth bung and their badge I'll be swapping out both as I prefer things to match when they can and performance isn't affected Last edited by Holshot; 04-22-2015 at 06:09 PM.. |
|
Appreciate
0
|
| 04-22-2015, 06:10 PM | #284 |
|
2126
Rep 43,349
Posts |
The next batch of CP's will have the wrinkle black fixed on all the mating surfaces. That was an oversight when switching finishes although we've pressure tested a few units and have never had any leaks due to the finish. The BOV location isn't ideal for the OEM intake but most of our customers are utilizing a less restirctive aftermarket intake.
|
|
Appreciate
1
|
| 04-22-2015, 10:11 PM | #285 |
|
Private
 32
Rep 64
Posts |
I purchased my vrsf cp tial bov combo and it is perfect for me. Make sure when installing you do get the cp fully seated on throttle body or it will be a bit sloppy. I did not have powder in my holes like others have stated, my welds looked great. I did however have to really stretch the coupler from cp to IC pipe, but Tiago gladly sent me a longer hose that completely fixed the problem FREE OF CHARGE...instead of putting it on me to buy a new coupler, he provided me with one that arrived in 2 days. Did I need a longer one to drive my car? No, but I was experiencing a boost leak because the coupler originally provided pulled on the ic pipe and the newer longer coupler resolved the issue. A+ to Tiago...excellent shipping, quality, and customer service. After all, this is just a pipe, it holds boost, praise Tiago for not robbing you for just a dang pipe...I will continue to go to VRSF for the rest of my mods, he's a great guy to deal with.
|
|
Appreciate
0
|
| 08-02-2015, 02:50 PM | #286 |
|
Private First Class
11
Rep 114
Posts |
Wondering if you guys can help with the MAP install as it appears that I'm having the same issue with the threading/screws. I'm struggling to get these screws to go in easily and I don't want to strip the holes. Any recommendations?
Also, just want to make sure of this but are the two small screws with washers in the DV caps packaging used for the MAP install? |
|
Appreciate
0
|
 |
| Bookmarks |
|
|


