

|
|
 |
 |
 |

|
 |
BMW Garage | BMW Meets | Register | Today's Posts | Search |
 |

|
BMW 3-Series (E90 E92) Forum
>
Building the E92 328csl
|
 |
| 08-30-2020, 12:39 PM | #353 |
|
Colonel
 3791
Rep 2,738
Posts |
I got the control arm aero covers on. This was a very easy job took about an hour. Cut the posts down so they are out of the way and drill holes in them for zip ties...
 Then align them to the control arm where you like and sick a sharpie up inside each post to mark the holes on the control arm. Drill 4 holes in each control arm... 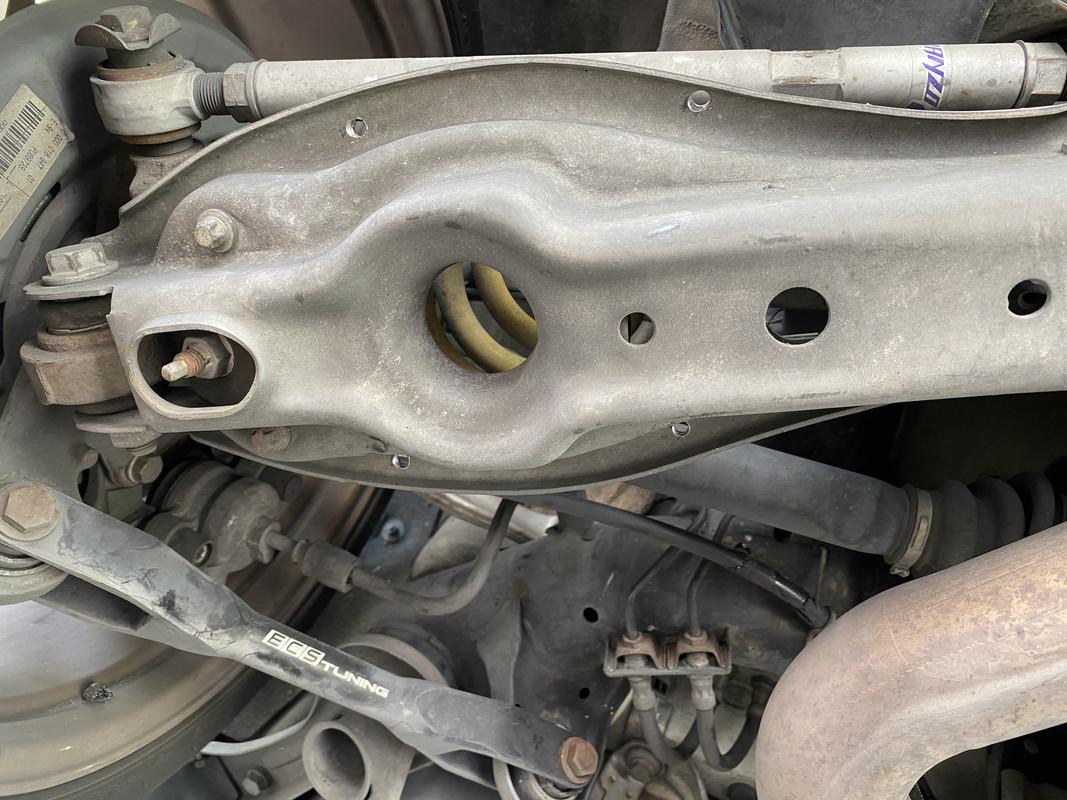 Put a zip tie in each hole and then install to the control arm...  Tighten them all carefully and evenly so the cover doesn’t shift and it’s good to go!     They look like they were made for this chassis. Once the posts are trimmed the fitment is very good. Not sure they add much but it’s a process of small subtle changes over time maybe amount to something larger that’s meaningful. Either way it was only $20 and an hour of time tinkering so not a big cost here. Next up I’m making a plate out of 0.1” thick aluminum to cover this big void around my muffler... 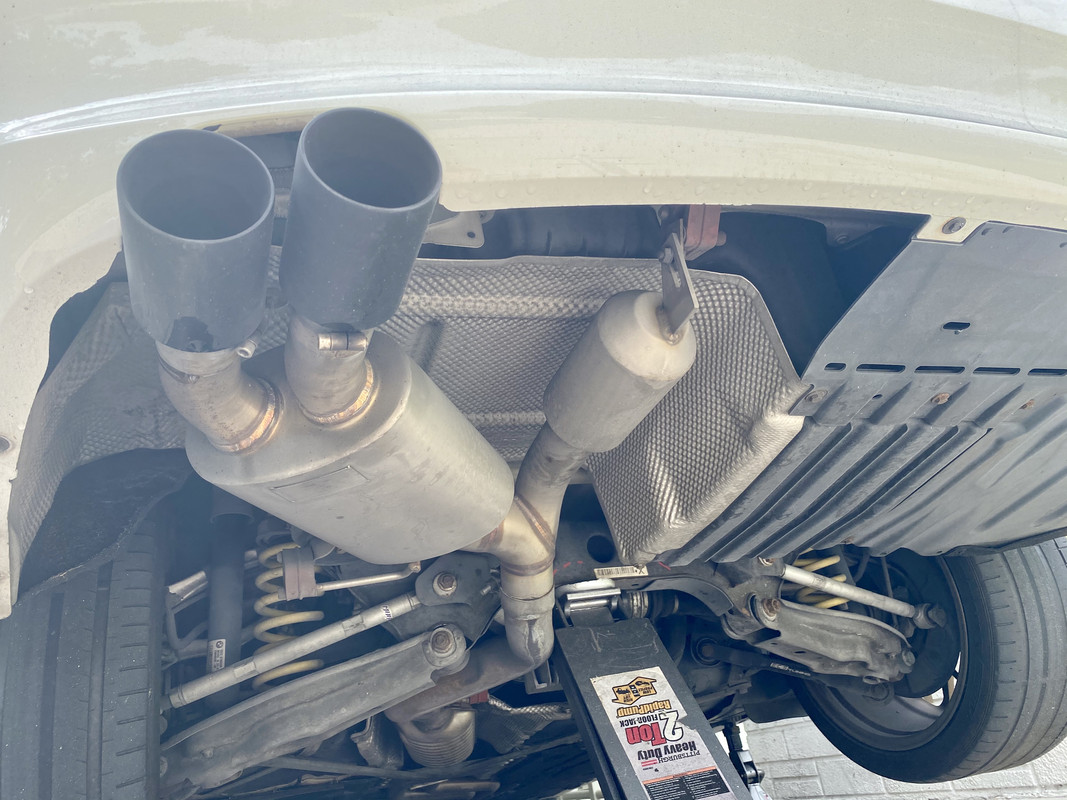
__________________
Last edited by Biginboca; 08-30-2020 at 12:47 PM.. |
|
Appreciate
4
|
| 08-30-2020, 02:24 PM | #354 |
|
Colonel
 3791
Rep 2,738
Posts |
So calling it a day. Here’s a few more pics from my aero tinkering today. This is how the control arm covers look at ride height. Forgive the less than ideal lighting...
 And I finished making a template for the cover to go around the muffler area. This is pretty much done I tweaked it a bit more after this pic but I am now ready to start cutting aluminum next week... 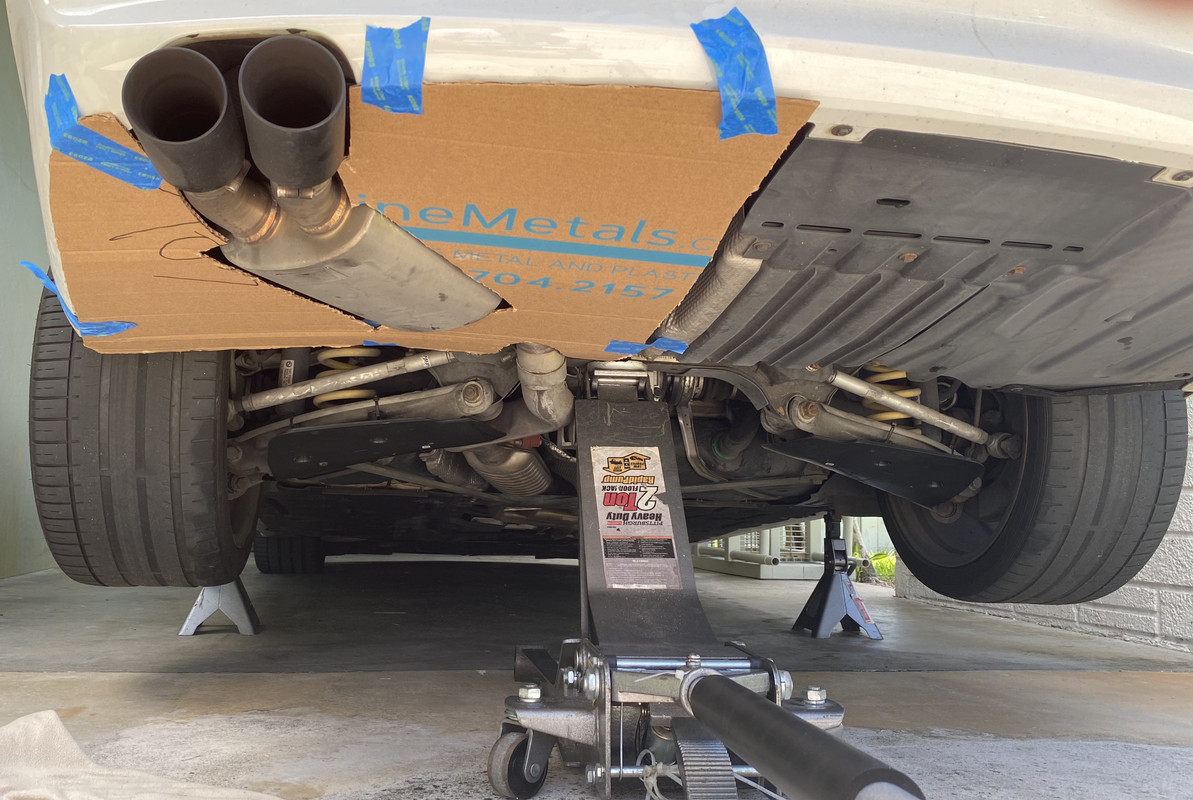
__________________
|
|
Appreciate
3
|
| 08-31-2020, 03:55 PM | #355 | |
|
Major
 779
Rep 1,434
Posts
Drives: 335is
Join Date: Apr 2017
Location: MI
|
Quote:
__________________
2011 335is DCT BQ Tuning / BMS CAI / VRSF kittyless DP's / Synapse BOV and charge pipe / 7" VRSF Race FMIC / Walbro 535 and 450 on BMP4 / E90 tune / Diff Brace / PR Coils / Relocation Inlets / DAW Stage3+ Turbos / MMP port injection / xHP Stage 3 / FPR and -6 fuel lines
|
|
|
Appreciate
1
Biginboca3790.50 |
| 08-31-2020, 04:06 PM | #356 | |
|
Colonel
 3791
Rep 2,738
Posts |
Quote:
Have you don’t any other aero mods to the undercarriage?
__________________
|
|
|
Appreciate
0
|
| 09-01-2020, 08:26 AM | #357 | |
|
Major
 779
Rep 1,434
Posts
Drives: 335is
Join Date: Apr 2017
Location: MI
|
Quote:
Most of the underside is covered anyway. I am interested in the muffler area that you are covering too. Rear defuses can be more harmful if not done correctly but I think as long as you are stopping the parachute situation it should help.
__________________
2011 335is DCT BQ Tuning / BMS CAI / VRSF kittyless DP's / Synapse BOV and charge pipe / 7" VRSF Race FMIC / Walbro 535 and 450 on BMP4 / E90 tune / Diff Brace / PR Coils / Relocation Inlets / DAW Stage3+ Turbos / MMP port injection / xHP Stage 3 / FPR and -6 fuel lines
|
|
|
Appreciate
0
|
| 09-01-2020, 01:14 PM | #358 | |
|
Colonel
 3791
Rep 2,738
Posts |
Quote:

__________________
|
|
|
Appreciate
0
|
| 09-01-2020, 03:57 PM | #359 |
|
Private First Class
 31
Rep 143
Posts |
Quote:
|
|
Appreciate
0
|
| 09-01-2020, 05:32 PM | #360 | |
|
Colonel
 3791
Rep 2,738
Posts |
Quote:
https://www.ebay.com/itm/RECARO-POLE...-/223753879523
__________________
|
|
|
Appreciate
1
tlow982312.50 |
| 09-01-2020, 06:07 PM | #362 |
|
Colonel
 3791
Rep 2,738
Posts |
I get asked that a lot lol.
About 2 years ago I purchased all brushed aluminum trim off this forum and when I unpacked it to install I decided I liked my trim and want to keep that part of the car original.
__________________
|
|
Appreciate
0
|
| 09-01-2020, 08:08 PM | #363 | |
|
Private First Class
 119
Rep 134
Posts |
Quote:
I'm keeping my dark walnut burl trim for sure, but I do like the OEM silver trim a lot too. If I had a red interior I'd have to have the silver trim. |
|
|
Appreciate
1
Biginboca3790.50 |
| 09-05-2020, 01:33 AM | #364 | |
|
Private First Class
 31
Rep 143
Posts |
Quote:
|
|
|
Appreciate
0
|
| 09-05-2020, 10:30 AM | #365 | |
|
Colonel
 3791
Rep 2,738
Posts |
Quote:
Order 1 of Part# R-9280 wide mount and 1 of Part# R-9281 standard mount. Use One of the wide mounts on the side of the seat facing the trans tunnel and one of the standard mounts on the side facing the door. This will pretty much perfectly center the seats in line with the steering wheel and oem location. If you have power seats (power sliders) you can use that functionality still with the BK mounts and they provide instructions for wiring and brackets for mounting a switch along with their brackets. Recaro doesn’t supply mounting bolts unless you buy their brackets. If you want to use the same set up I used do yourself a favor and order this off amazon: MINHER M8-1.25 x 20mm Socket Head Cap Screws Metric, Allen Socket Drive, 12.9 Grade Alloy Steel, Black Oxide Finish, Machine Thread, 15 PCS https://www.amazon.com/dp/B088LPWB6D..._Cz6uFbWHSJK2Q Also grab some washers to go under the bolt heads. It amazes me that Recaro won’t include 4 bolts with a $1200 seat lol The reason I wanted to reuse the factory sliders with the BK brackets is the oem sliders offer the longest travel and most adjustments, plus they are known for not becoming loose (developing play) over time. Reusing the oem slider I was able to keep back seat functionality for my kids where the aftermarket sliders (or fixed brackets) you will entirely lose back seat access in a coupe. This may not be a consideration for you. With the set up I have the lowest mounting height I can achieve puts the seats about 1.5” lower than the lowest I was able to adjust my oem manual sport seats to. So if you want to go super low and sit on the floor then this might not work for you. I was able to code out the airbag lights using Bimmergeeks Pro Tool. The coding for my car was go through these menus: Safety > MRS-Airbag > Coding > Standard Then Deactivate these items: Seat Mat Sensor (OC3_1) Driver Seat Position Sensor (SPSF_1_CD) Left Side Airbag (SIDEBAG_LINKS_1) Passenger Seat Position Sensor (SPSBF_1) Right Side Airbag (SIDEBAG_REICHTS_1) And lastly I had to deactivate both left and right side active head restraints in the same menu section. (I didn’t record the coding for that part.)
__________________
Last edited by Biginboca; 09-05-2020 at 10:55 AM.. |
|
| 09-05-2020, 11:10 AM | #366 |
|
Colonel
 3791
Rep 2,738
Posts |
Here’s a few pictures of the install it’s just 4 bolts holding the oem seats in.
 As you can see there is 1 wiring harness under the seat that you disconnect by pulling the black retainer clip on the side of it towards the center of the car. A flat head will pry it open easily I have circled it in red in this pic (showing a test fit of the BK Brackets and OEM Sliders. You must bolt the seats to the brackets before installing everything into the car obviously.) 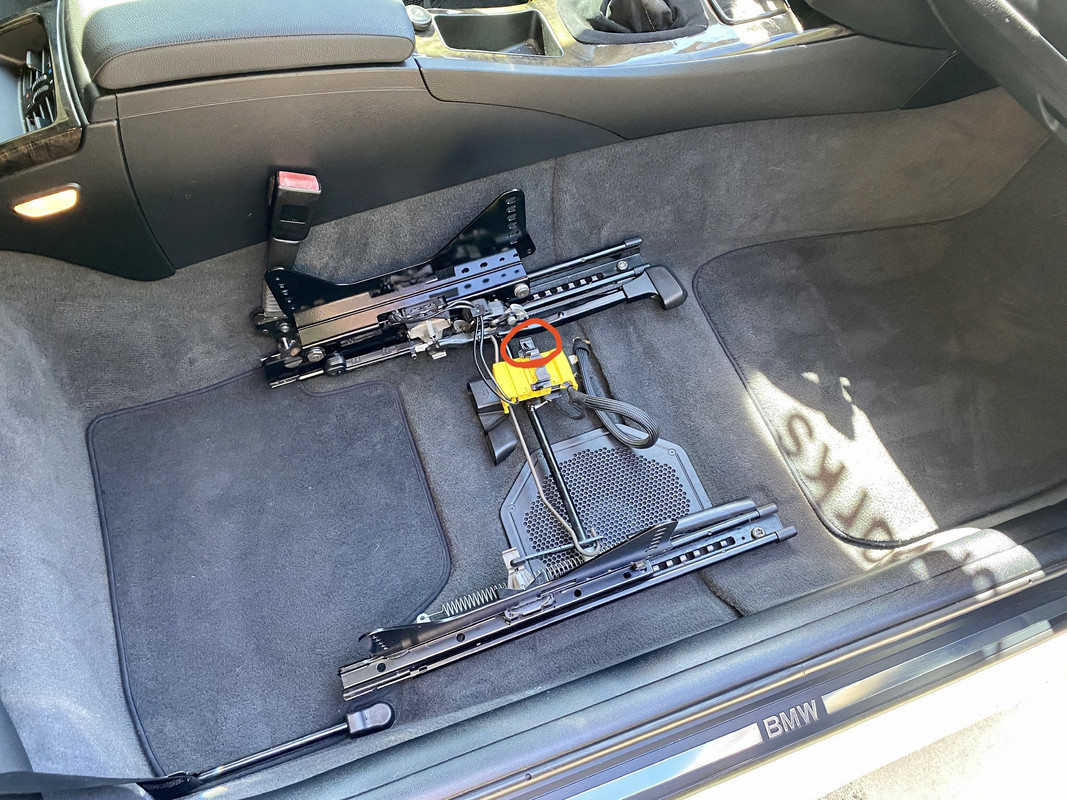 The part of that yellow plug that stays attached to the seat you took out actually contains like 3 or 4 separate plugs inside it. You have to disassemble it and take just the seat belt sensor plug out and then reassemble it on the new seat with just that single seat belt plug that you will still use. Then it can be installed back into the car. This shows it under new driver seat:  And here’s a few more pics to show how the new seats are sitting in the car:    There weren’t really any hurdles to the install. It took me a few days behind the wheel and 3 times total mounting the seats to get them exactly how I wanted for angle and height, but since it’s just 4 bolts and a wiring harness it’s not a huge pita to get them in and out of the car. If you want to see a pic of anything in detail or have questions I’m happy to help.
__________________
Last edited by Biginboca; 09-05-2020 at 11:21 AM.. |
|
Appreciate
0
|
| 09-07-2020, 07:42 PM | #368 |
|
Colonel
 3791
Rep 2,738
Posts |
I started working on the aluminum panel for covering the rear bumper area today. A 36Ē square sheet of 0.063Ē thick aluminum is $50 on amazon. I priced a piece of carbon fiber the same size from 3 vendors and it was $300. So Iím using aluminum lol
 It probably weighs about 3lbs after cutting/sizing it. I feel like itís worth adding a little weight to cover this huge cavity.  I got the panel cut and fitted today, but need to order some more and longer screws before I can mount it. I was able to test fit though... 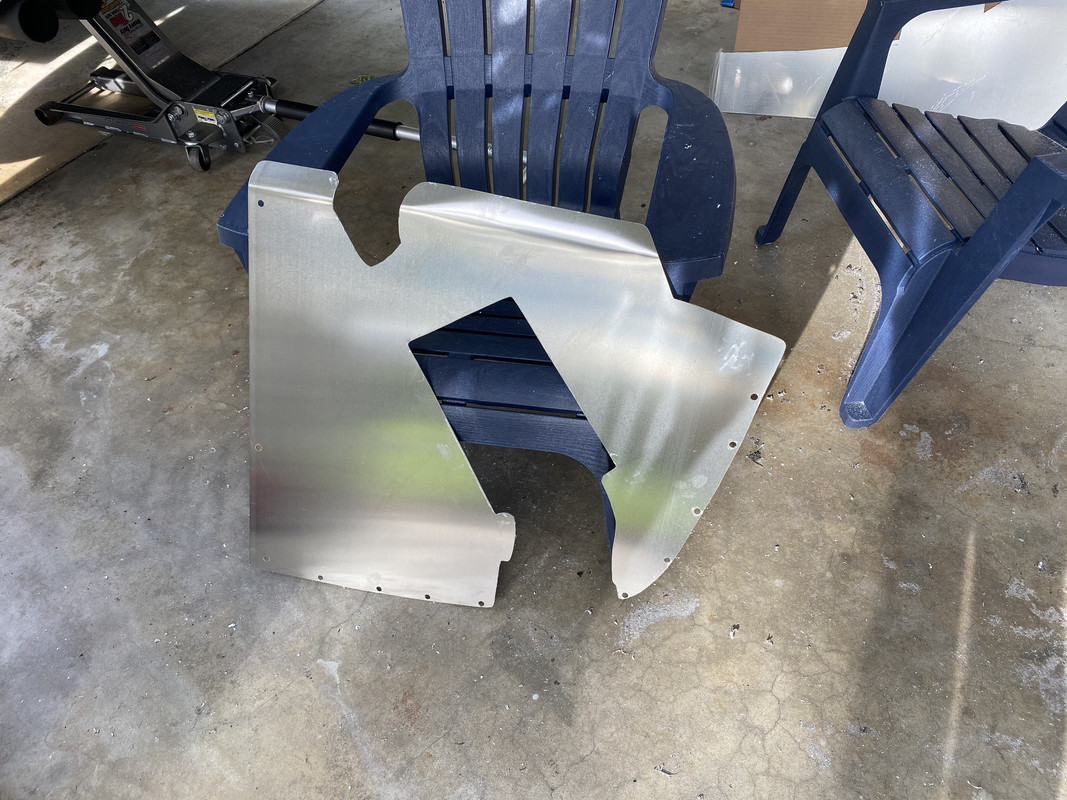   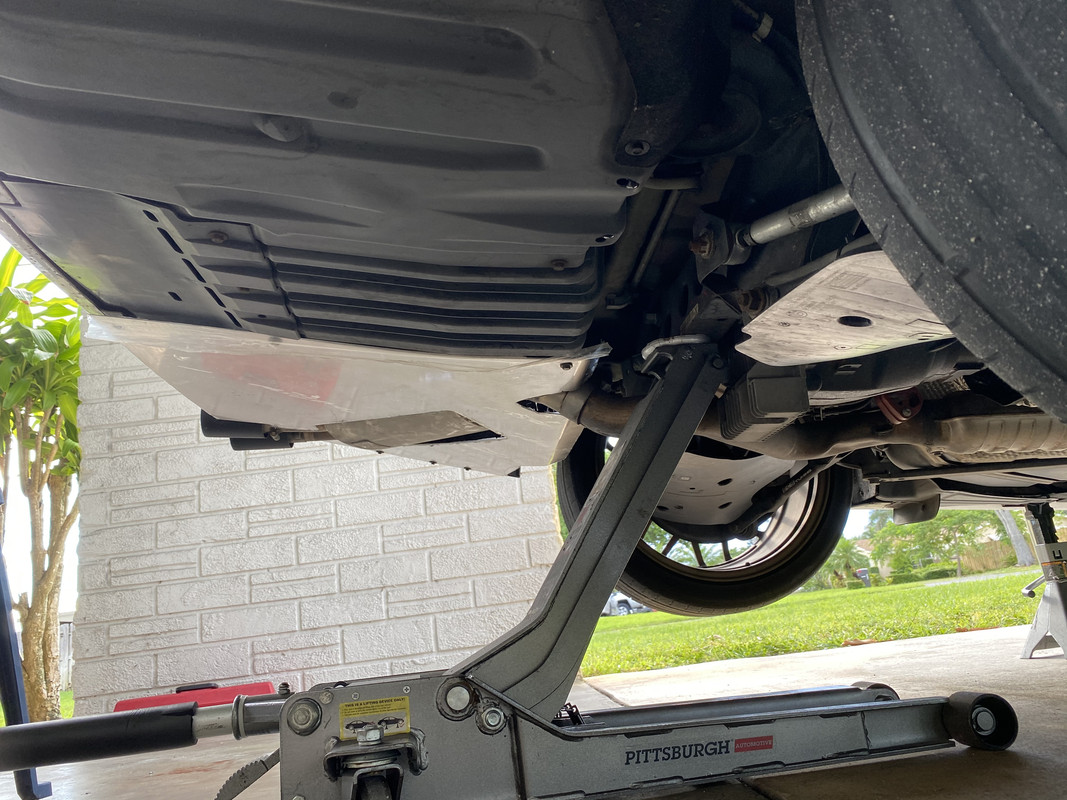 
__________________
|
|
Appreciate
2
E92William2022.50 lab_rat396.50 |
| 09-08-2020, 04:32 AM | #371 |
|
Colonel
 3791
Rep 2,738
Posts |
Not just rears lol. New tires coming tomorrow!
__________________
|
|
Appreciate
0
|
| 09-08-2020, 05:29 AM | #372 |
|
Major
 779
Rep 1,434
Posts
Drives: 335is
Join Date: Apr 2017
Location: MI
|
What did you use to make the bends in the Aluminum?
__________________
2011 335is DCT BQ Tuning / BMS CAI / VRSF kittyless DP's / Synapse BOV and charge pipe / 7" VRSF Race FMIC / Walbro 535 and 450 on BMP4 / E90 tune / Diff Brace / PR Coils / Relocation Inlets / DAW Stage3+ Turbos / MMP port injection / xHP Stage 3 / FPR and -6 fuel lines
|
|
Appreciate
0
|
| 09-08-2020, 06:51 AM | #373 |
|
Colonel
 3791
Rep 2,738
Posts |
__________________
|
|
Appreciate
4
|
| 09-08-2020, 08:05 AM | #374 |
|
Major
 779
Rep 1,434
Posts
Drives: 335is
Join Date: Apr 2017
Location: MI
|
 This is awesome sauce.
__________________
2011 335is DCT BQ Tuning / BMS CAI / VRSF kittyless DP's / Synapse BOV and charge pipe / 7" VRSF Race FMIC / Walbro 535 and 450 on BMP4 / E90 tune / Diff Brace / PR Coils / Relocation Inlets / DAW Stage3+ Turbos / MMP port injection / xHP Stage 3 / FPR and -6 fuel lines
|
|
Appreciate
1
Biginboca3790.50 |
 |
| Bookmarks |
|
|