

|
|
|
|
 |
|
 |
BMW Garage | BMW Meets | Register | Today's Posts | Search |
 |

|
BMW 3-Series (E90 E92) Forum
>
Before & After on black paint
|
 |
| 05-16-2013, 09:03 PM | #23 | |
|
Lieutenant
 31
Rep 547
Posts |
Quote:
 a bit more...... a bit more...... Another member from the geek on this forum.  I seriously recommend having your paint measure prior to wet-sanding. You don't want to jeopardize your protection anymore than you have to. There are paint gauges (not as accurate as the Defelsko) that you can get for around $200-$300. OEM paint is thin. 150 microns is about the average and a dollar bill is about 110 microns. Your paint (including CC) is just a little thicker than a dollar bill. I am trying out the CarPro Hydr02 Touchless sealant. It has been 2 weeks and I will see how it does on the wheels this Saturday. Now... Back to your regularly scheduled program. 
__________________
What is absolute control???? Having the means and the abilities to exercise it at will but....chooses not to.
|
|
|
Appreciate
0
|
| 05-16-2013, 09:11 PM | #24 | |
|
Lieutenant Colonel
 
98
Rep 1,509
Posts |
Quote:
__________________
2009 E90 328i Monaco Blue
premium/idrive/convience/logic-7/cold weather/ xenons/ saddle brown interior  |
|
|
Appreciate
0
|
| 05-16-2013, 10:17 PM | #25 |
|
Captain

41
Rep 627
Posts |
That's some nice work there.
I'm also a rookie and wouldn't mind some advice. Last week I used Menz SIP with a LC orange flat pad and did the majority of the big panels. I don't have enough room to polish in my garage. What I did was pulled part of my car in and worked at it section by section. It was supposed to be a two day process but couldn't finish it off on Sunday. I have some time tomorrow so should I just wash the car tomorrow and continue with the polishing? I don't need to clay again do I? |
|
Appreciate
0
|
| 05-16-2013, 11:01 PM | #26 | |
|
Lieutenant Colonel
98
Rep 1,509
Posts |
Quote:
__________________
2009 E90 328i Monaco Blue
premium/idrive/convience/logic-7/cold weather/ xenons/ saddle brown interior |
|
|
Appreciate
0
|
| 05-17-2013, 12:40 AM | #27 |
|
Private First Class
 16
Rep 175
Posts |
if youre going to drive it you should have waxed the panels that you finished so theres protection on them, but just be gentle. washes arent intended to get everything off, just light dirt. you do not need to clay again
|
|
Appreciate
0
|
| 05-22-2013, 03:26 AM | #28 |
|
Second Lieutenant
21
Rep 268
Posts |
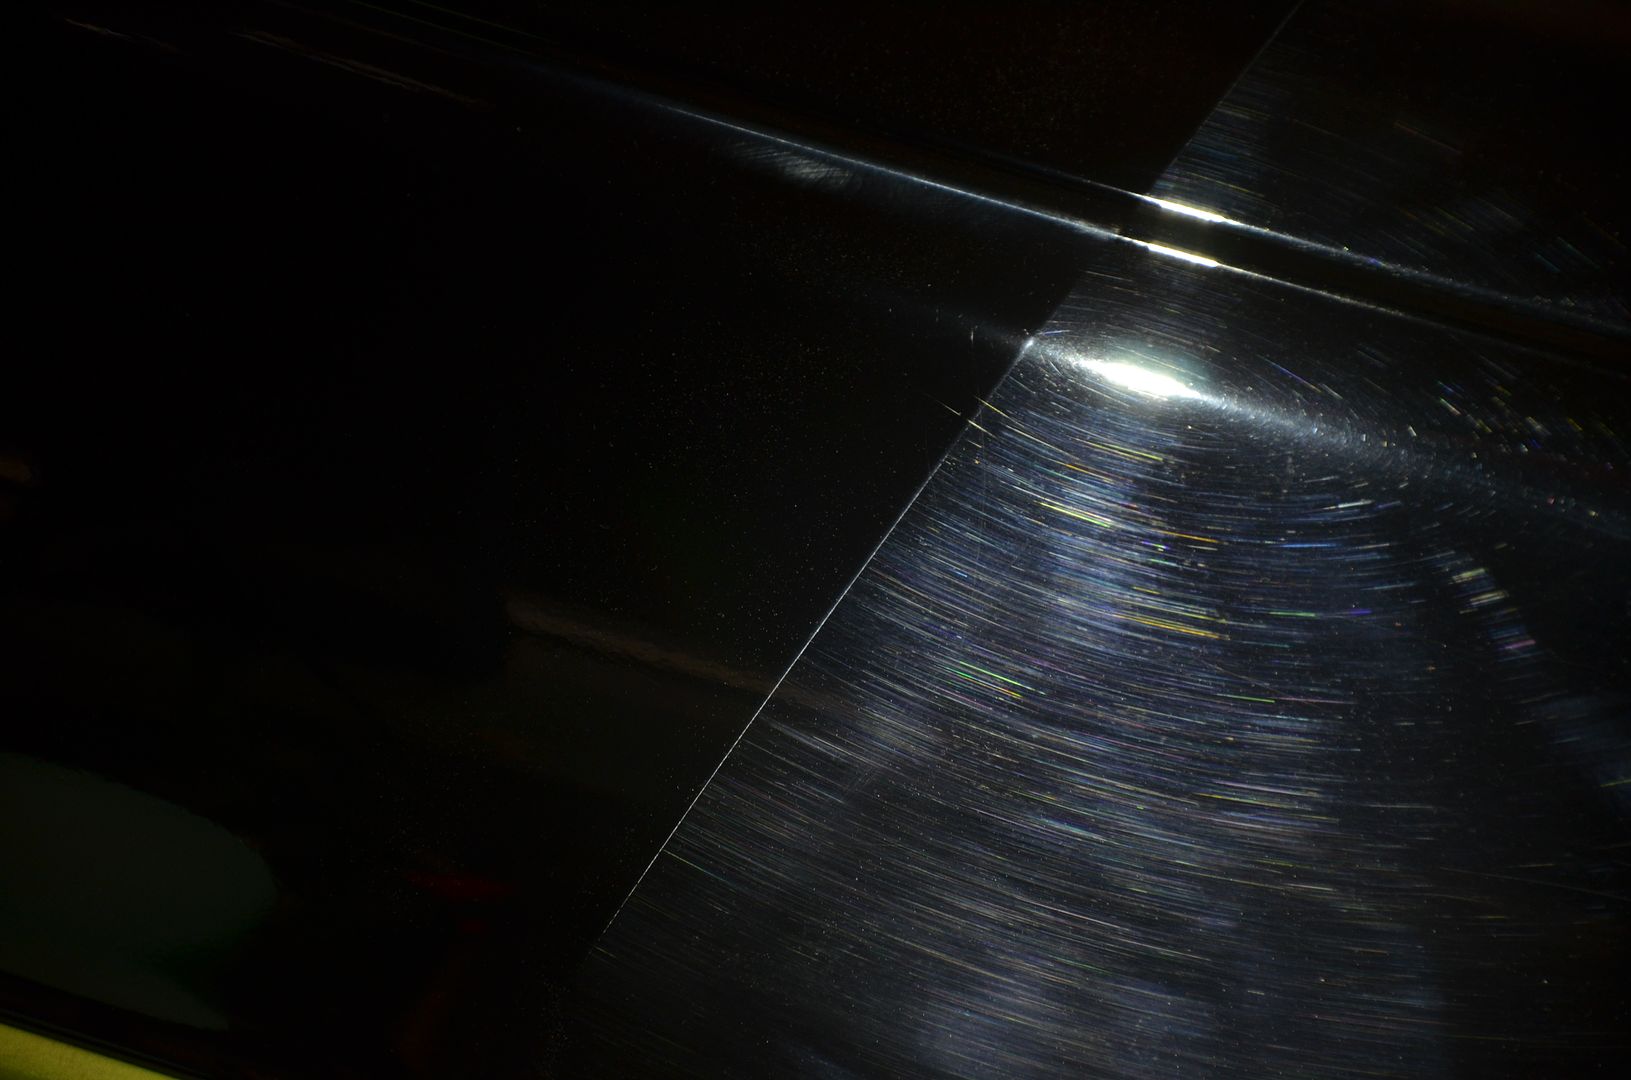
So here are the pictures you've all been dying for lol
This hood is from a 98? Mercedes Benz. The clearcoat seemed VERY hard. Pic 1: wet sanded with 1500 grit Pic 2: wet sanded with 2000 grit Pic 3: meg105 with makita and 7" wool pad. i must have done 8 passes or more. it was my first time picking up a rotary so i wasn't sure how much pressure should be applied. please chime in pic 4: the "scratch lines" i was talking about. you can't see it unless you are up close or if you shine a spot light on it. the camera simply wont pick up what can only bee seen in person. its not even noticeable with the fluorescent tubes, but to my eyes it is not even close to perfect at all So.. do i need to sand it down with 3000 or more grit to avoid these scratches? is there technique with the rotary that i am missing? i tried using it with hardly any pressure, and worked up to pressing down on it like i would on my pc. i tried it on 1200 rpm all the way up to 2000 rpm lol. and dont bash me cuz remember! this is what i went to get a junkyard hood for! to figure out my limits Any advice or suggestions is greatly appreciated guys! |
|
Appreciate
0
|
| 05-22-2013, 05:23 AM | #29 |
|
New Member
0
Rep 21
Posts |
I saw this on my 320d M Activity when it was a year old. BMW knew of the problem and said that it required new door handles with a slimmer layer of paint on the internecine terms of the 4 cylinder versions, if it has the automatic Start/end feature which stops the engine in traffic when simple is selected and the clutch is published then it will be a 2007 - 2010 model.
__________________
Last edited by abrahambeckers; 05-28-2013 at 03:42 AM.. |
|
Appreciate
0
|
| 05-22-2013, 12:00 PM | #30 | |
|
Lieutenant
31
Rep 547
Posts |
Quote:
IMO... this is the future. I think we will have sanding discs within the next 10 years that could finish down like a traditional polish/foam pad. I know you are trying to learn but I would strongly recommend you get yourself a paint gauge. This will help you to understand how much paint you are taking off with this process so that you could better plan your future project.
__________________
What is absolute control???? Having the means and the abilities to exercise it at will but....chooses not to.
|
|
|
Appreciate
0
|
| 05-22-2013, 02:54 PM | #31 |
|
Second Lieutenant
21
Rep 268
Posts |
a paint guage is definitely on my list to buy.. only thing is.. do i shell out $500 for a good one? or can i get away with one on ebay for $120?
about using a 3000 grit foam disc, i tried using one on a side skirt i picked up from the junk yard.. yielded the same results.. maybe 4000 or 5000 grit? but i see people doing it with 3000 grit and getting mirror like results. |
|
Appreciate
0
|
| 05-22-2013, 03:00 PM | #32 | |
|
Second Lieutenant
21
Rep 268
Posts |
Quote:
|
|
|
Appreciate
0
|
| 05-22-2013, 06:06 PM | #34 |
|
Second Lieutenant
21
Rep 268
Posts |
i only have 1000, 1500 and 2000 grit sand paper at the moment lol. so i made do with what i had. i just ordered some 2500 and 3000 grit. what grit should i start with and work up to assuming it is brand new paint?
|
|
Appreciate
0
|
| 05-22-2013, 06:47 PM | #36 | |
|
Banned
89
Rep 2,854
Posts |
Quote:
oem paint is going to be the thinnest if you want to fool around with this stuff, do it to a respray where the clear will (generally) be much thicker. edit: if you can't 100% remove sanding scratches even after 3000 grit, you're likely dragging contaminants around or you haven't sanded well enough with the previous grit. are you using soapy water to wet sand? it helps release buildup from the sandpaper also, are you using a foam block to sand? if you're using just your hand on flat surfaces, you're definitely going to get RDS |
|
|
Appreciate
0
|
| 05-22-2013, 07:32 PM | #37 | |
|
Lieutenant
31
Rep 547
Posts |
Quote:
Regarding wet sanding...... In the perfect world, you want to finish up with the highest grit medium available. Unfortunately, we don't live in a perfect world. Guess work and experimentation will be involve and this is where experience comes in. There really isn't a simple formula like you do A and B to get result C. There are way too many variables. I generally use the Griot Garage 3" DA to spot sand. 3M Trizact foam sanding discs on the DA has been working for me. I am not in the body shop environment and I generally avoid OEM orange peel correction so I seldom would use sandpaper under 2000 grit.
__________________
What is absolute control???? Having the means and the abilities to exercise it at will but....chooses not to.
|
|
|
Appreciate
0
|
| 05-22-2013, 08:08 PM | #38 | |
|
Second Lieutenant
21
Rep 268
Posts |
Quote:
 |
|
|
Appreciate
0
|
| 05-23-2013, 10:28 PM | #40 |
|
BimmerPost Supporting Vendor
2489
Rep 7,050
Posts  |
 e39 m5 - jet black - Menzerna FG400 with a Rupes BigFoot LHR21ES followed by Sonax Nano Polish with a Rupes BigFoot LHR15ES |
|
Appreciate
0
|
| 05-26-2013, 05:23 PM | #43 |
|
Brotographer
95
Rep 1,742
Posts |
Wangsta -
Not to circlejerk here, but I do want to congratulate you on going on out a limb and trying to learn this by yourself--and in the right way as well! So much kudos for not practicing on your car, and instead getting a hood from a yard. Kudos for having the balls for trial and error. Definitely giving me an interest in learning how to really detail--beyond the simple "Mothers California" Wash/clay/3-stage wax process I do now. |
|
Appreciate
0
|
| 05-27-2013, 01:50 AM | #44 | |
|
Second Lieutenant
21
Rep 268
Posts |
Quote:
Check out the pics! |
|
|
Appreciate
0
|
 |
| Bookmarks |
|
|


