
|
|
 |
 |
 |
|
 |
BMW Garage | BMW Meets | Register | Today's Posts | Search |
 |

|
BMW 3-Series (E90 E92) Forum
>
[Toe Arm Install] Bolt stripped
|
 |
| 09-23-2015, 03:01 AM | #1 |
|
Lieutenant
   
261
Rep 530
Posts |
[Toe Arm Install] Bolt stripped
Hi fellas,
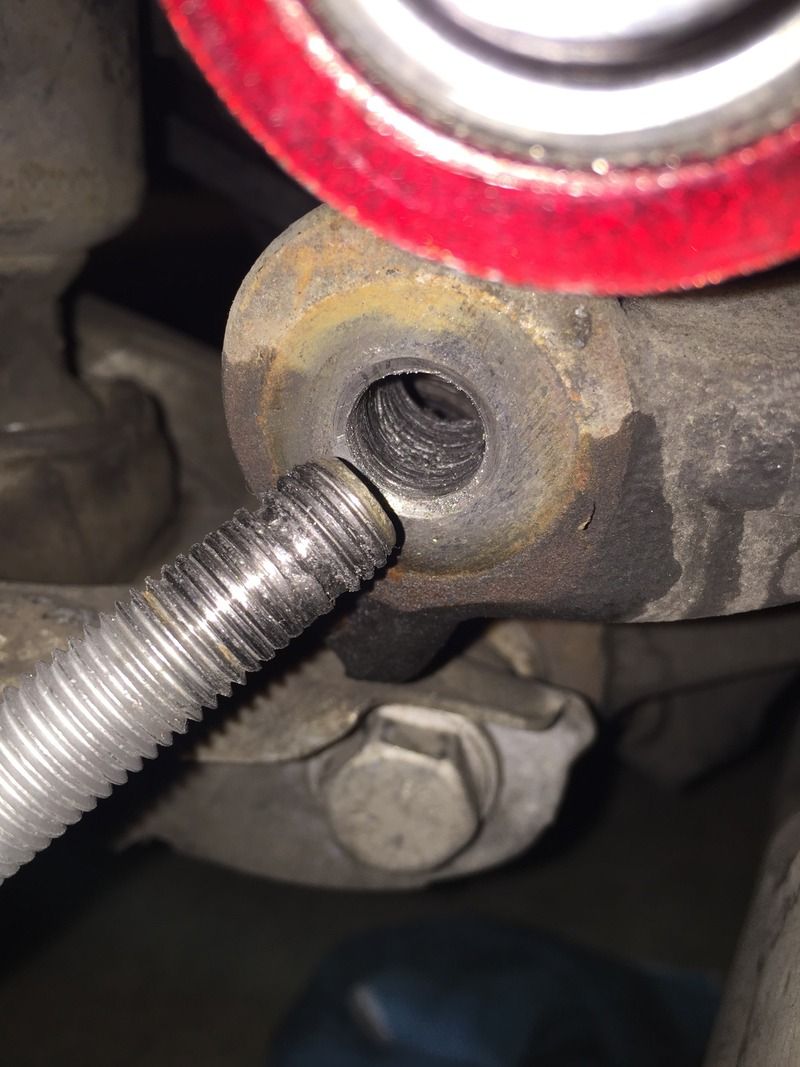
Recently, I lowered my E92 on H&R Sports on Sport Shocks. Install went fine and went to get an alignment done. All was well except the driver rear, the toe was out one degree. The shop advised to install some adjustable toe arms to correct the issue. When removing the passenger rear toe arm, it was a little tough to remove. I thought this was normal since this car has seen snow/ice until it moved to California. When I removed the bolt, the threads on the bolt are obviously crossed. The threads on the knuckle (?) also seem to be a bit mangled. The bolt drives in fine, but constantly spins and never tightens because of the cross threading on the bolt. The inner threads don't look horrible and are still visible and not smoothed out. My questions, would it be appropriate to retap the thread in the knuckle that connects to the toe arm? I know I'm going to need a new bolt (lol), but I'm curious what can be done to help straighten the threads in the knuckle or whatever he bolt goes through. Also, does anyone know the size and pitch of the bolt? Going to see if I'm able to find a tap to straighten the threads out. Picture attached for reference. Thanks all.   Last edited by puppydax; 09-23-2015 at 03:20 AM.. |
| 09-23-2015, 08:13 AM | #2 |
|
Mad Linux Guru On The Loose
1181
Rep 5,455
Posts
Drives: 2008 335i Sedan, 2023 M3
Join Date: Aug 2009
Location: Chicago, IL
|
Similar thing happened to me.
Rethread the toe arm, put new longer bolt with a nut at the end. Problem solved.
__________________
|
|
Appreciate
1
|
| 09-23-2015, 09:30 AM | #3 |
|
Major General
  
4289
Rep 9,224
Posts |
happens on pretty much all e9x. First get new bolt and drive it from the opposite side to clean the treads on the mounting tab. Use lubricant, oil or grease. If that works mount as you normally would. If doesn't go with above advise from vasillalov
|
|
Appreciate
1
|
| 09-23-2015, 10:36 AM | #5 |
|
Lieutenant
   
261
Rep 530
Posts |
Thank you guys so much, especially feuer. Read your post about folks posting stuff that commonly happens, but I saw majority of it happening to camber bolts. Going to give BMW a call and will try that. Will report back on both threads now lol.
|
|
Appreciate
0
|
| 09-23-2015, 12:16 PM | #6 |
|
Lieutenant
   
261
Rep 530
Posts |
Alright, so cleaning the threads and re-threading was a no go. The bolts screws in, but when it's time to tighten the bolt, it just spins and spins. I'll have to shoot for a slightly longer bolt and nut.
Any suggestion on how many threads? There is limited space from the sway bar end link and the bolt/nut. Would have to be a precise size. |
|
Appreciate
0
|
| 09-23-2015, 12:24 PM | #7 | |
|
Major General
  
4289
Rep 9,224
Posts |
Quote:
> did you try to drive it in from the opposite side? (from the side of the sway bar link) , that has worked for me few times > did you try to do this with the same old damaged bolt? that wasn't going to happen even if the tread on the mounting tab is OK as the bolt is severely damaged |
|
|
Appreciate
0
|
| 09-23-2015, 12:32 PM | #8 |
|
Lieutenant
   
261
Rep 530
Posts |
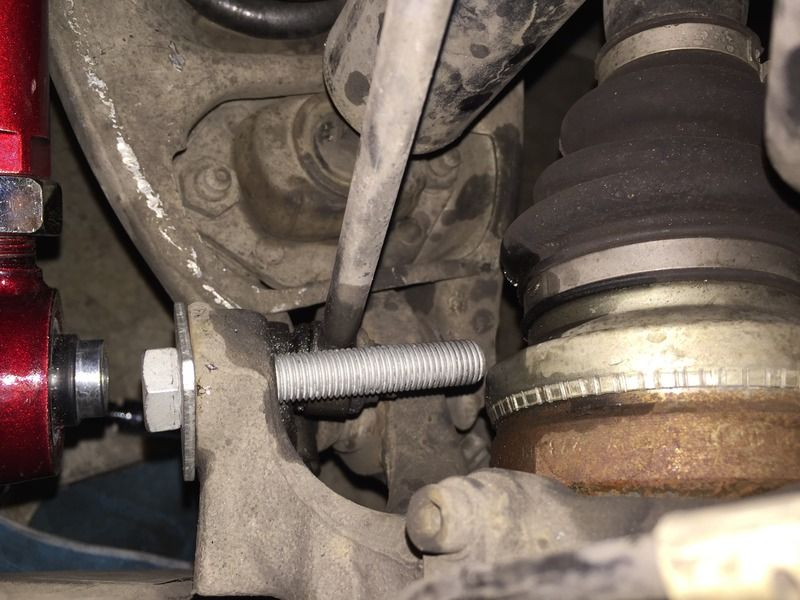
The problem is, I don't think there is enough room to insert the bolt from behind (near the sway bar link) because the axle is in the way. If it weren't there, there would be plenty of room. I used an m12x1.5 tap to smooth the threads out.
Here is a photo of the factory bolt fully inserted. Not sure how I'd get around that.  Last edited by puppydax; 09-23-2015 at 12:54 PM.. |
|
Appreciate
0
|
| 09-23-2015, 01:06 PM | #9 |
|
Major General
  
4289
Rep 9,224
Posts |
You should be OK with the standard length, installed like in the photo you have. just use self-locking nut. When I did this I had everything gutted out from the up-right. Sorry, I did think of the half shaft being on the way.
|
|
Appreciate
0
|
| 09-23-2015, 01:12 PM | #10 |
|
Lieutenant
   
261
Rep 530
Posts |
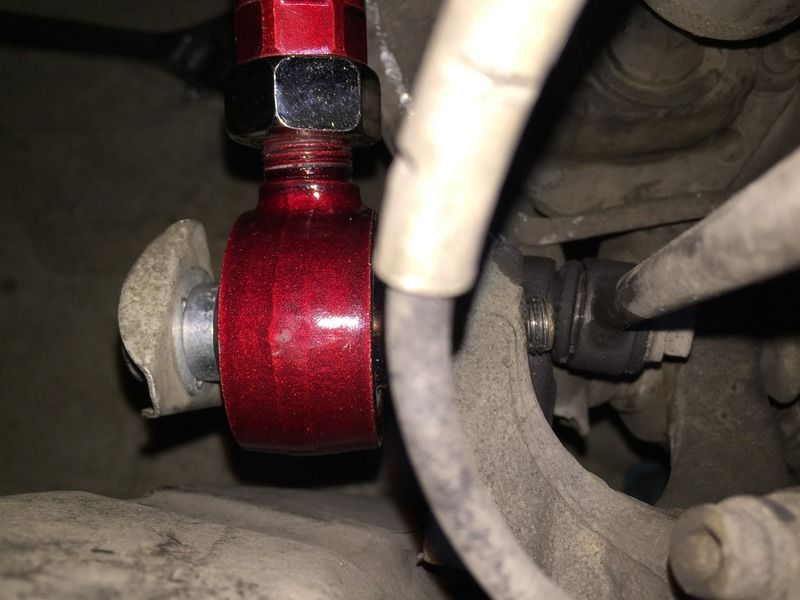
I'll look into that. The only problem is if I stay with the factory length, the nut would not be threaded fully over bolt. In the second picture of my first post, that's the correct length left from threading through the arm and knuckle. Not sure if that's enough threading for a nut.
|
|
Appreciate
0
|
| 09-23-2015, 01:16 PM | #11 | |
|
Major General
  
4289
Rep 9,224
Posts |
Quote:
|
|
|
Appreciate
0
|
| 09-23-2015, 01:52 PM | #12 |
|
Lieutenant
   
261
Rep 530
Posts |
Shoot, wanted to avoid having to do any of that. I might just try to find a slightly longer bolt with self locking nut just enough to clear the end link. This is stressful lol. Luckily I don't live far from work and can Uber here lol.
|
|
Appreciate
0
|
| 09-23-2015, 02:06 PM | #14 |
|
Lieutenant
   
261
Rep 530
Posts |
|
|
Appreciate
0
|
| 09-23-2015, 03:54 PM | #17 |
|
Second Lieutenant
 31
Rep 228
Posts |
I would look at helicoil or keylocking threaded inserts if you can't make it work with a nut if you're confident in machining out the hole straight by hand. Cutting oil is your friend. Or if clearing the axle is the issue, use a stud-bolt with nuts at both ends.
|
|
Appreciate
0
|
| 09-23-2015, 05:52 PM | #18 |
|
Lieutenant
   
261
Rep 530
Posts |
Just bought some helicoil stuff so I can get the same size bolt in there. Will see how it goes. Hope I can get it straight enough considering I can't take this part off. Lol.
|
|
Appreciate
0
|
| 09-24-2015, 09:39 AM | #19 |
|
Second Lieutenant
 31
Rep 228
Posts |
You need to drill slower through metal, take your time and keep a sharp, lubricated bit and let it do the work, don't try to brute force it through. I've read that folding a small piece of emery cloth in half with the rough side facing inward and placing it over the hole and drilling through it cuts down on bit chatter also.
|
|
Appreciate
0
|
| 09-24-2015, 01:52 PM | #20 |
|
Lieutenant
   
261
Rep 530
Posts |
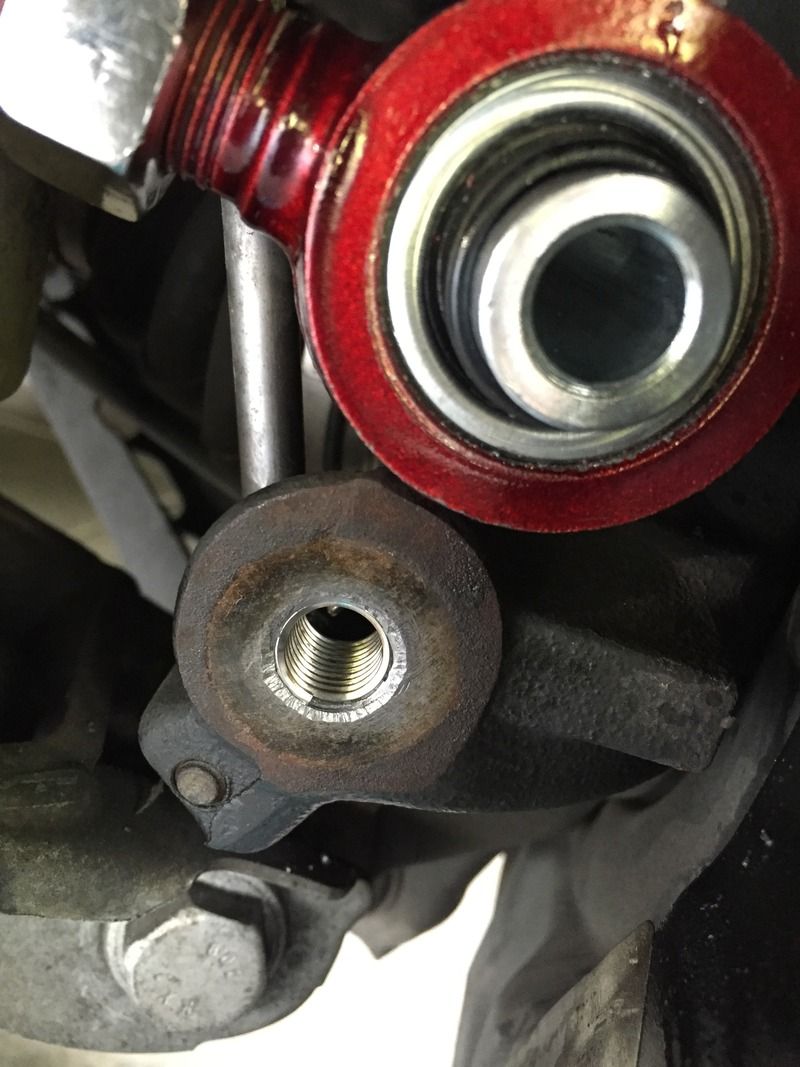
So it's all fixed and the toe arm is in. For anyone searching, here is what I used.
-1/2" drill (Corded, 7.5 amps) -31/64" drill bit (Napa Auto) -Cutting Oil (Napa Auto) -M12x1.5 Helicoil Repair KIT (Napa Auto) Kit includes install tool, tap and inserts. Picture for reference. I did add quite a bit of cutting oil to make sure it was lubed appropriately to cut through threads. Appropriate torque was achieved, so I'm a happy camper. Now, to make sure the toe on the driver side adjusts appropriately:  Last edited by puppydax; 09-24-2015 at 04:09 PM.. |
| 09-24-2015, 03:45 PM | #22 |
|
Lieutenant
   
261
Rep 530
Posts |
Thank you! Was nervous as this was my first time using a helicoil and drilling through existing threads, but I'm fairly mechanically competent. I have no issue with rebuilding diffs and setting backlash etc, but I have a problem completely removing threads and starting new ones.

__________________
https://www.instagram.com/puppydax/
Previous: 2007 E90 335i | 2008 E92 335i | 2009 E82 135i Current: '25 ///M2 Portimao Blue |
|
Appreciate
0
|
 |
| Bookmarks |
|
|