|
|
|
|
 |

|
 |
BMW Garage | BMW Meets | Register | Today's Posts | Search |
 |

|
BMW 3-Series (E90 E92) Forum
>
MOD:Turn your M-tech rear bumper into M3-look like
|
 |
| 09-14-2010, 05:45 AM | #1 |
|
New Member


5
Rep 21
Posts |
MOD:Turn your M-tech rear bumper into M3-look like
First of all credits may go to anyone (if any) made that before me. The mod was entirely my idea.
Car is E93 330i with M-tech package. Mod is suitable for all M-tech rear bumpers I guess. Couple of days ago I found my car's Mtech front bumper ugly scratched right underneath the reg plate. Front mesh had small damage aswell. Exchanged the mesh part #51118041179. I was about to throw it away unless an idea enlightened me. Time ago I did quad exhaust mod. My M-tech rear bumper got new CFdiffusor and cyba's quads - thread is here - http://www.e90post.com/forums/showthread.php?t=369869 Between them there is a grey plastic cover part #51128041192 which I got modified. You need: - front mesh part #51118041179 damaged or new (new cost roughly 30 bucks). Ome mesh makes material for 3 mods. - painter's tape - clear tape - piece of cardboard - carving knife from Home Hardware (dollar stores have sets too) - 2-component clear epoxy found at the Home depot - some time Now, clean the parts first. Use painter's tape to cover the grey plastic and make sure all corners are covered well. Do not remove that about-to-be modded cover from the bumper. Have a pencil and draw the corners to get the shape. Remove the tape. Now you have mirror image. Stick it on the cardboard and cut with scissors. Stick the cutout with clear tape on the FRONT - BOTTOM end (bend goes up) of the mesh and make sure to center it the way it will be cut down equally top & bottom, left & right. Put the mesh on flat surface and cut all the grid parts one by one straight down around the cardboard. Remove the cutout and detail if needed. Fit it on place and detail again if needed. Should not need any additional detailing if properly measured and cut down. Mix small amount of epoxy. Have a toothpick and apply small amounts all around the back of the grid where the lines cross.. Make sure the amount of epoxy applied is good enough to stick the grig to the plastic but stay invisible and doesnt't mess up aroumd the mesh lines when pushed down. Act fast because epoxy dries fast. Fit it and push lightly. Keep pushing for minute untill epoxy gets hardened. Enjoy your new M3-look-like bumper.        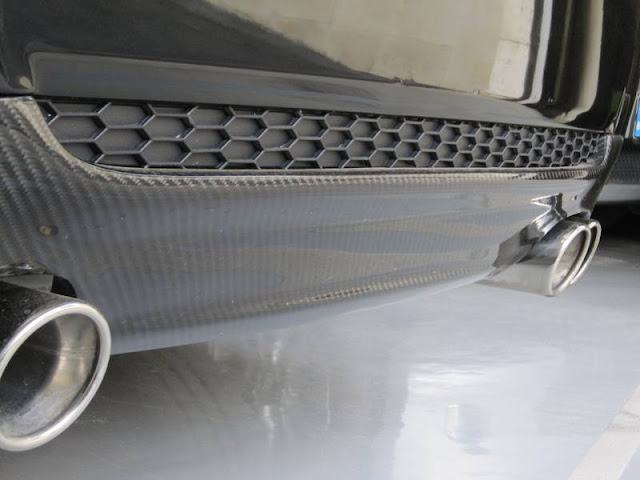      Last edited by sorost; 09-15-2010 at 04:27 AM.. |
| 09-14-2010, 07:29 PM | #7 |
|
Major General
 
426
Rep 8,003
Posts
Drives: '08 E90 335i, '99 E36 M3
Join Date: Apr 2009
Location: Houston, TX & Atlanta, GA
|
Looks good.
|
|
Appreciate
0
|
| 09-15-2010, 07:48 AM | #10 | |
|
New Member
5
Rep 21
Posts |
Quote:
 The mod is at the bottom of the bumper... The mod is at the bottom of the bumper... |
|
|
Appreciate
0
|
| 09-17-2010, 05:34 AM | #13 |
|
What
142
Rep 9,325
Posts |
nice
__________________
E92 328xi Space Gray
Aero Lip | M3 Side Skirts | CF Performance Spoiler | ACS Roof | Gloss Black Grilles | LUX H8 Angels | BMW Performance Exhaust My E92 Photos |
|
Appreciate
0
|
 |
| Bookmarks |
|
|