
|
|
 |
 |
 |

|
 |
BMW Garage | BMW Meets | Register | Today's Posts | Search |
 |

|
BMW 3-Series (E90 E92) Forum
>
DIY: 335d M57 Fuel Injector Replacement
|
 |
| 08-03-2016, 10:58 AM | #1 |
|
Lieutenant Colonel
 
78
Rep 1,689
Posts |
DIY: 335d M57 Fuel Injector Replacement
Injectors 3 and 4 were misfiring at 2000rpm and upgrading the DDE version and re-calibrating didn't help (though it greatly improved my idle); so out they go for brand new ones.
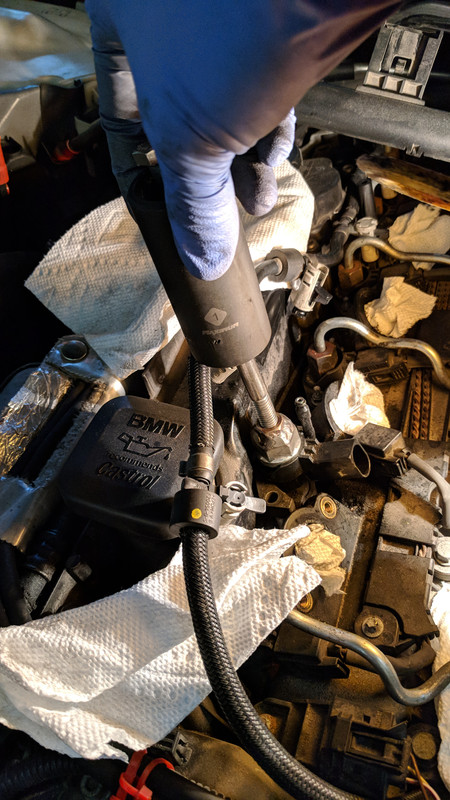
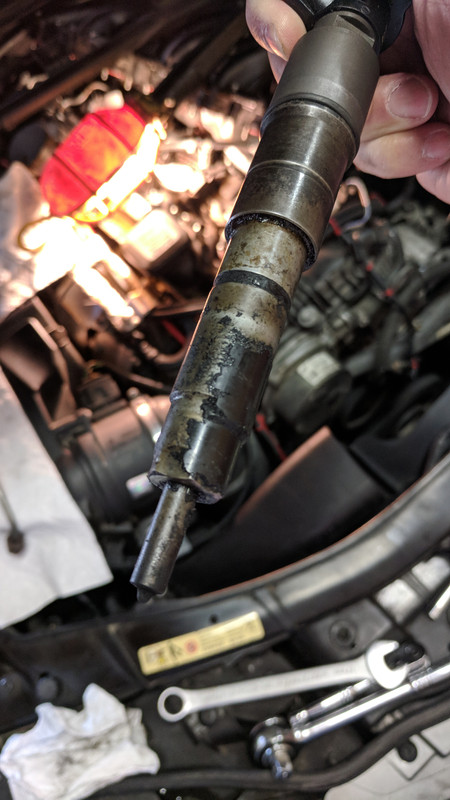
Notes: Removing the intake manifold is pretty common place now and there are lots of DIYs on how to pull the throttle body, EGR, and intake manifold for CBU cleaning. This DIY is for that little extra step to get at the fuel injectors without a slide hammer or other special BMW tools. Tools Needed For Fuel Injector Removal: - 17mm wrench Or 17mm crows foot socket > Edit 06/26/2018: Depending on your cylinder being replaced, a 17mm wrench may not give you the required clearance to torque the fuel injector nut down sufficiently. After doing this job again on cylinder 2, I'd highly recommend a 17mm fuel injector socket. Usually around $20 on eBay. - 8mm socket Cheapy BMW Special Fuel Injector Removal Tool: - M14 1.5 Lug Nut <- This is the thread on top of the fuel injector. - 3/8" nut <- Go with whatever nut size gives you a long bolt. - longest 3/8" bolt you can find <- Some length helps to give you swinging room for your hammer. Note: I had an exhaust shop weld the two nuts together for me. They ground the welds down a bit to make it a tad nicer. You're in effect making a sort of slide hammer so you can tap the fuel injector up and out. This cost me $6 in hardware and $20 for the exhaust shop to weld it. Pricey I know, but it was a Sunday on a long weekend and not many shops were open. .jpg) Before you begin: It is very important that you keep all fuel surfaces and lines as clean as possible. It does NOT take much to muck up your pricey brand new fuel injector. Keep protective caps in place until it's time to put in the new injector. Steps: 1. Remove engine covers/braces 2. Remove intake manifold (might as well CBU clean while you're at it.) .jpg) ***Don't forget to stuff some paper towel in the intake holes. Last thing you want is something falling inside that shouldn't.*** 3. Remove fuel pressure return line (black hose with grey plastic clips) - This is done by pulling up the grey plastic lock and then pulling the line off the fuel injector. Careful about prying at the top of the plastic tab as it can go flying. I pried from the base of the grey clip. I removed all six even though I was only swapping two injectors to get the line out of the way. Rest it on a clean paper towel to keep it from getting dirty. .jpg) 4. Remove wiring harness. Press in the tab and pull gently. 5. Unscrew hard fuel lines. This is done with a 17mm wrench. .jpg) 6. Unbolt fuel injector bracket by removing the two nuts. This is done with an 8mm socket. 7. Attach the injector puller tool to the top of the fuel injector (with a spacer and wrench at the top). Make sure not to screw the bolt down to the point where it's pressing against the injector. With a hammer, tap up on the wrench close to the bolt to get it up and out. .jpg) .jpg) ***My fuel injector holes had some grit and other crap in it. Clean out what you can and use a shop vac to suck out what you can. I wiped down the walls after to make it as clean as I could. Bore hole cleaning tools will help here. Of note, make sure those copper washers at the base of the fuel injectors come out with the old injector. New washers should come pre-installed with the new fuel injector.*** 8. Insert new fuel injector with bracket correctly oriented. (Don't worry, it doesn't really fit properly if it's upside down.) .jpg) 9. Tighten down both nuts slowly taking care to switch back and forth to give it even pressure. (Tighten down to 13 Nm (9.5 ft lb) as per Bentley manual.) (I had to use a rod and hammer to gently tap down the bracket so I could get the threads started on the nuts; you might need to do the same.) 10. Reinstall hard fuel line. (Installation is tightened to 23 NM (17 ft-lb) as per Bentley manual.)(Note: These lines can only be re-tightened 10 times then need to be replaced.) 11. Clip fuel lines back on by pressing down on the black tab and then pressing the plastic clips down. a. .jpg) b. b..jpg) 12. Plug in fuel injector harness. 13. Reinstall your intake manifold, etc.. etc.. double checking as you go. 14. Start the car. It took around 30 seconds of cranking before my car sputtered to life. Air in the lines might take a while to push out. (The next few starts were also rough but the time to start gradually decreased with subsequent restarts.) Let the car idle a bit and shut off. Double check your fuel lines to ensure nothing is leaking. Finishing Notes: Hope this DIY helps anyone who wants to do their own fuel injector replacement. Remember to note the serial numbers on top of the fuel injectors and which cylinder they're going in to. This is very important as the new fuel injectors need to be coded to the car (Injection Quantity Compensation). ISTA-D (Or ISTA+ as it's now known) will be needed to do this. Your car may run like crap until they're coded in. (Albeit possibly less crappy than on worn injectors.) These fuel injectors are really something and the manufacturing tolerances on these must be insanely small. Can you see the fuel injector holes on the tip? .jpg) ***This is why it's IMPERATIVE you regularly change your fuel filter. It doesn't take much to gum up these injectors.*** Compared to the gunked one that came out: .jpg) .jpg)
__________________
2010 BMW 335d "Ha! She wants the D."
2006 VW Jetta 2.5 Once upon a time... '03 VW GTI, '99 Audi A4 1.8TQ, '00 VW Jetta 1.85T, '09 BMW 335i xDrive, '04 BMW Z4 3.0i, '01 Audi TT 1.8T, '04 Volvo S80 2.5T Last edited by pbdm4k; 06-26-2018 at 03:58 PM.. Reason: Added lessons learned from the most recent fuel injector replacement. |
|
Appreciate
8
TDIwyse621.50 135i_vs_73.50 rulonger110.50 Persian Whisperjet170.50 sukutash67.00 kydiesel35166.00 POBEP415.00 Attacking Mid31.50 |
| 08-03-2016, 10:59 AM | #2 |
|
Lieutenant Colonel
 
78
Rep 1,689
Posts |
Update: 06/2018
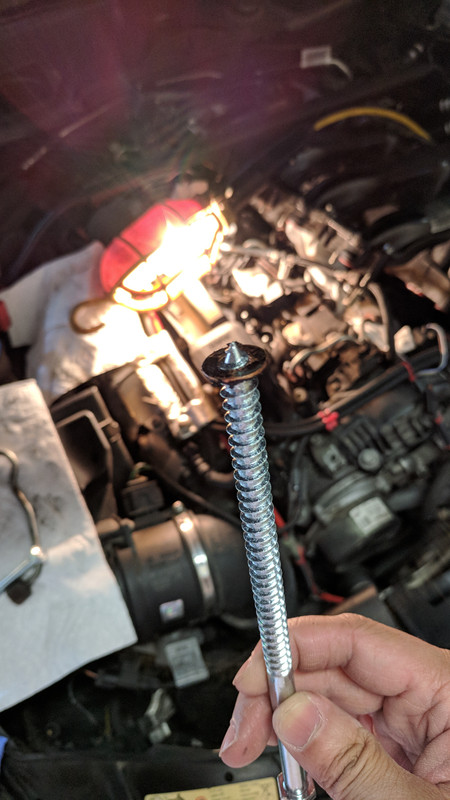
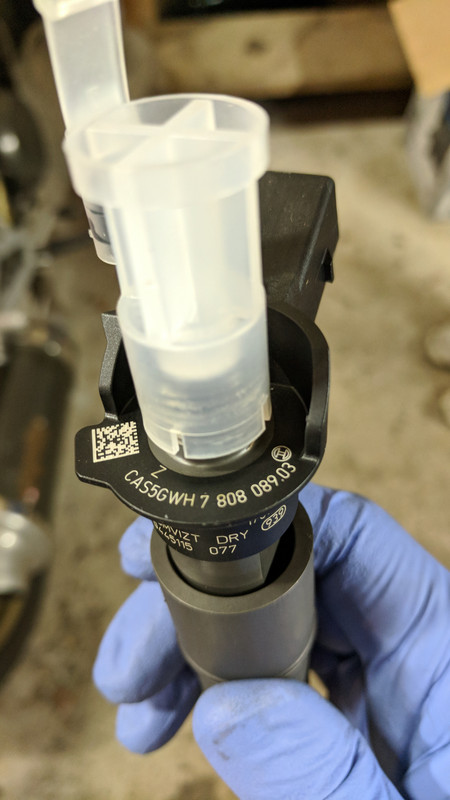
Engine Code: P02CE Time to replace another injector. 242000km on this one. As an update to the DIY, I had much more difficulty removing this one to the point where my hammer and wrench technique didn't work. I revised this by using the same 3/8" bolt and nut but instead using an upside down 1" socket to act as my slide hammer. If more force is required, try this method.  You'll see there was much more carbon blow by this time built up around the injector and making it a general PITA to hammer out.  This time I also had the misfortune of the copper washer not coming out with the injector. Picking and prying and soaking in WD40 didn't help to break down enough carbon for me to easily pop out the copper washer from its new solidified home at the bottom of the injector opening. So Home Depot to the rescue with a 3/8" x 10" lag bolt for $2.44 (Much more affordable than the professional copper washer removal tools.). Gently twist it into the copper washer by hand and a little wiggle and it'll pop right out. Be careful not to go too hard on this as you don't want to scratch the hole behind the washer. The tapered tip of the lag bolt should help with this.  As usual after replacing an injector, ISTA+ to reset all adaptations and code in the new injector. When coding in the injector, the code is the 7 character code on the top left of the injector:  In my case, the code is CAS5GWH. I just about forgot how to use ISTA+ to code my injector so for ease of reference, instructions below: Warnings for ISTA+: - Compatible K+DCAN cable required - Keep a battery tender on your car. Turn off lights, radio, hvac, etc... to preserve battery power. Not doing so can result in a fried DDE and a dead car. I'm a rebel though and did this quickly without a battery tender. 1. Vehicle Information (You must first pull all fault codes.) 2. Navigate to: - Vehicle management -- Service functions --- Digital Diesel Electronics ----Adjustment functions -----Injection quantity compensation 3. In the right panel, select "ABL Injection quantity compensation", click "Display" 4. Click "Continue" after observing your current injector calibration values. 5. Select "1" To update your new injector calibration value and click "Continue". 6. Input the cylinder number for which injector you are updating. 1 is at the front of the engine, 6 is at the back. 7. Input the new Injector calibration value. 8. Save your new value. 9. Turn off the ignition. 10. Turn on the ignition. 11. Exit ISTA+.
__________________
2010 BMW 335d "Ha! She wants the D."
2006 VW Jetta 2.5 Once upon a time... '03 VW GTI, '99 Audi A4 1.8TQ, '00 VW Jetta 1.85T, '09 BMW 335i xDrive, '04 BMW Z4 3.0i, '01 Audi TT 1.8T, '04 Volvo S80 2.5T Last edited by pbdm4k; 06-26-2018 at 04:11 PM.. |
|
Appreciate
1
BMWerkeUSA38.00 |
| 08-03-2016, 03:18 PM | #3 |
|
Captain
    
74
Rep 697
Posts |
This video originally really scared the heck out of me regarding our fuel injector replacement.
I'm glad your DIY instructions is a lot less...aggressive. |
|
Appreciate
0
|
| 03-30-2017, 11:24 PM | #5 |
|
Captain
    160
Rep 803
Posts |
Thank you for this. I recommend spraying kroil or some other good rust eating penetrant a day or two before removal. My 6 came out easily and 5 with a little hammering. I had the x5 stupid plastic partitions crack issue which soaks the stupid sound foam and corrodes 5 and 6. 5 was 20kOhm to ground, 6 was 200 Ohm! To ground. Code 4b99 was stalling me more and more, it's code for bank 2, due to the grounded injector (s).
|
|
Appreciate
0
|
| 03-31-2017, 01:54 AM | #6 |
|
Captain
    160
Rep 803
Posts |
Anyway runs good but ista d /Rheingold doesn't want to save my injector code! Says not o.k.
Below that it said use aaaaa5g if the code doesn't work. That saved over my old values for 5 and 6. Anyone have an idea? I'll try tool 32 tomorrow, just annoying weird stuff like this spooks me. |
|
Appreciate
0
|
| 03-31-2017, 09:48 AM | #7 |
|
Colonel
 548
Rep 2,087
Posts |
That injector that came out doesn't look all that bad to be honest. It would be interesting to pop test it and see how the spray pattern is.
__________________
'09 335D
'18 540i xDrive |
|
Appreciate
0
|
| 03-31-2017, 09:59 AM | #8 |
|
Captain
    160
Rep 803
Posts |
In my case, the injectors looked clean at the tips, especially compared to what my tdi would have been at 100k., but the electrical piezo part was intermittently grounding until it would kill bank 2
|
|
Appreciate
0
|
| 04-03-2017, 11:42 PM | #11 |
|
Captain
    160
Rep 803
Posts |
Fixed it, turns out there are 2 sets of 7digit/letter codes on the injector! Confusing Germans
 the top by the line is the one to use the top by the line is the one to useA cheap usb endoscope came in handy to get the codes by the injector nut. The smooth running control is tucked inside troubleshooting, not very intuitive if you were used to vag com |
|
Appreciate
0
|
| 06-26-2018, 03:52 PM | #12 |
|
Lieutenant Colonel
 
78
Rep 1,689
Posts |
TTT if anyone is running into injector issues lately.
Had to swap another one this past weekend. Hit a few snags that made what I thought would be a 2 hour job into a 6 hour one including trips to Home Depot for creative tools. Hope these tips help anyone else who has to go through this.
__________________
2010 BMW 335d "Ha! She wants the D."
2006 VW Jetta 2.5 Once upon a time... '03 VW GTI, '99 Audi A4 1.8TQ, '00 VW Jetta 1.85T, '09 BMW 335i xDrive, '04 BMW Z4 3.0i, '01 Audi TT 1.8T, '04 Volvo S80 2.5T |
|
Appreciate
0
|
| 10-19-2018, 07:48 PM | #16 |
|
Second Lieutenant
 46
Rep 281
Posts |
Does anyone know of up-sized or up-rated injectors from other cars that will fit?
__________________
SLOW & SMOKEY. My car loses to every Chevy Malibu unless I mash the throttle.
Mods: *ATM 304SS Turbo-back exhaust, w/ ox-cat *ATM stepped intercooler *ATM silicone tubing kits (hot & cold sides) JR 2.8 tune *Whitbread CP3R90 HPFP *AArod EGR racepipe*Execuhitch hidden hitch *Stage 3 transmission tune |
|
Appreciate
0
|
| 10-24-2018, 03:00 PM | #17 |
|
New Member

0
Rep 24
Posts |
https://www.ebay.co.uk/itm/Diesel-In...edirect=mobile
Will this work to remove the injectors. I have a late 2008 LCI E90 335D. Thank you in advance. |
|
Appreciate
0
|
| 11-24-2018, 12:33 AM | #18 | |
|
Private First Class
 20
Rep 105
Posts |
Diesel injector extractor
Quote:
on the pic you have, this is the right side that you can reverse for the right diameter, here this is 14 mm pas 1,5 mm. Before mounting it on the injector, do some ''go-back'' with the heavy part to make it running smoothly while using it (sliding hammer). Don't forget to put a piece of cardboard plate between the engine and the right side of the car in order to not have the piece holding the injector to go down ... ----------------------------------------------------------------------------------- You can then code the IMA using only INPA on the OBD : open INPA (contact ON) both lamps must be ON Choose Shift F8 (chassis E89-90) Then Engine and ''DD6 for M57TOP/M57TU2'' right side of the window -> F6 for Activate then 3 choices : F1 synchronize EWS/CAS start value F2 Activate 1 -> F3 IMA Adujstment choose F3 You will see yours 6 IMA numbers from 1 to 6. (1 is the front/radiator and 6 near the binnacle/body car) -> F1 to change IMA using this format : number of your cylinder eg 1 put a '';'' before the injector reference ------------------------- eg for the injector number 3 : ima3;EBBNMIH If you have an error, this bad format, don't forget ''ima'' before the injector number, then the Ref (7 digits above the head of the new one) You 're done, shut down and restart BUT : cause of the air Inside the new one you normally have to wait one minute at least to allow the electric fuel pump to pull out a bit of the air. Good luck. Last edited by Pierre26; 11-24-2018 at 01:04 AM.. |
|
|
Appreciate
0
|
| 03-31-2019, 11:03 PM | #19 |
|
New Member
3
Rep 15
Posts |
Thanks for this guide. I want to try changing an injector for the first time myself.
I ordered the Bimmergeeks cable for coding. Can someone point me in the right direction for the ISTA+ software. Last edited by at100plus; 03-31-2019 at 11:53 PM.. |
|
Appreciate
0
|
| 03-31-2019, 11:14 PM | #20 |
|
New Member
3
Rep 15
Posts |
Oh one more thing. I noticed some of them say they don't work with F series despite listing compatible with 1998-2018 cars.
I also have a 2014 535d so I would prefer to get a kit that does both my E90 335d and my F10 535d. Thanks! |
|
Appreciate
0
|
| 08-11-2019, 12:57 PM | #22 |
|
Registered
2
Rep 3
Posts |
Thanks pbdm4k for the detailed instruction. I just did this job on 2 injectors over the weekend and your post ensured that I had everything I needed for the job. A couple of updates and learnings for anyone else who's thinking about doing this soon.
1) I purchased injectors from eBay from EDM auto parts in the UK. Delivered in less than a week and price varies from $250-$265 depending on how many you buy. https://www.ebay.com/itm/Diesel-Inje...72.m2749.l2649 2) I purchased a slide hammer from eBay as well that worked well. In my case the injectors came out with a couple of whacks. "Diesel injector extractor / puller / remover Bosch and lucas M8, M12, M14"https://www.ebay.com/itm/Diesel-inje...72.m2749.l2649 3) After assembly the car would not start, just crank over but not start. I found that ISTA+ had a fuel system bleed function which runs the fuel pump for 3 minutes. Did this and still no luck. Read some other posts when people mentioned they loosened the nut on top of the fuel injector to see if fuel was coming out. I ran the fuel bleed function again and slowly loosened the nuts on the fuel injectors I had replaced. They hissed a it and then fuel followed. Tightened them up quickly and let the function finish its cycle. Hit start and the beast fired right up! Thanks to everyone who's posted about performing this job in the past or I would have never tackled it myself! |
|
Appreciate
1
POBEP415.00 |
 |
| Bookmarks |
| Tags |
| 335d, bosch, fuel injector, m57, tool |
|
|