

|
|
 |
 |
 |

|
 |
BMW Garage | BMW Meets | Register | Today's Posts | Search |
 |

|
BMW 3-Series (E90 E92) Forum
>
DIY: Installing the Factory E90 Alarm
|
 |
| 06-20-2005, 02:45 PM | #1 |
|
Captain
    45
Rep 722
Posts |
I went forward with my E90 alarm install, and took some pics along the way. I would say that it is an easy install, as long as you have some mechanical confidence and experience. The "hardest" part is removing the left rear wheel to install the siren. Since our cars do not come with a jack, you have to use your own (or buy the BMW jack), and there are special lift points that require a special fitting so as not to damage the lift point (nice work BMW). If you have any doubts about your ability to safely lift your car with a jack, do not attempt this install.
The E90 Factory Alarm kit from BMW (pn 66 12 0 403 658) lists for $300 but I got mine for about $229 from Circle BMW. They supplied the kit and printed out the offical BMW PDF instructions, which dealers have access to. Typically the kit does not include printed instructions since they obviously prefer the dealer to do the installation. The kit is pretty minimal, and kind of a crime that it costs so much and it not included with every car.  It consists of an ultrasonic module for inside the vehicle, a hood switch, and a siren that goes up under the left rear wheel well. See picture below: It consists of an ultrasonic module for inside the vehicle, a hood switch, and a siren that goes up under the left rear wheel well. See picture below: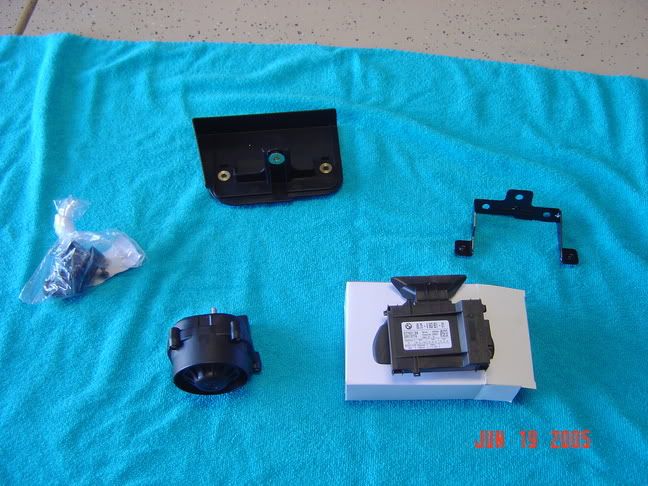 1. Remove Negative Battery Terminal. To get started, first disconnect the negative battery terminal. As you know, the battery is in the trunk (or "boot" for you English-English speakers). The nut on top of the negative (black) terminal is 10mm. I put the removed negative terminal on a rag so that it would not drop back on to the battery or touch the positive terminal. 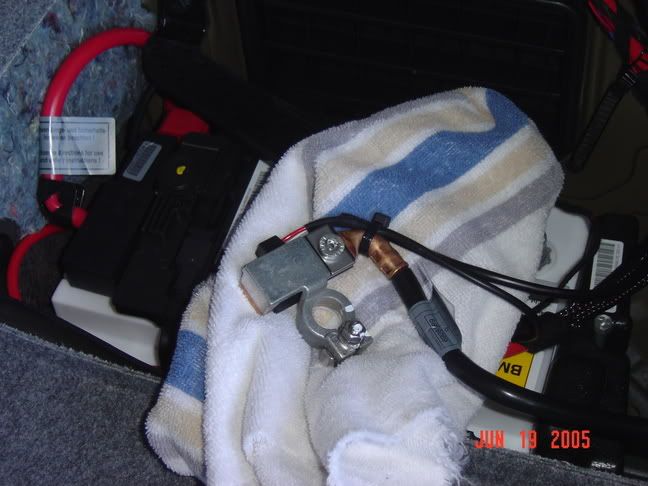 2. Install Ultrasonic Module into interior of car. To install the Ultrasonic Module, you must pop open the rear dome light fixture inside the cabin. Make sure you do the REAR one (aft of the sunroof). This was not specified in the instructions, and I spent about 1 hour figuring out that the front light fixture was not correct! To remove the rear dome light fixture, I used a plastic spatula as a pry tool so as not to damage the headliner or plastic. When you do this MAKE SURE your hands are very clean, as you will stain your headliner if they are not. (really, I am serious about this) The spot to pry is immediately behind each reading light, at the back edge of the fixture. There is a release tab immediately behind each circular light, and you have to get the pry tool in just the right place. I did one side, and then held it with my hand and did the other side. You should not have to use tremendous force if you get the pry tool in the right place. Don't worry if the frosted clear light surround pops off when you do this, it easily snaps back in place later: 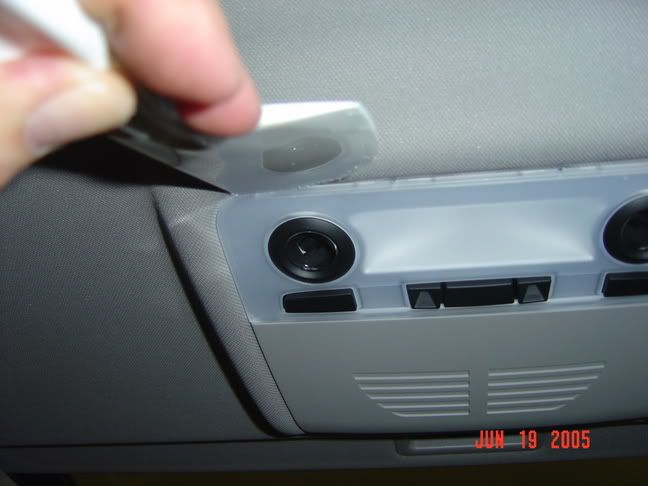 Once the tabs are released, I found it easiest to unplug the wiring harnesses to completely free the dome light fixture from the car. (This is not necessary, but it makes the next step easier). Then you simply put the ultrasonic module in place (it snaps in) and reinstall the dome light fixture into the car, taking care to connect the original wiring harness for the lights, and the previously unused one that snaps in to the awaiting ultrasonic module you just installed: 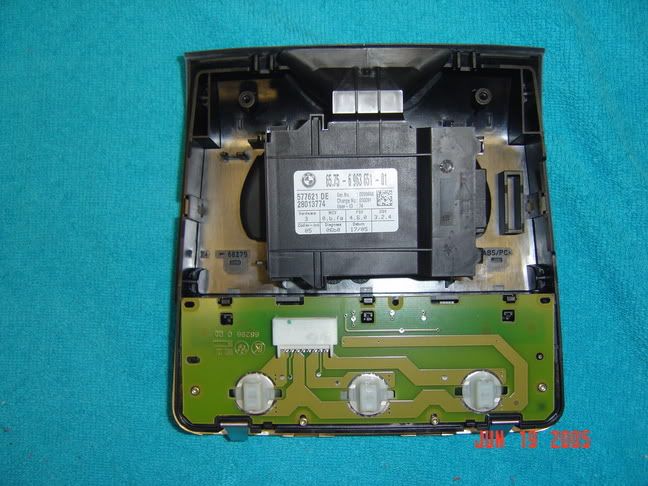 3. Installation of the Hood Switch For the next step, open the hood (or "bonnet" for you English-English speakers) and locate the hood switch wiring along the drivers side edge of the engine compartment. It is taped to another batch of wires neatly. You will see a cap with 3 blue dots on the end, which is a termination for the harness that will eventually plug into the alarm hood switch. 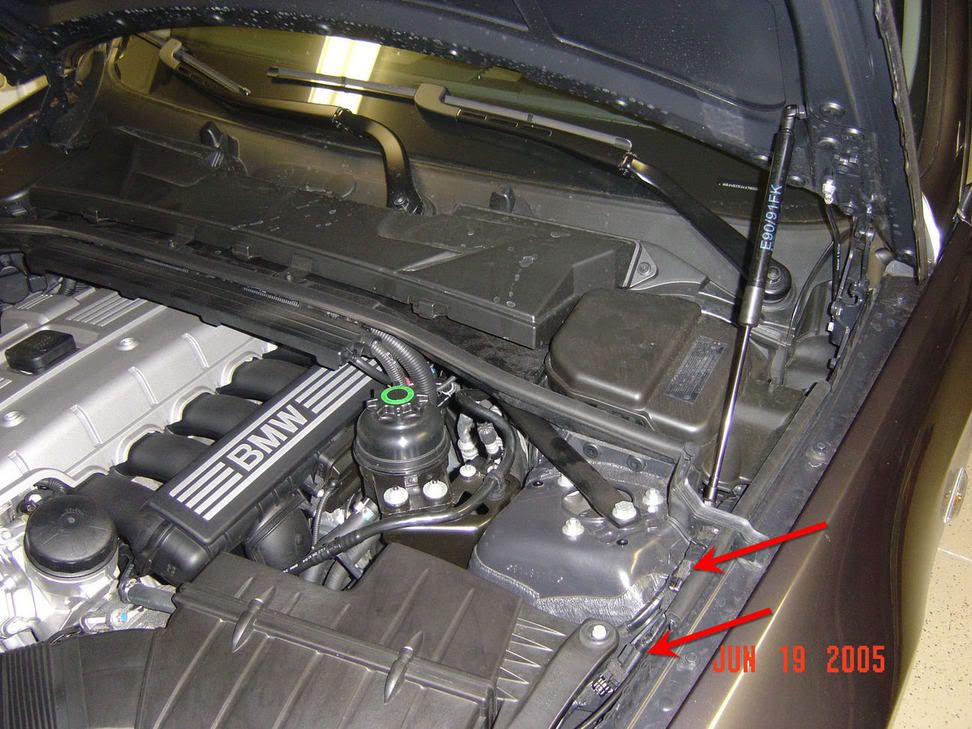 CAREFULLY cut or unwrap the felt tape that holds the hood switch wires to the larger wiring bundle, and pull them up toward the windshield. You will need to remove the cover for the brake resevoir, and it is also easier if you remove the short weatherstripping piece and plastic braket that are shown in the pictures below:  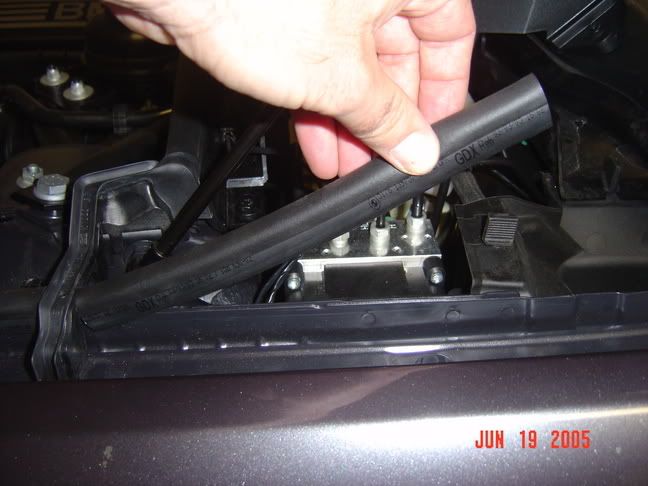 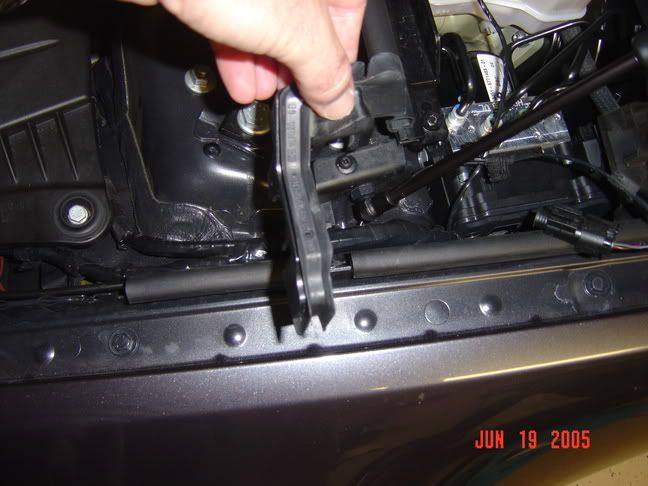 These pieces pop right off easily, but use care when doing the brake resevoir cover. It has a clip at the front and back that you should release when removing. Once these pieces are removed, straighten out the hood switch wiring, and you will notice 2 plastic clips that are used to mount the wiring to 2 plastic tabs in a channel near the hood switch mounting location. Simply push them down onto the tabs to mount them. 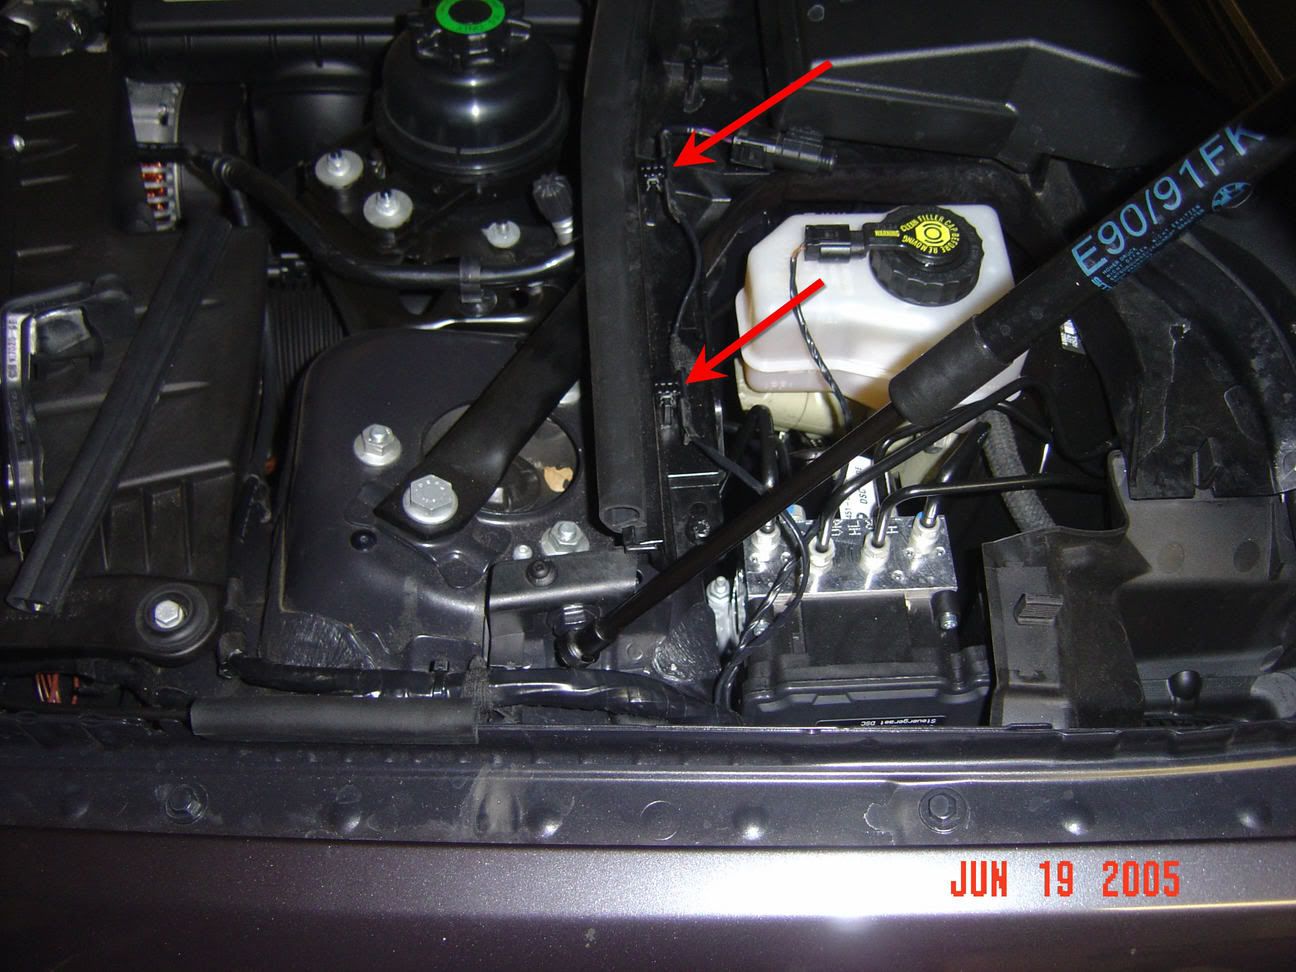 Next, mount the hood switch bracket. There is only one correct orientation of this bracket. The notch in the bracket goes toward the middle of the car and aft. Secure this with the provided screw: 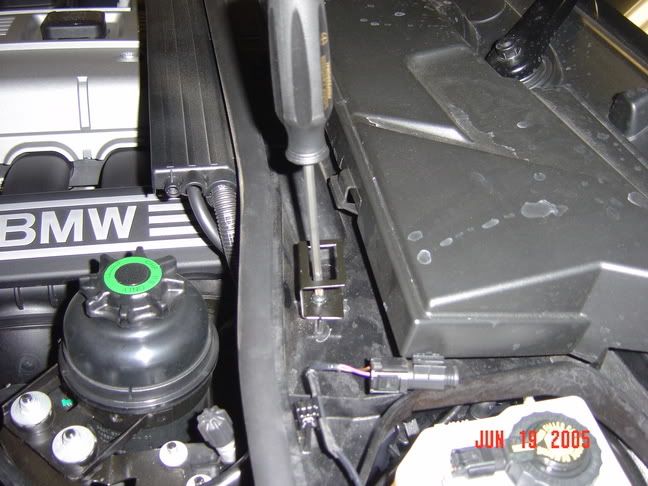 Now, mount the hood switch into the bracket (it basically drops in) and connect the wiring harness to the switch. You must remove the "plug" that is in the connector first. In the pic, the plug is not yet removed. 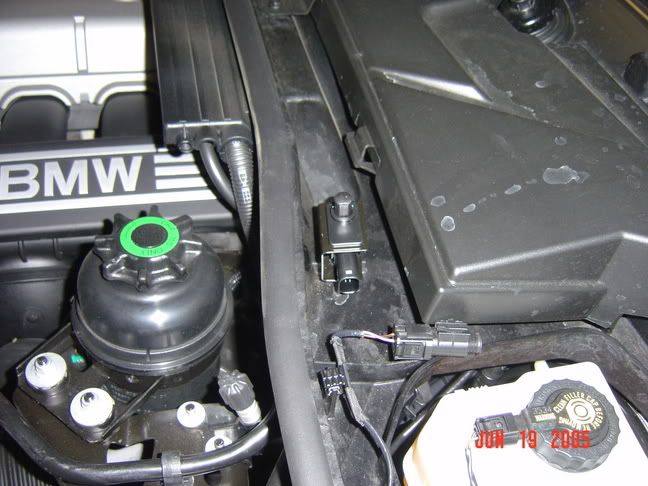 3. Installation of the Siren in the wheel well For the next step, you must jack up the vehicle and remove the left rear wheel. This is the "scariest" part of the install. If you have any doubts about doing this safely, do not perform this install. Apparently there is a special tool that fits into the plastic jacking points under the vehicle. They look like upside-down boxes. I just used a block of wood that I cut for this purpose that fit inside each "box" and protruded down below the lift point just far enough to prevent damage from my flat floor jack platform. I suggest buying the fitting or tool from BMW, though. Before jacking I loosened the lugs slightly (17mm socket) to make it less scary when removing the wheel when lifted. Immediately after jacking the car up, I put 2 jackstands under 2 different parts of the rear suspension that appeared strong enough to support the weight of the car if the jack failed. Always assume your jack will fail! Since I had the lugs loosened slightly, I was able to easily able to remove the wheel once lifted. Next you must remove the wheel arch cover, which is the felt lining inside the wheel well. This is pretty easy. There are about 10 nuts that must be removed, 10mm and 8 mm. Make sure you get them all. Then simply pull the felt liner out and set it aside. 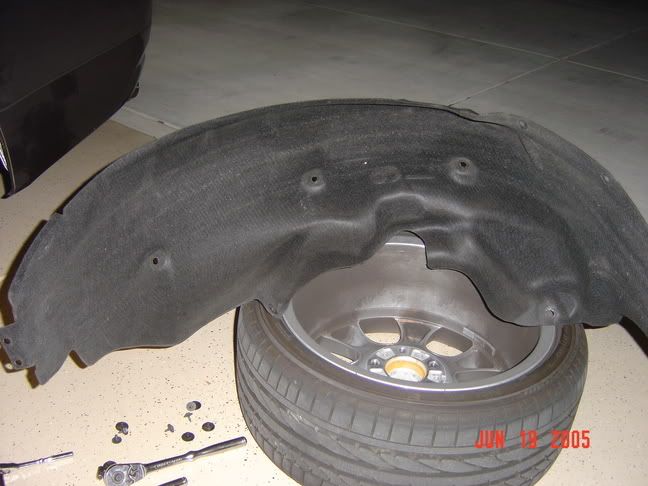 Look up to the top of the wheel well. There is a cavity up there with some unused wiring, which is neatly tied up with felt tape, and 3 threaded studs. Undo the felt tape to release the connector. Place the supplied bracket over the exposed studs and secure it with the hex nuts. (10mm I think). 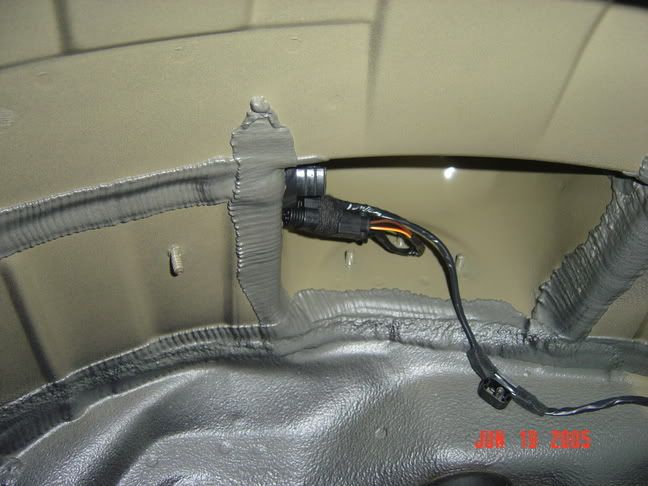 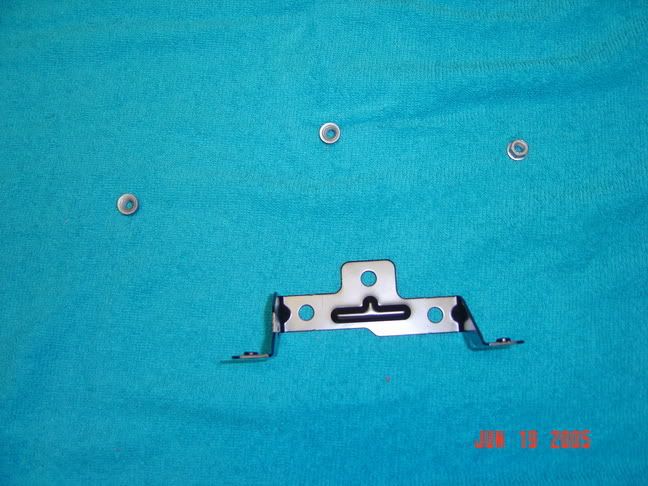 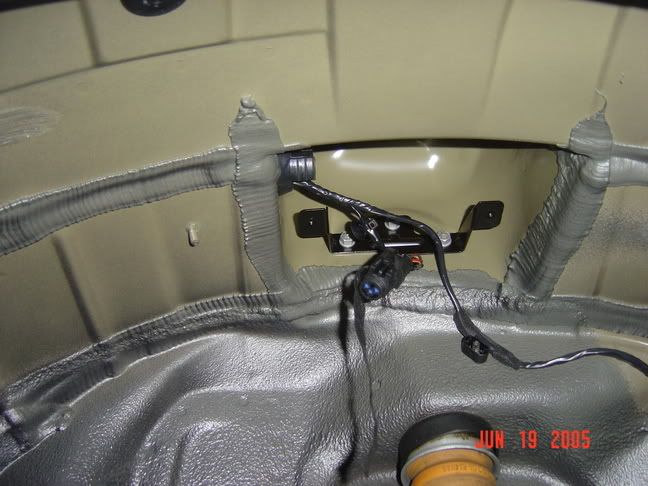 Next, connect the siren to the siren mount with the supplied nut. 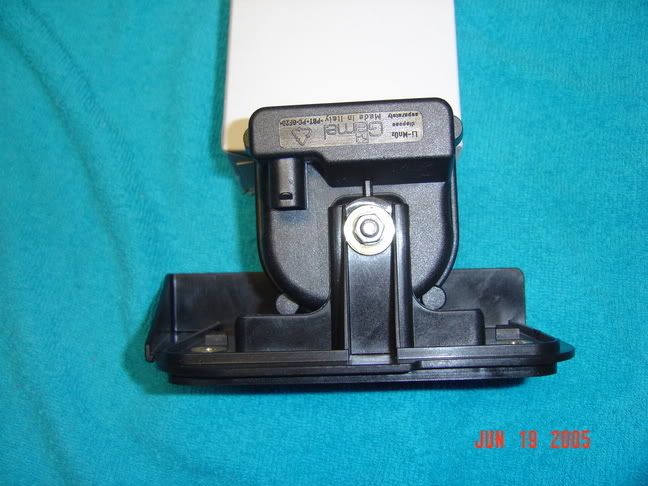 Remove the "plug" from the connector in the wheel well, and plug the connector into the siren. There is a plastic grommet that pushes into the bracket to support the weight of the siren when it is not mounted. Make sure you push this into the bracket before letting the siren "hang". 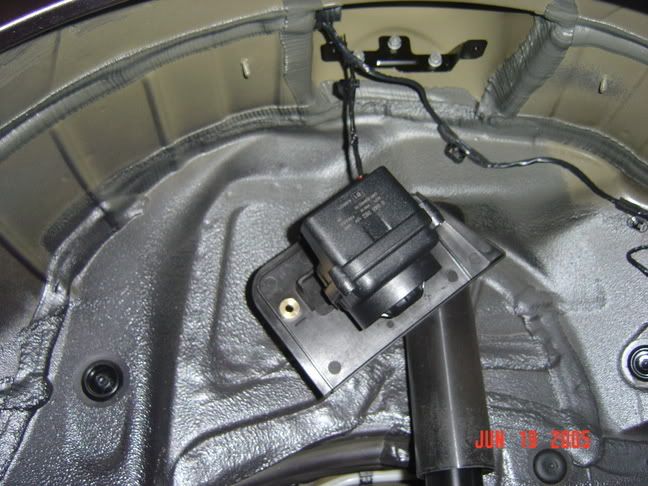 Then install the siren mount to the bracket with the supplied screws. Make sure that the wires are not pinched between the wheel well and the siren mount. Securely fasten these screws but do not overtighten. (Sorry, no picture here). Finally, replace the felt wheel arch cover and the rear wheel. Make sure you get the cover tucked in to all the right places and make sure to replace ALL mounting screws. Torque specs for the rear wheel are between 120 and 140 Nm, which translates to about 90 lb/ft. Make sure to use a torque wrench and check the torque again after a short drive. Do not over or under torque! If your car has had the proper software updates and programming, the alarm may function immediately after installation. Mine didn't, and I have to go to my dealer and have the software updated to activate the alarm. If you have Nav, you can configure several parameters of the alarm. If you don't have Nav, you may have to live with all features active. Consult your dealer for different configurations. Enjoy! On a side note, my dealer says he still can't activate my alarm because he doesn't have the software updates from BMW yet. LAME! If anyone else gets their alarm activated, please let me know. Last edited by CC 330i; 06-21-2005 at 07:07 PM.. |
| 06-20-2005, 03:24 PM | #3 |
|
Administrator

43512
Rep 21,323
Posts |
It's great to see someone willing to roll up their sleeves and do a little work on their brand new E90. Everything I've installed on my car myself I appreciate much more than if I just had someone do the install for me, and I bet you feel the same way with your pedals and alarm so far
 Great writeup! Great writeup! |
|
Appreciate
0
|
| 06-20-2005, 03:37 PM | #4 |
|
Captain
    45
Rep 722
Posts |
Thank you. It's a little scary doing it yourself sometimes, but I do find it is very rewarding, and you learn a lot more about your car. You just have to be careful and go SLOWLY, and don't be afraid to ask questions. This is my first new car, so I am a little apprehensive doing anything to it, though.
I don't fault anyone for having the work done at the dealer, of course. But it's like I tell my wife, I have a hard time paying for things that I can do myself, even if I don't always have the time. When it comes to my BMW, I can barely even stand to let the dealers touch it. I know that since our cars are so new, very few BMW techs have even had a chance to work on one themselves. Of course they are experienced with other BMWs so they have a huge head start on us. On a side note, when I had the rear wheel off, I noticed that I did have a nail (suspected this due to very slow leak) in the tire (in the first 1300 miles!). So it was off to the tire shop to have a qualified tech fix the punture. I would never try something like that on my own, but for things like pedals, the alarm, and the wheel stud locks, I think most people could do them on their own if they have some experience working on cars. |
|
Appreciate
0
|
| 06-23-2005, 01:20 PM | #7 |
|
Captain
    45
Rep 722
Posts |
All the cars are pre-wired for the alarm, but I believe it is a dealer installed option only. It's easy enough to install yourself if you want it.
UPDATE: I just noticed that my clown nose is flashing now (and my fog lights which didn't work before are now working) after installing my alarm. The alarm itself has still not been activated, but the clown nose flashing is a good start! For all I know, the alarm may work already, but I can't figure out how to set it off without breaking anything... Tried sitting inside and locking the doors and then opening them, but no luck. Tried also opening the hood when the doors were locked, to no avail. I think it really is not activated... Last edited by CC 330i; 06-24-2005 at 12:06 AM.. |
|
Appreciate
0
|
| 07-24-2005, 12:38 PM | #9 |
|
New Member
3
Rep 9
Posts |
Did any who installed the alarm, get it activated? How!! I'm having the same problem as CC 330i!! I don't know if the alarm horn works. Also, has anyone seen any options for the alarm in the I-Drive..
|
|
Appreciate
0
|
| 08-03-2005, 05:27 PM | #10 | |
|
Captain
    45
Rep 722
Posts |
Quote:
|
|
|
Appreciate
0
|
| 08-04-2005, 08:00 AM | #11 |
|
BIG PAPI

11
Rep 189
Posts |
I had a good deal with the alarm and if you guys need one here is the email from the person I got mine from. mikeanzz@hotmail.com this alarm I just got is the OEM for the e90 brand new in the box never opened and I got it for $160 plus shipping i think this is a good deal so if you have any questions drop this guy a line.
 |
|
Appreciate
0
|
| 10-28-2005, 03:38 AM | #12 |
|
missing two turbos.

612
Rep 4,859
Posts
Drives: fast around corners.
Join Date: Sep 2005
Location: Curves
|
I have question.
Installation seems like pretty much "plug-and-play", correct? I don't see any custom cutting/drilling/wiring involved. Also, so after you get this alarm installed, it just "Activates(assuming you have software upgrade)" and connected with your remote key fob? I heard bmw factory alarm also have window/sunroof closing feature. How can you do that with your remote? As for alarm system arming, if you lock, it arms, when you unlock, it un-arms? Any idea on how to activate panic feature?
__________________
06 AW E90 330i ZPP/ZSP/Step/Expired Warranty  : Prior Design Front : ACS Rear : ACS Roof : BlackLines : Simota Intake : Carbon Fiber Interior Trim : : MTEC V3 : 24% Charcoal : V1 Hardwired : Solaris Invisibulbs/LED interior : |
|
Appreciate
0
|
| 10-28-2005, 10:20 PM | #13 |
|
New Member
0
Rep 10
Posts |
CC 330i:
Your post is very useful but know that I´m going to order my e91 I´m thinking in buying my alarm+PDC after market... I´ve 2 questions:the alarm kit I saw here http://www.realoem.com/bmw/showparts...87&hg=65&fg=60 does not have all the peaces you have at your first picture.However, the your kit number is the same as at this link? Do you think that rear PDC does already have electric installation such as the alarm? Waiting for your reply |
|
Appreciate
0
|
| 11-06-2005, 07:29 PM | #14 |
|
Captain
    63
Rep 946
Posts
Drives: BMW Fanatic
Join Date: Sep 2005
Location: NYC
iTrader: (1)
Garage List 2013 Fiat Abarth [0.00]
1993 Honda Civic EG ... [0.00] 2009 Suzuki LTR 450 [0.00] 2008 Acura MDX [0.00] 2001 Z3 M Coupe S54 [0.00] 1988 E30 M3 [0.00] |
When you installed the ultrasonic modlue didnt you have to cut open the slits in order for the sensor signals to pass through because on a e90 w/o the factory alarm the slits are not cut out..
__________________
 1988 E30 M3 Diamantschwartz/Black |
|
Appreciate
0
|
| 11-06-2005, 07:53 PM | #15 | |
|
Administrator

43512
Rep 21,323
Posts |
Quote:
http://www.e90post.com/forums/showthread.php?t=3793 |
|
|
Appreciate
0
|
| 11-10-2005, 09:57 PM | #16 |
|
Captain
    63
Rep 946
Posts
Drives: BMW Fanatic
Join Date: Sep 2005
Location: NYC
iTrader: (1)
Garage List 2013 Fiat Abarth [0.00]
1993 Honda Civic EG ... [0.00] 2009 Suzuki LTR 450 [0.00] 2008 Acura MDX [0.00] 2001 Z3 M Coupe S54 [0.00] 1988 E30 M3 [0.00] |
There's a TSB on this. Car should have come from the factory with a slotted rear light module cover. Plenty of members here have taken this TSB printout to their dealers and had them install the correct slotted cover for free. See the first TSB here to see what I'm talking about -
cool..thanks for the info..
__________________
 1988 E30 M3 Diamantschwartz/Black |
|
Appreciate
0
|
| 11-13-2005, 12:37 PM | #17 |
|
Bimmer me up
20
Rep 340
Posts |
I just finished installing my alarm. It took about 50 minutes thank to the help of this thread. Now I just have to get it programmed to work. I can't believe that BMW service charges 2hrs labor ......
|
|
Appreciate
0
|
| 11-13-2005, 04:02 PM | #18 |
|
Captain
    
82
Rep 876
Posts |
I felt the same way but i had them program on my alarm my cd changer and do the sept update all at the same time... Worked out well for me because i got a lot of stuff taken care of...
|
|
Appreciate
0
|
| 11-13-2005, 04:54 PM | #19 | |
|
missing two turbos.

612
Rep 4,859
Posts
Drives: fast around corners.
Join Date: Sep 2005
Location: Curves
|
Quote:
Does anyone know how much it is to get alarm installed @ dealer? I mean as an option(including the alarm kit + installation). Isn't it like $500 installed for everything?
__________________
06 AW E90 330i ZPP/ZSP/Step/Expired Warranty  : Prior Design Front : ACS Rear : ACS Roof : BlackLines : Simota Intake : Carbon Fiber Interior Trim : : MTEC V3 : 24% Charcoal : V1 Hardwired : Solaris Invisibulbs/LED interior : |
|
|
Appreciate
0
|
| 11-13-2005, 11:55 PM | #20 |
|
Bimmer me up
20
Rep 340
Posts |
The first quote I got was $738+tax CDN installed. But since I bought the "alarm system" for $338(had to haggle to get the "wholesale price"), I only have to get it programmed which should be under 40 bucks. I truly do appreciate quality work performed by qualified techs for a fair dollar, but this is childs play. There's no way they should be charging 2 hrs for this.
|
|
Appreciate
0
|
| 11-14-2005, 01:13 AM | #21 | |
|
Private First Class
 10
Rep 121
Posts |
Quote:
Here in the US, I think they charge $90/hour.
__________________
2006 330i | Black Sapphire Metallic | Black Dakota Leather | 6SP MT | ZPP | ZSP | ZCW | Sirius
|
|
|
Appreciate
0
|
| 11-14-2005, 01:43 AM | #22 | |
|
missing two turbos.

612
Rep 4,859
Posts
Drives: fast around corners.
Join Date: Sep 2005
Location: Curves
|
Quote:
 I am assuming the $738 CDN is for the installation(including programming, not including the alarm kit cost), right? I bought alarm kit, and I plan on installing myself also. I was wondering how much it'll cost to get it activated by the dealership. I think you are saying it'll cost under 40 bucks to get it activated?
__________________
06 AW E90 330i ZPP/ZSP/Step/Expired Warranty  : Prior Design Front : ACS Rear : ACS Roof : BlackLines : Simota Intake : Carbon Fiber Interior Trim : : MTEC V3 : 24% Charcoal : V1 Hardwired : Solaris Invisibulbs/LED interior : |
|
|
Appreciate
0
|
 |
| Bookmarks |
|
|