

|
|
|
|
 |
|
 |
BMW Garage | BMW Meets | Register | Today's Posts | Search |
 |

|
BMW 3-Series (E90 E92) Forum
>
Tips for removing exhaust with DPF to SCR lock nuts stuck
|
 |
| 06-24-2021, 06:15 PM | #1 |
|
Private First Class
 6
Rep 154
Posts |
Tips for removing exhaust with DPF to SCR lock nuts stuck
Im currently trying to get my engine mount bracket off but im unable to get two of the 8mm bolts off the side of the engine mount bracket. I had the engine lifted up but i read somewhere that because i have the v band off already that it will make it so i cant get these off? also im unable to get the bolts off from where the SCR connects to the DPF. Do i have to lift these up a little more?
So I thought I would provide a tad more info since I got some sleep.. well I'm intending to get some e torx sockets this morning to make it easier to grip on to the bolts considering I was trying to get them with a regular hex socket. Im hoping ill be able to get them with a regular socket wrench and not have to resort to buying an angle impact driver, but if that's what needs to be done ill see what I can make happen. Last edited by fearitself165; 06-28-2021 at 12:54 AM.. Reason: add more info |
| 06-25-2021, 03:02 PM | #2 |
|
Lieutenant
 87
Rep 433
Posts |
X5? It can be a bit tricky, if you loosened the vband already you'll need someone to lift the dpf up slightly while you slide the socket into the recess underneath. You can also turn the DPF a bit to get more clearance
|
|
Appreciate
0
|
| 06-26-2021, 01:20 AM | #3 |
|
Private First Class
6
Rep 154
Posts |
I have a tendency to drone on when I'm tired so I apologize if that's why I'm not getting any responses. So I have the whole exhaust dropped except the two lock nuts between the DPF and the catalytic converter, and the one bolt remaining on the top DPF bracket is the one on the engine block. If I manage to get that bolt out will I be able to pull the whole exhaust out as one piece? Or will the DPF just fall out(that would be ideal
 ) On the top side I started taking the vacuum reservoir off but I couldn't get the last bolt nearest the firewall. I figured taking this off would clear some space out to get more leverage on the top DPF bracket bolt. ) On the top side I started taking the vacuum reservoir off but I couldn't get the last bolt nearest the firewall. I figured taking this off would clear some space out to get more leverage on the top DPF bracket bolt.Last edited by fearitself165; 06-27-2021 at 02:06 AM.. |
|
Appreciate
0
|
| 06-27-2021, 03:59 PM | #4 |
|
Brigadier General
 796
Rep 3,572
Posts |
Put vband clamp back on and get the DPF back up out of your way. Use the E torx bits like youre supposed to. A mechanics mirror is very helpful to see and lube un Etorx on the hidden one.
We all learned long ago to not have the DPF flopping fish in your way while doing bracket removal. Bracket first and DPF second |
|
Appreciate
0
|
| 06-27-2021, 09:27 PM | #5 |
|
Private First Class
6
Rep 154
Posts |
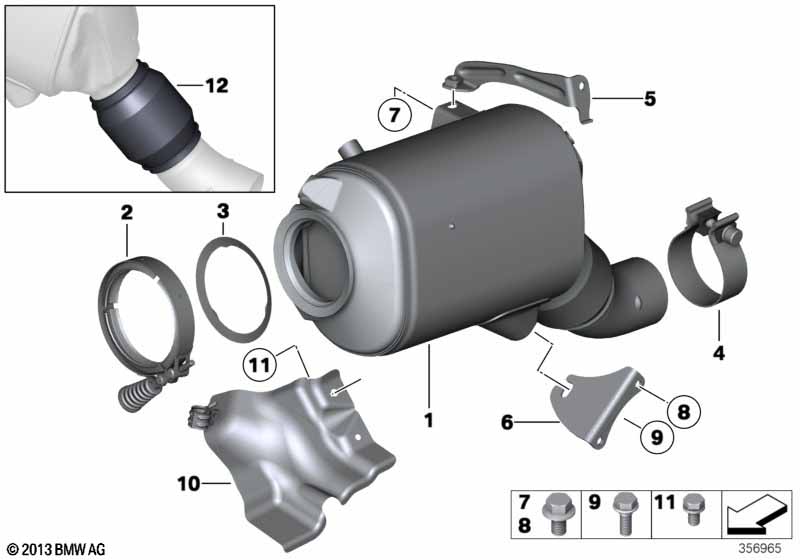 This picture is from the x5 so a few things are different but the #5 bracket on the inside near the engine block i believe its a 13mm bolt. I just want to know if once I remove this if the DPF will pretty much fall out or if I'm in for some problems. Ah and the advice about the mirror is great thanks since I do have one laying around I just need to find it. 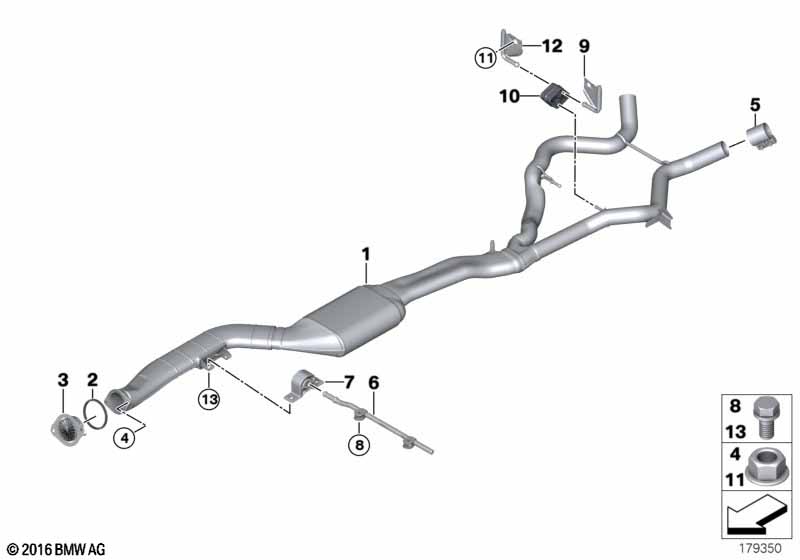 Also the two #4 which are also 13mm nuts these are as far as my experience goes which isn't too much but it seems like it may be rusted on? I tried an impact driver, albeit a smaller one on both of these multiple times, and putting all my strength on a socket wrench and I couldn't break either of them.. they literally seem locked on. So hopefully with those two I am better able to be understood. If I get that last 13mm bolt by the DPF im hoping I can just pull the exhaust out as one piece. EDIT: im so surprised I literally haven't seen anything online about the two lock nuts that connect the DPF to the rest of the rear exhaust.. Not one person has been stuck on these two? I'm thinking because I only have a 12 point 13mm socket I've read somewhere that a 6 point will be better obviously so I'm gonna look around for one and try that on the impact driver. Now that I am looking at realoem again I see that there are exhaust clamps between the mufflers and SCR/middle exhaust? These are removable correct? And if I remove them will the two parts separate? Last edited by fearitself165; 06-28-2021 at 12:55 AM.. |
|
Appreciate
0
|
| 06-28-2021, 08:42 AM | #6 |
|
Brigadier General
796
Rep 3,572
Posts |
I've unbolted this area about 5X times. If you change from factory setup, you need (2) loose screws with matching fat washers, lock washers, and nuts. I bought stainless steel type for all of these. Did you spray it with liquid wrench or kroil? I use another type called PB blaster. Let soak overnight and then spray it again.
You shouldn't need to use impact. I did it by hand. Perhaps a 6 pt socket and a cheater bar on the socket wrench. Don't mangle the nut anymore as you're only making life harder. Good luck. |
|
Appreciate
0
|
| 06-28-2021, 02:06 PM | #8 | |
|
Private First Class
6
Rep 154
Posts |
Quote:
|
|
|
Appreciate
0
|
| 06-28-2021, 02:33 PM | #9 | |
|
Private First Class
6
Rep 154
Posts |
Quote:
 I've been reading about these nut "busters" or nut splitters. That one is about $12 bucks. Have you ever used one and if so how well do they work? If you have any other ideas I'd be glad to hear it just in case I have more trouble. |
|
|
Appreciate
0
|
| 06-28-2021, 06:24 PM | #11 |
|
Enlisted Member
 7
Rep 32
Posts |
Following your SAGA lol .... the last of my replacement parts shows up this week. I have learned a lot, Dont un bolt anything (dpf)before getting the motor mount out of the way and set aside a couple days to get it done. The big time suck pulling the exhaust and cleaning up the SCR and welding up the access point.
You might have bent the posts on the DPF flange if you had a lot of weight hanging from those...? If so and if you have room a long cheater bar is the way to go. Put a little heat into the bolts as well Good luck I've been reading about these nut "busters" or nut splitters. That one is about $12 bucks. Have you ever used one and if so how well do they work? If you have any other ideas I'd be glad to hear it just in case I have more trouble.[/QUOTE] |
|
Appreciate
0
|
| 06-29-2021, 12:41 AM | #12 |
|
Private First Class
6
Rep 154
Posts |
Ok well I've been going over the diagrams again because I m planning to go and try to finish everything tonight, and I kept wondering why I didn't see many people mentioning the bolt in the engine block... now that I've had some sleep, I see that it looks like the bracket isn't even connected to the DPF on that side.. is this correct? And if that's true then I shouldn't even have to get this out before I can pull it off? I hope this is true.
Edit: if this is correct im gonna be able to focus on pulling the dpf down and removing it as one piece ideally. |
|
Appreciate
0
|
| 06-30-2021, 08:29 AM | #13 |
|
Brigadier General
796
Rep 3,572
Posts |
Per post #9, I've had to use a nut buster on a different place on an E90. Top of rear shock where it goes though the tower. I was able to run a dye on the threading and salvage the shock. Good thing as it would have been a new Koni red in M3 configuration (through bolt is horizontal). So, i have a nut buster in my arsenal now.
I have reused the v-band clamp going on 4 times now. This not including the factory install. No issues here. I have adopted use of anticeaze on the clamping face of it as it helps it to not get stuck on when you need to take it off the next time. I also use same anticeaze where downpipe and back of LP turbo mate together. That little metal ring gasket can be a pain in the arse' to stay put so the stickem' helps with this. Last edited by BB_cuda; 06-30-2021 at 02:17 PM.. Reason: always the spelling |
|
Appreciate
0
|
| 07-01-2021, 01:57 PM | #14 |
|
Private First Class
6
Rep 154
Posts |
I got it! Cars pretty much done, just need to line these dang motor mount bracket bolts up.. I actually got the dpf and the rest out a couple days ago, but my lady has been complaining a little because apparently I was paying too much attention to the car... well now I need to finish .. I can't get the bottom left one in the hole lined up when I'm trying to fix the bracket in place. I tried jacking up the oil pan and I also tried jacking up under the AC compressor. And neither way seemed to work. I also tried loosening the top flange nut for the drivers side motor mount, because I thought I remembered reading somewhere that will help. Maybe not in my situation? I'm still trying to visualize where to lift the engine up or if I need to lift another spot.
|
|
Appreciate
0
|
| 07-01-2021, 02:51 PM | #15 |
|
First Lieutenant
106
Rep 333
Posts |
If you leave them loose you can see the holes as you pull the arm out just a touch....plus you'll have some wiggle room.....once started then tighten the center 1 first. Way easier to do with the DP out of the way.....can even do them from the top.
|
|
Appreciate
0
|
| 07-03-2021, 03:15 AM | #16 | |
|
Private First Class
6
Rep 154
Posts |
Quote:
Regardless, i finished and im wrapping up putting everything else back on. The only thing im really having trouble with now is the exhaust tips.. They arent seeming to be lining up very well... May be something i need to make a new thread on. Its the straight pipe ATM exhaust. One of the tips slides on a whole lot farther than the other.. And its difficult to get the clamp over both the pipe and the tip. i just got it half on both and tried to tighten it as much as possible. im hoping maybe the heat softens them up? and the passenger side one isnt even staying like that. |
|
|
Appreciate
0
|
 |
| Bookmarks |
|
|


