|
|
|
|
 |

|
 |
BMW Garage | BMW Meets | Register | Today's Posts | Search |
 |

|
BMW 3-Series (E90 E92) Forum
>
Alternative to Blacklines
|
 |
| 11-06-2008, 11:06 PM | #1 |
|
Gearhead

3
Rep 68
Posts |
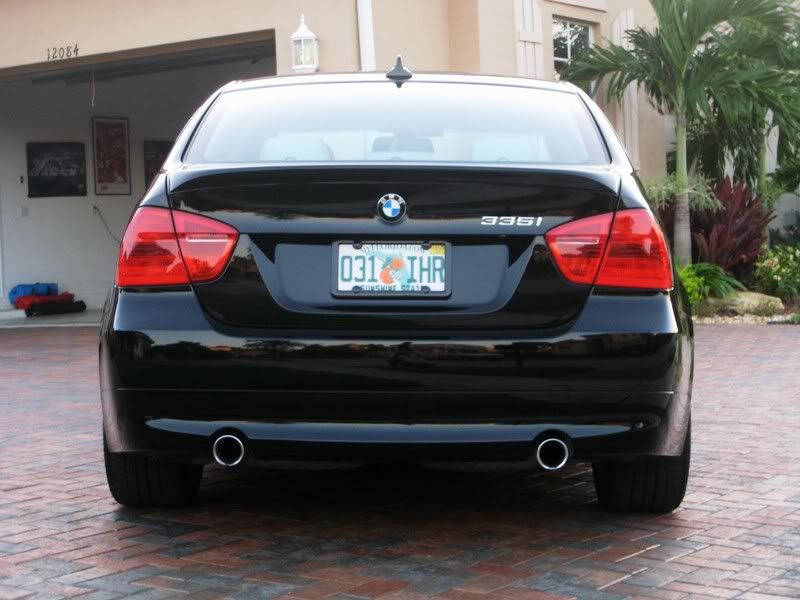
Alternative to Blacklines
Hated the white reverse tails and did not feel paying the money for blacklines is worth it so decided to do something different. Here's some results.
 |
| 11-06-2008, 11:21 PM | #2 |
|
Brigadier General
 
256
Rep 4,201
Posts
Drives: F30 328i
Join Date: Apr 2006
Location: Magic Mountain
|
nice Howd u do it?
__________________
 |
|
Appreciate
0
|
| 11-06-2008, 11:31 PM | #3 |
|
¡Viva España!
405
Rep 7,803
Posts |
Looks good.

__________________
24 G20 330i Skyscraper Gray Metallic Black, Open Pore Fine Wood Oak Grain Interior Trim MODS Clear Guard, 15% Ceramic Tint, Floating Caps
|
|
Appreciate
0
|
| 11-07-2008, 02:08 AM | #4 |
|
Lieutenant General
1267
Rep 12,446
Posts |
hmmm...it's definitely unique, and more in-line with the new taillights.
__________________
Past: '08 E92 335i|ZPP|ZSP|6AT
Past: '15 Mustang GT|401A|PP|6MT Current: '20 Shelby GT350|6MT |
|
Appreciate
0
|
| 11-07-2008, 02:27 AM | #5 |
|
Aberry is a scammer
599
Rep 5,507
Posts
Drives: SGM E92 335i, AM E90 335i
Join Date: Jun 2007
Location: Seattle, WA
|
hmmm, not bad..
|
|
Appreciate
0
|
| 11-07-2008, 02:41 AM | #6 |
|
General

688
Rep 26,876
Posts
Drives: 2-325 330 2-335 2-Z4 2-135 X5d
Join Date: Mar 2007
Location: Huntington Beach, CA
|
Not bad at all!
DIY??? |
|
Appreciate
0
|
| 11-07-2008, 08:24 AM | #7 |
|
BMW4Life
37
Rep 233
Posts
Drives: 2018 F30 340i X-Drive
Join Date: Jul 2008
Location: Florida
|
Interesting design. Not bad.....
|
|
Appreciate
0
|
| 11-07-2008, 08:45 AM | #9 |
|
Gearhead
3
Rep 68
Posts |
Yeah, DIY and I'll take some pictures of the materials I used tomorrow and post. Hopefully, I can retrace the steps and do a step-by-step guide. It is really quite easy.
|
|
Appreciate
0
|
| 11-07-2008, 04:26 PM | #10 |
|
Major
 
118
Rep 1,347
Posts
Drives: 2011 335d
Join Date: Apr 2007
Location: Atlanta, GA
|
Pretty neat!
__________________
 1997 M3 Coupe - BMWCCA I-Prepared #22 2006 M Roadster - 23,000 miles and slowly counting |
|
Appreciate
0
|
| 11-08-2008, 09:20 AM | #11 |
|
Gearhead
3
Rep 68
Posts |
Mod guide part 1
Ok, this simple guide will explain how I did it. One thing I have to make clear is that I am "simulating" what I did because my mod on the reverse lights were completed and I am not going to "redo" everything.
Explanation according to the pictures in sequence. 1) You need: - Red and black tint transparent film. I have used up my black tints so I can't show it.... you get the idea  - Pair of scissors to cut to sizes - A plastic ruler to push water out of adhered surfaces - A water spray bottle - Penknife to trim edges - A lighter to cure edges 2) Cut the transparent film to size. As long as it covers the entire reverse section, it should be enough 3) Spray the tail light with water. Ensure that the surface is clean and free from dust/ dirt that may get trapped between adhered surfaces 4) Spray the "cut out" transparent film with water. Last edited by pengful; 11-08-2008 at 09:36 AM.. |
|
Appreciate
0
|
| 11-08-2008, 09:35 AM | #12 |
|
Gearhead
3
Rep 68
Posts |
Mod guide part 2
Now, this next part follows.....
5) Paste the "watered" transparent tint onto the "watered" tail light. Take the plastic ruler or something flat (preferably not metallic as metals have the tendency to slice the transparent film) to push the water out. Do this throughout the entire surface. You should by now have a nice clean surface covered by the transparent film 6) Take the penknife and carefully trim the lines. Lots of freehand so make sure you do it slowly. Another thing to note is make sure the penknife is sharp. Break off used tips and use a fresh one. 7) After you trimmed out the film, use the penknife to cut out about 2-3 mm at the edges. Next, take the lighter and cure the sides to make sure they do not "stick out" Repeat the same for the black tint if you want to make it look darker, else you could either leave it white or red (if you really do not want to use the penknife to trim the lines). It is up to you. Hope this guide is useful.  Last edited by pengful; 11-08-2008 at 10:29 AM.. |
|
Appreciate
0
|
| 11-08-2008, 09:05 PM | #17 |
|
General
688
Rep 26,876
Posts
Drives: 2-325 330 2-335 2-Z4 2-135 X5d
Join Date: Mar 2007
Location: Huntington Beach, CA
|
Awesome!
Thanks for the DYI!!! I didn't realize you did this on the exterior of the light. Easier than i thought Where did you get the tint film? |
|
Appreciate
0
|
| 11-09-2008, 10:57 AM | #19 | |
|
Major
83
Rep 1,253
Posts |
Quote:
|
|
|
Appreciate
0
|
| 11-09-2008, 11:38 AM | #20 |
|
Major General
254
Rep 6,125
Posts |
What a creative people here.
I really like how it looks!
__________________
 PAST: F80 M3 ZCP | 911.1 C2S | F10 M5 ZCP | E70 X5M | E90 M3 | E46 M3 | E36 M3 |
|
Appreciate
0
|
| 11-09-2008, 12:23 PM | #21 |
|
///M Specialist South Shore BMW
810
Rep 7,109
Posts |
Is it this stuff? http://cgi.ebay.com/ebaymotors/Red-O...Q5fAccessories
__________________
2021 M5 COMPETITION LCI Brands Hatch Gray on SIlverstone, carbon roof, comp wheels, Mperf splitter, carbon pro spoiler, carbon diffuser , carbon paddles, executive pkg. Dinan HAS, RaceChip, dinan spacers, FC stud kit, etc
|
|
Appreciate
0
|
 |
| Bookmarks |
|
|